Electrical energy has a unique property - it can be produced in any quantity. It does not require fuel and does not require the use of minerals. The only necessity is to use appropriate equipment with sufficient performance and power.
In our country, hydropower is the predominant type, but its capabilities should be considered from a strategic position. Many users use wind energy to generate electricity in small quantities. It is free and available almost everywhere.
All that remains is to assemble a small wind power station, and a car generator can be used as a converter of rotational energy into electricity.
Wind generator design
There is a huge variety of types of wind generators and drawings for their manufacture. But any design includes the following mandatory elements:
- generator;
- blades;
- storage battery;
- mast;
- the electronic unit.
Having some skills, you can make a wind generator with your own hands.
In addition, you need to think through the control and distribution system of electricity in advance and draw an installation diagram.
Rotor manufacturing
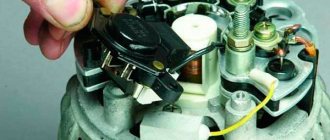
The autogenerator rotor has an electromagnetic excitation winding, which requires additional control electronics and brushes with a commutator.
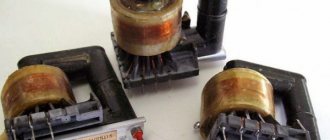
If you make it yourself using permanent magnets, the design can be simplified by removing the collector. In addition, it is necessary to rewind the stator windings so that the device turns from high-speed to low-speed. You should also remake the iron rotor, which closes the magnetic lines to itself and, as a result, no current will be generated in the stator coils. The figure below shows a disassembled generator.
Autogenerator disassembled
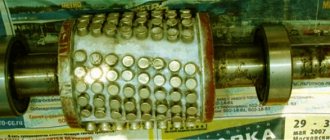
A non-magnetic attachment for the old rotor shaft is machined from aluminum. Then a steel pipe bandage is put on it with tension. Markings are made on it, and rectangular neodymium magnets with alternating poles are glued with superglue. Epoxy resin is poured between them, after which the surface is leveled.
DIY rotor with neodymium magnets
The generator produces enough energy when rotating at a speed of about 6000 rpm. For it to be effective at 600 rpm, the stator winding should be rewinded, increasing the number of turns by 5 times. In this case, the cross-section of the wire must be reduced.
To get a powerful source of energy, you will need a homemade generator for a windmill using neodymium magnets.
The disadvantage of supermagnet generators is magnetic sticking, when it is difficult to move the shaft from its place.
To reduce it, magnets are glued with a slight distortion. In addition, the blades should also be made larger. The magnetic field will decrease if you go through all the stator plates, separating them with a knife and hammer. They are then leveled on the anvil with a rubber hammer. The stator is assembled using special equipment with the plates tightened with clamps.
Wind wheel
The blades are perhaps the most important part of a wind generator. The operation of the remaining components of the device will depend on the design. They are made from different materials. Even from a plastic sewer pipe. Pipe blades are easy to manufacture, inexpensive and not susceptible to moisture. The procedure for manufacturing a wind wheel is as follows:
- It is necessary to calculate the length of the blade. The diameter of the pipe should be equal to 1/5 of the total footage. For example, if the blade is one meter long, then a pipe with a diameter of 20 cm will do.
- Using a jigsaw, cut the pipe lengthwise into 4 parts.
- From one part we make a wing, which will serve as a template for cutting out subsequent blades.
- We smooth out burrs on the edges with abrasive.
- The blades are fixed to an aluminum disk with welded strips for fastening.
- Next, the generator is screwed to this disk.
Blades for wind wheel
After assembly, the wind wheel needs balancing. It is mounted horizontally on a tripod. The operation is carried out in a room closed from the wind. If the balancing is carried out correctly, the wheel should not move. If the blades rotate on their own, then they need to be sharpened until the entire structure is balanced.
Only after successful completion of this procedure should you proceed to checking the accuracy of rotation of the blades; they should rotate in the same plane without distortion. Please allow 2mm error.
Generator assembly diagram
Connection of windings of a three-phase generator
The star is connected like this: all the beginnings or ends are together, and the remaining three outputs are connected to a diode bridge.
A star gives more voltage at the same speed compared to a triangle, so charging starts earlier, and a triangle gives more current, but charging starts at higher speeds. The difference between star and triangle in current and voltage is approximately 1.7 times. The triangle is connected like this: the end of the first phase with the beginning of the second, and the end of the second with the beginning of the third, and the end of the third with the beginning of the first, these three points are connected to the Larionov diode bridge, this is the standard bridge of the auto-generator.
When the generator is finished, that is, it is working and generating electricity, by the way, it is advisable to spin it and measure all the data. At 300 rpm you should get about 20-30 volts at idle and 2-4 Amps to the battery. If so, then everything is fine with the generator. Measure the rotor starting moment; if it is about 0.2-0.4 Nm, then everything is fine, but if it is more, then there may be problems with starting the propeller in light winds. You can probably figure out how to make a frame with a tail and a rotary axis yourself. But the screw is a complex matter, and a little more about it.
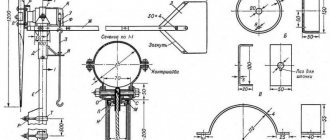
Mast
To make a mast, an old water pipe with a diameter of at least 15 cm and a length of about 7 m is suitable. If there are buildings within 30 m of the intended installation site, then the height of the structure is adjusted upward. For efficient operation of the wind turbine, the blade is raised above the obstacle by at least 1 m.
The base of the mast and the pegs for securing the guy wires are concreted. Clamps with bolts are welded to the stakes. For guy wires, galvanized 6 mm cable is used.
Advice. The assembled mast has considerable weight; if installed manually, you will need a counterweight made of a pipe with a load.
Wind generator assembly and installation
The wind generator should be installed away from residential buildings and other structures. The distance should be at least 20 meters, and, in general, the more, the better. It is best to install a wind farm in open space or on hills, where the wind is much stronger. When installing, take into account the density of the soil. This will determine the length of the wedges, which will be the attachment points for the guy wires of the mast itself.
If the soil in the installation area is soft, then wedges of larger diameter and length will be required. There should be at least three such wedges for attaching guy wires, and even better, 4.
Methods for arranging guy wires are chosen depending on the height of the mast. The wind generator mast itself is placed in the ground to a depth of half a meter or less. The base of the mast and the wedges to which the guy wires are attached are concreted. If this is not done, the soil may become loose after rain, which will lead to weakening of the stretch marks.
If the design of the mast does not imply its lowering, then some kind of lift should be provided. It will be required in order to climb to the main working elements of the wind generator for their maintenance. This could be some kind of staircase, steps, and so on. Such a lifting device should be welded to the mast to make lifting easier. In addition, at altitude the wind is much stronger than at the surface of the earth. Therefore, it is better to make some kind of platform for greater convenience when servicing the wind generator.
Generator conversion
To make a windmill generator, a generator from any car is suitable. Their designs are similar to each other, and the modification boils down to rewinding the stator wire and making a rotor with neodymium magnets. Holes are drilled in the rotor poles to fix the magnets. Install them alternating poles. The rotor is wrapped in paper, and the voids between the magnets are filled with epoxy resin.
Car generator
In the same way, you can remake the engine from an old washing machine. Only the magnets in this case are glued at an angle to avoid sticking.
The new winding is rewound along the reel onto the stator tooth. You can make a random winding, depending on who you are comfortable with. The greater the number of turns, the more efficient the generator will be. The coils are wound in one direction according to a three-phase circuit.
The finished generator is worth testing and measuring data. If at 300 rpm the generator produces about 30 volts, this is a good result.
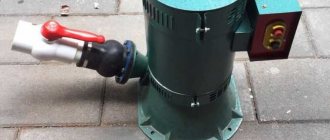
Generator for a windmill from a car generator
Generator for a windmill from a self-generator
The generator is the same basic element of a windmill as the impeller.
While the impeller blades convert wind energy into rotational motion, the generator converts rotation into electricity. Its design and capabilities determine the performance and power of the installation, and the ability to work in low wind flows. When manufacturing wind turbines, the question of using a homemade or ready-made generator almost always arises. Most often, the solution is approached in a combined way - they use a ready-made car generator, sometimes without design changes, but most often with some modifications that increase sensitivity or output power.
Car generators are ready-made devices designed to generate electric current at a given voltage. It is constantly at the output, which provides a voltage stabilizer (regulator) that keeps the values within a narrow range. The only feature that requires intervention is the operating mode - car generators are driven by the engine and operate at high speeds.
Moreover, the rotation speed of the car engine is not constant, it varies throughout the entire operating time within significant limits - from 800 rpm to 6000 rpm, and sometimes more. In addition, a car generator has a current limit that the device cannot exceed under any circumstances.
The efficiency of self-generators does not exceed 60%, which is explained by the presence of losses in structural units and energy consumption on Foucault currents. The higher the total power of the device, the higher its efficiency. Alternating current is produced, which is converted to direct current using a diode rectifier.
Final assembly
The generator frame is welded from a profile pipe. The tail is made of galvanized sheet. The rotary axis is a tube with two bearings. The generator is attached to the mast in such a way that the distance from the blade to the mast is at least 25 cm. For safety reasons, it is worth choosing a calm day for the final assembly and installation of the mast. When exposed to strong winds, the blades can bend and break against the mast.
To use batteries to power equipment that operates on a 220 V network, you will need to install a voltage conversion inverter. The battery capacity is selected individually for the wind generator. This indicator depends on the wind speed in the area, the power of the connected equipment and the frequency of its use.
Wind generator device
To prevent the battery from being damaged by overcharging, you will need a voltage controller. You can make it yourself if you have sufficient knowledge in electronics, or buy a ready-made one. There are many controllers available for sale for alternative energy production mechanisms.
Advice. To prevent the blade from breaking in strong winds, install a simple device - a protective weather vane.
How does a wind power plant work?
A wind power plant is a complex of equipment made up of several units:
- an impeller, or windmill, is a device for converting the energy of air flows into rotational motion;
- a generator that generates electricity from rotation using a drive from a windmill;
- rechargeable batteries that heat up the charge to release it to consumers;
- a set of instruments and equipment for converting the received energy into the desired state (voltage, direct/alternating current, frequency, etc.).
Each of these nodes performs its own task and is an absolutely necessary element. There are small installations with a simplified composition, but they are limited in functionality and are used only for solving small local problems (for example, for lighting paths or office premises).
Wind farm operation scheme:
- The impeller rotates and transmits movement to the generator axis;
- The generator generates electricity and charges the batteries;
- The battery charge is regulated by a voltage controller (a device that regulates and distributes loads, as well as eliminating the occurrence of critical battery conditions - overcharging or overdischarging);
- The batteries supply charge to a current converter (inverter-converter), which produces standard alternating current with a voltage of 230 V and a frequency of 50 Hz.
Sometimes they use a circuit to power consumers directly from the battery. This allows you to significantly reduce the cost of the entire installation (the current inverter is quite expensive). However, the output is a direct current with a voltage depending on the condition and charge level of the battery. As a rule, such schemes are used only for lighting and are usually found in holiday villages.
Wind generator maintenance
A wind generator, like any other device, requires technical monitoring and maintenance. To ensure uninterrupted operation of the windmill, the following work is periodically carried out.
Wind generator operation diagram
- The current collector requires the most attention. Generator brushes need to be cleaned, lubricated and preventatively adjusted every two months.
- At the first sign of a malfunction of the blade (shaking and imbalance of the wheel), the wind generator is lowered to the ground and repaired.
- Every three years, metal parts are coated with anti-corrosion paint.
- Regularly check the fastenings and tension of the cables.
Now that the installation is complete, you can connect devices and use electricity. At least while it's windy.
Conclusions and useful video on the topic
Even an ordinary electric screwdriver can become a windmill if you know the basics of a wind generator.
Interest in wind generators is not decreasing. On the contrary, this option for producing electrical energy is increasingly being considered at the level of country property owners. Obviously, if you combine several types of energy at once - wind, solar, hydro turbines or nuclear power plants, such a combination can provide an economic effect. In this case, the user’s risk of being left without electricity is reduced to zero.
Wind generator for a private home: photo
Coordinates for cutting a blade from a pipe
Screenshot from a program for calculating blades from PVC pipes
By the way, it can also be cut from a 110th pipe, just reduce the size by one and a half times, and the screw will work perfectly. But the 110th pipe has a wall thickness of only 3.2 mm, and in a strong wind the so-called flutter will appear - the growling of the propeller at high speeds due to the deflection of the blades, so it is better to make it from the 160th pipe with a wall thickness of 4.9 mm, with it the flutter effect not visible.
Below are new photos of my generator. Out of boredom, I decided to experiment with the rotor magnets, and at the same time take photos of the wind generator.