What is a wall chaser
When renovating apartments, homeowners take a new approach to the placement of utility networks and various communications:
- water supply pipes;
- heating lines;
- power cables;
- sewer risers.
It is understandable that apartment owners want to place communications inside the walls and thereby improve the appearance of the premises. The technology for hidden placement of highways involves the creation of special grooves. In the vocabulary of professional builders, such channels are called grooves. For their production, a gas silicate wall chaser is used.
Wall cutter for aerated concrete. The tool began to be used relatively recently. Before its appearance, equipment was used for chiselling grooves that created vibration during operation and negatively affected the strength of building structures:
- a bolt or chisel that was struck with a hammer. The process of creating the grooves was slow and required considerable effort;
- pneumatic hammer. The tool created increased noise and significant vibration. A lot of dust was also present during the formation of the channel;
- industrial hammer drill. During the formation of cavities, vibration negatively affected the strength of concrete and caused the formation of cracks.
The use of these types of equipment required significant physical effort and was characterized by reduced productivity and increased labor intensity. Increased concentration of dust, significant noise and vibration caused a lot of inconvenience. The outdated equipment was replaced by a wall chaser for aerated concrete - a hand-held tool that has many advantages:
- reduces the duration of laying channels in walls;
- reduces the labor intensity of construction operations for gating;
- allows you to provide the necessary channel geometry in various building materials;
- provides the ability to adjust the width and depth of the cavity being formed;
- removes dust from the treated area, reducing dust concentration;
- forms a channel of the correct shape with constant dimensions along the length.
Industrial wall chaser for aerated concrete.
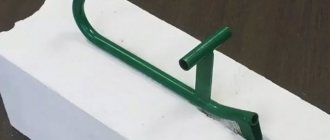
For one-time work, there is no need to purchase an industrial wall cutter for aerated concrete, which is quite expensive. There is a good solution - you can assemble a wall chaser from an angle grinder with your own hands. Drawings are not needed for this modernization, because the design is simple. Using available materials, you can expand the technical capabilities of home tools equipped with an aspiration system. The use of a self-made tool ensures:
- reducing the cost of plastering the groove due to the neat shape of the channel. The resulting groove does not require an increased amount of plaster;
- the ability to cut grooves in building materials with increased hardness. In this case, two cuts are performed at once in one pass.
After processing, all that remains is to remove the cut building material located between the cuts, and you can begin laying communications.
A little about gating
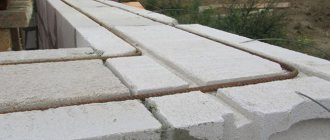
A groove (the term “furrow” is less commonly mentioned) consists of two parallel grooves, the width and height of the walls of which determine the possibility of installing communications in it. To make grooves, the following groove dimensions are required:
- Width from 3 to 50 mm (the first option provides for laying only power and low-current cables in the groove, the second - for installation of heating system pipes);
- The depth of the groove is no less than its width, but it is better with a small margin of 5...10 mm;
- The bottom of the groove is smooth, without protrusions.
Sometimes you have to cut inclined grooves. For oblique grooves, all specified dimensions are usually increased by 10...12%. The groove should be as even as possible, since any slope of the groove will automatically increase the length of the cable or pipe. The distance from the groove axis to adjacent ceiling structures, openings, etc. must be at least 150 mm, and to the gas pipeline elements - at least 400 mm.
The material of the walls also matters. Since the groove is obtained by removing material from under the tool disk, all dust and stone fragments fall into the worker. Even when performing such work in walls made of foam or aerated concrete, the need for dust collection is very important, since fine dust will remain in the air for a long time.
In a professional wall chaser, all these problems are solved by connecting a vacuum cleaner with a cyclone filter to the tool. Ordinary mesh ones will become clogged with gating products within a few seconds of continuous operation of the wall chaser.
The second significant difference between gating with a specialized tool is the presence of a movable frame with wheels, which, when controlled, can significantly reduce the load on the worker’s hands. A single-disc wall chaser attachment for an angle grinder does not fundamentally solve the problem, since the depth of the groove is not limited in any way, and manual removal of the jumper is very labor-intensive and does not ensure good quality of the bottom of the resulting groove. In addition, during the second pass it will not be easy to achieve parallelism of the walls of the groove.
Preparing surfaces for punching walls with a hammer drill
First of all, we prepare a diagram where the wiring will be laid. It indicates the location of the output of sockets and switches.
When drawing up a work plan, you should definitely consult with an electrician who is well versed in the information.
When we get to work, we need to check whether there is any electrical wiring running through these places under the plaster. To check, take a voltage indicator. When the wiring is discovered, we carry out mandatory work to de-energize it. Next, we need to prevent dust that occurs during such work from entering other rooms; to do this, we hang a damp cloth on the doorways. In addition, when performing work near the ceiling, we provide the master with a stand with reliable stability.
After this, we begin to transfer the prepared placement plan to the walls, where all the grooves and holes will be in the future. When we do this work, we must use a level, because the channels must be clearly positioned horizontally or vertically. When the markings have already been completed, we next use a crown to drill holes for sockets, junction boxes and switches.
Wall chaser for foam blocks - design features
Manual tools for grooves can be manufactured in the following design options:
- based on a regular grinder. The design provides for the installation of two concrete cutting discs on the device shaft, between which a sleeve of the required length or the required number of washers can be installed. By changing the length of the spacer element, the interval between the cutting discs is adjusted, corresponding to the width of the channel;
- modernized version. It is an improved version of the grinder, on which, in addition to two circles, a casing made of metal sheet is mounted. Dust generated during the gating process is removed through a pipe attached to the metal casing of the aspiration device;
Wall chaser based on a regular grinder
- based on a hand grinder. An improved version of the tool is similar in design to a grinder with an aspiration casing. A distinctive feature of the design is the presence of a mobile platform with wheels, fixed at the bottom of the dust receptacle. This option allows you to easily move the device along the wall without applying significant effort.
An electric wall chaser for a gas block is more efficient than a manual tool due to the following points:
- increased cutting speed;
- smooth surface of the groove walls;
- clear channel geometry;
- increased security;
- aspiration possibilities.
Modern electric scoring tools include:
- protective casing. It prevents the operator from being injured by fragments when rotating the disks;
- aspiration pipe. Provides dust extraction from the work area when connected to a vacuum cleaner;
- work site. Provides smooth movement of the device along the wall and allows you to adjust the depth of the groove;
- working handle. It can be installed in various places of the casing, providing a convenient location for the device when cutting;
- electric drive. Accelerated slitting is provided with a power of 2 kW and a spindle speed of 5500 rpm.
Making a wall chaser with your own hands
The cost of a professional wall chaser ranges from 5-50 thousand/rub. Naturally, for a team of professionals or a construction company, such an amount will pay off quite quickly. But for a master doing one-time repairs in an apartment or house, such an acquisition makes no sense at all, since, apart from cutting channels, it is impossible to do anything else with a wall chaser. The best option in this case would be to make it on the basis of a regular grinder.
Preparatory stage
It is possible to produce the simplest tool for cutting channels based on an angle grinder . For this:
- A combination of standard nuts and two cutting discs is required for working with stone or concrete.
- The first disc is put on the angle grinder shaft and clamped with a standard fastening nut, which will act as a separating sleeve between the discs. Then a second disk is installed, which is secured with a nut intended for the grinding wheel.
- If the length of the working shaft allows, to adjust the distance between the disks, you can add a few more flat washers or make a separate bushing. In this case, it will be possible to cut channels of different widths.
- Naturally, when cutting with two discs, the load on the electric motor of the grinder will increase, so periodic breaks should be taken during operation to prevent it from overheating.
But when working indoors, it is still advisable to equip a handicraft wall chaser with a casing to collect dust and protect the worker from small fragments thrown out by the rotating disks.
Making a protective casing
Naturally, even with a homemade wall chaser based on an angle grinder, it’s practically impossible to do without a protective casing. In addition to protecting the worker from various fragments, the casing must have a special connection for connecting a vacuum cleaner. Various filter elements that capture dust during operation can quickly become clogged without the help of a vacuum cleaner.
If the volumes for cutting channels are small and the work is not carried out indoors, the casing can be made from waste plywood or laminated floor strips.
Such a casing, of course, will not be able to solve the problem with dust, but it will be good protection for the operator and the surrounding working area from flying fragments when cutting channels (fines).
True, with such a casing design, the cutting depth will always be the same without the possibility of adjusting it, but for channels of the same type, for example, for electrical wiring, this will be quite enough. And the plywood base will easily slide along the surface of the wall and the presence of a sled with wheels is not at all necessary.
Use of metal
Having familiarized yourself with all the elements of the wall chaser, you can freely make it yourself from metal, so that if the disk accidentally breaks or breaks, it does not injure the working operator.
A metal pan with a diameter slightly larger than the cutting disc is best suited for the casing. You will also need a sheet of metal 1.5 or 2 mm thick, a clamp for the mounting diameter of the standard protective casing of the angle grinder, a short metal pipe and a plumbing outlet, the diameter of which must match the diameter of the hose from the vacuum cleaner.
For the sole, you can use a profile pipe. To do this, you need to cut it lengthwise, and weld a frame from the resulting halves, placing the cut halves parallel to each other. to weld the halves using metal tubes through which the axles for attaching the rollers can be passed.
Then cut two sidewalls from a metal sheet and weld them to the finished frame.
After this, cut out the mount for the grinder and weld a clamp to it. To secure the clamp, you can use a hex head screw or a screwdriver.
Cut a hole in the bottom of the pan equal to the diameter of the hole in the standard casing. Then shorten the walls of the pan to a certain height and cut it below the hole.
Then you need to cut out the side from a sheet of iron and weld it to the pan opposite its bottom. But before that, a hole is also cut in it. The result is a finished casing that is welded to the sole frame.
In the almost finished casing, a hole is cut in its front part and a metal pipe from a pipe with a diameter of 40 mm for a plumbing pipe is welded. A wide nut under the handle from the grinder is welded to it. And a plumbing outlet for the hose from the vacuum cleaner is inserted into the pipe.
The pipe can also be welded to the top of the casing, and a different location can be chosen for the handle.
After the casing is completely assembled, rollers are attached to the sole , and a screw is used to set the cutting depth of the grooves.
After completing the complete assembly of the nozzle casing, it is installed on the angle grinder and fixed to it with a clamp.
After welding work and complete assembly, clean the manufactured casing-nozzle with a file from burrs and sharp corners, as well as from welding spatter. For ease of use of the vacuum cleaner, you should use a long hose, which should be at least two m/n.
Application benefits
Wall chipping is a difficult, troublesome task that takes a lot of time and effort. Previously, a variety of devices were used for such work: a chisel and chisel, a hammer drill, an angle grinder. But it is much more convenient and efficient to use a wall chaser or an attachment on an angle grinder for chasing.
So, using a specialized tool has the following advantages:
- The speed of work completion increases significantly, and labor costs are reduced.
- Can be used in conjunction with a construction vacuum cleaner.
- Work safety increases.
- It is easy to adjust the width and depth of the groove.
- The grooves are smooth, without chips or drops.
Wall chaser design and functions
Structurally, this universal tool is most similar to an angle grinder (angle grinder), which in everyday life is called an angle grinder. It is widely believed that this is an angle grinder with two discs. Frankly speaking, it is almost correct. The main difference is that the wall chaser is equipped with a powerful electric motor, usually with the ability to control speed and smooth start. Good models have overheating and overload protection functions. In case of significant loads, they will allow you to save the tool.
The wall chaser uses diamond discs, the distance between them is adjusted to obtain a groove of the required width (usually up to 60 mm). For safety reasons, they are covered with a special casing. In addition, the casing has an outlet for connecting a vacuum cleaner, this allows minimizing the emission of dust during gating. To obtain the required depth, it is equipped with a special adjustable stop (usually up to 80 mm).
With the help of an attachment for an angle grinder, you can completely replace the wall chaser.
Nozzle – wall chaser
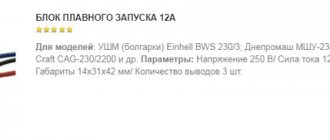
The selection begins with an interesting attachment that turns an angle grinder into a full-fledged wall chaser. The device allows you to install two saws at once for direct and precise cutting of grooves with a width of 12 mm. The attachment supports cutting wheels with a diameter of 125 and 100 mm. On the back of the device there is a connector for connecting a vacuum cleaner. The cutting depth can be adjusted using three reliable clamps.
Product photo taken by the buyer:
Customer Feedback:
FIND OUT PRICE
Features of choosing a tool
When there is a need to purchase such a tool, it is better to follow simple instructions:
- Select the required power of the tool. Here it is important to be guided by the amount of work ahead. Low-power wall chasers (up to 1.3 kW) are suitable for solving small household problems. Medium-power tools (1.3 kW - 2 kW) can cope with all household tasks, they heat up much less than their low-power counterparts, and their service life is much longer. It makes sense to buy powerful models over 2 kW only for regular and very large, volumetric work. In addition, the more powerful the tool, the heavier it is. This feature should also be taken into account.
- Determine such characteristics as the required maximum depth and width of the groove, the possibility of cutting the groove at an angle, the range of regulation of the electric motor speed.
- Availability of additional options: slip clutch, protection against overheating and overloads, a brush wear control system, the ability to use it in “grinder mode”, the presence of a vibration protection system.
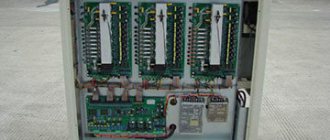
Electric
This is a powerful tool that has two rubber rollers that help the wall chaser move easily along the wall surface being processed. This furrower is equipped with comfortable handles and several cutters that move thanks to a built-in electric motor. Designed for cutting grooves in various hard building materials.
This is a fairly simple construction tool, but its use requires certain skills and experience from the master. Also, when working with power tools, you should remember to wear personal protective equipment, as they create a lot of construction dust and noise.
Grooving technique
Then, using a drill, we punch holes along the markings, then using a spatula, according to preliminary markings, we select grooves for the wiring. The blade itself is placed along the groove. If you put it across, the edges, which are already torn, will become even worse, even to the point of falling out whole pieces. A spatula is an inexpensive tool, the only thing is that it is better to use it after preliminary cutting. When used independently, its edges turn out to be somewhat torn.
Removing excess concrete with a chisel Using the chisel attachment
The difference in working on walls made of concrete and brick is that when working with a concrete wall you need to apply more force to the hammer drill, and when working with brick walls you need to first make holes manually using a core and a hammer. Then the drill will immediately take the right direction and will not go to the side.
When working with brick walls, you should not press too hard to avoid breakage of both the tool and the drill. Any hole must first be drilled with a small diameter, 4-6 mm, then 8 mm, only then the desired diameter is made using a drill. The bridges between the holes are removed with a spatula with a U-shaped tip in the “impact with drilling” mode. It is advisable to drill holes as close to each other as possible or use a hammer drill attachment to drill concrete.
Working with a hammer drill
In this case, the hammer drill is set to impact with drilling mode.
The nozzles themselves, depending on the type of work used, come in different shapes.
If you need to remove plaster or old tiles on the wall, use a pick, which has a narrow and thin chisel at the end. For making grooves, the best attachment is considered to be a squeegee. But most often, a drill and a shovel, or, as it is also called, a chisel, are used to knock out a groove.
Do-it-yourself wall chaser from an angle grinder
A wall chaser is a rather rare tool that not everyone has, but almost every home craftsman has an angle grinder. As already noted, structurally, these tools have a lot in common, so for home use you can easily make a wall chaser from an angle grinder with your own hands.
To begin with, it should be noted that you can use a grinder for slitting without any modifications, but it will be inconvenient, dusty and ineffective. A wall chaser is incomparably more convenient in this regard, but it is expensive. The rework will not require any special material or time costs.
We should start with the main difference - the wall chaser has two discs, and the grinder has one. It is necessary to order or grind yourself a nut with an additional ring to secure the second disk. The first disk will be secured in the usual way, and the second one directly to this nut. It is best to make several nuts of different thicknesses so that you can adjust the width of the groove. It is necessary to pay attention to the length of the shaft; it should be enough to mount two disks. It may be necessary to purchase or manufacture an extended shaft. Read about how to make a casing for connecting a vacuum cleaner here.
The second stage is the manufacture of a groove depth limiter. It is much more convenient and easier to work with him. You should also make a support plane so that the grinder with the attachment can be moved along the groove.
At the last stage, a homemade protective casing is made. By the way, the depth limiter can be combined with a protective casing, which is very convenient and greatly simplifies the entire design. It is necessary to provide an exhaust pipe in the casing for connecting a vacuum cleaner, otherwise it will be almost impossible to work in a closed room due to the high concentration of dust. It is absolutely forbidden to work without a protective casing - the likelihood of injury, even death, is extremely high.
Selection of nozzles
Basically, the crown and similar attachments are included with the equipment. The price of slotting attachments for a rotary hammer is quite high, but it is also impossible to work without them. If you buy an ordinary attachment, for example, the same crown, it can be inexpensive, but it will not last long. Of course, you can increase the service life of the nozzles, water them, for example, with water to cool them, and take frequent breaks so that they do not overheat.
But it is much more effective to use diamond drill bits, but when choosing them you need to take into account the permissible size and type of hammer drill.
Diamond bit
You also need to choose a drill for concrete. The one that comes with the equipment is generally not for heavy loads. Therefore, you need to choose a set for the job, or choose a high-quality tool that has a certificate. Not quite suitable Chinese drills for an expensive hammer drill. When choosing, you need to pay attention to the spiral - it is considered the best with a more twisted spiral. When choosing a blade, you need to look at what metal is used in it. A hardened tool will crumble and require constant sharpening.
Attachments for hammer drills for wall slitting
It is better to choose the original instrument. Analogs are not helpful in this type of work, you’ll just waste money.
| Attention Bearing Buyers Dear customers, send your questions and requests for the purchase of bearings and components by email or call now: Delivery of bearings throughout the Russian Federation and abroad. Bearing catalog on the website |
Attention Bearing Buyers
Dear customers, send your questions and requests for the purchase of bearings and components by email or call now: +7 [email protected] Delivery of bearings in the Russian Federation and abroad. Bearing catalog on the website
themechanic.ru
Assembling the wall chaser
If you have a new nut, all that remains is to assemble a homemade furrow maker as follows:
- mount the first circle on the shaft;
- install the bushing that was made together with the nut;
- place the second cutting disc on top;
- we pass the modernized nut through it and tighten it until it stops; As a result, the fastening element fixes the first disk and prevents the second one from jumping off the shaft.
At the last stage, a protective casing is installed, to the nozzle of which the vacuum cleaner hose is connected.
How to properly operate a manual wall chaser on aerated concrete
After assembly, you should check the functionality of the device on a pre-marked cutting area and learn operating skills. Sequencing:
- Assemble the discs with the bushing on the shaft and tighten them with a nut.
- Set the required groove depth and turn on the aspiration unit.
- Press the power button after connecting to the network.
- Touch the marked surface and groove.
The device should be moved after the discs are immersed to the desired level. It is important to monitor engine heating and periodically stop the engine to cool.
Manual wall chaser for aerated concrete - preparation for work and cutting principle
Before performing work, it is necessary to apply appropriate markings to the surface to be treated using a pencil, ruler and level.
Carry out activities to prepare a homemade tool and groove according to the following algorithm:
- Install the cutting disc on the spindle of the device.
- Insert a spacer of the required width onto the drive shaft.
- Assemble the second disk on the shaft and secure it with a special nut.
- Set the required channel depth and turn on the air sampling system.
- Apply power supply by pressing the motor start button.
- Place the rotating discs on the surface to be treated.
- Immerse them to the specified depth and move the tool along the markings.
The principle of operation of the device is to simultaneously make parallel slots using two disks rotating at equal speeds. The tool is equipped with a special platform that allows you to adjust the cutting depth.
Adjusting the cutting depth
Almost all models of wall chaser attachments for industrial angle grinders use roller guides with an oscillating sole. It is easy to make such a system with your own hands.
The cutting depth adjustment system looks like a frame, the front edge of which is fixed to the casing using a hinge, and the opposite side is fixed with a bolt-nut fastening. When the wing or bolt head rotates, the back bar with rollers deflects, which allows you to accurately adjust the depth of the wall chaser nozzle disk.
Hammer
Another common and fairly simple way to make a wall chaser yourself is to use a hammer drill. But instead of the usual drill, you should insert a cutter of the required size into it.
Such a wall chaser is quite simple and does not require much time and effort to manufacture, but at the same time it produces a very low quality of work. The groove is not only curved in height and length, but also of different depths and widths. As a result, you will have to spend much more time on gating and a much larger amount of finishing materials.
Basic rules for carrying out work
Most importantly, when starting work, you need to know the basic rules for gating walls.
If this is an apartment building, such work on cutting grooves in load-bearing walls is prohibited. This is especially true for panel houses. In the process, the reinforcement is exposed and becomes corroded, which weakens the structure of the entire house. In a brick house, during this work you should use an ordinary metal detector. It is also prohibited to cut ceilings in apartment buildings.
It is best to have an apartment plan indicating load-bearing walls or consult with a BTI specialist. There is a document that would be a good idea to read before starting work. This is SNiP 3.05.06-85. It specifies the rules for the distribution of wires in the walls. It’s better not to be lazy, but to read it so that no incidents happen during the gating. It must also be remembered that the depth and width of the groove after work should not exceed 2.5 mm, and the length 3 m. The distance from doorways should be at least 100 mm, and from gas pipes 400 mm.
Slotting scheme
You also need to know the location of the old electrical wiring so that you can bypass it and lay grooves without touching it. It may make sense to de-energize the old wiring. Be sure to have voltage indicators with you. After punching the grooves, the wires begin to be laid. They can be laid in two ways - either by laying them in a pipe or by fixing them in the channel with plaster. The holes for the socket are made in blocks, that is, everything is placed in one unit: sockets, connectors for the telephone, the Internet, etc.
What to make a protective dust cover for an angle grinder from
The manufacture of a protective casing involves the use of such types of materials as a plastic canister, aluminum pans, chipboard, plywood, laminate, board, stainless sheets, etc. You can choose any material that is available on the farm. This eliminates the need to buy an attachment, since making it with your own hands is very easy and simple.
The main condition is to ensure sufficient strength of the finished attachment for the grinder. The casing must withstand the impact of small particles of concrete flying out during work. To make the casing, there is no need to resort to the use of auxiliary tools, such as welding, since a nozzle can be quickly made from a plastic canister. An example of such a nozzle is shown in the photo below.
The manufacture of such a device requires a minimum of time. A homemade wall chaser from an angle grinder can be made quickly and easily, using an arsenal of improvised tools. If you use materials made of aluminum or wood, then when working on the manufacture of nozzles you will need self-tapping screws, and when using steel you cannot do without a welding machine. Let's consider the principle of making a wall chaser attachment for an angle grinder with your own hands:
- For production you will need leftovers from chipboard or fiberboard. In addition, even plywood will do, so we use any sheet material that is available
- Two side bases are cut out of chipboard according to the appropriate shape. The shapes of these bases depend on the size of the available tool
- To avoid having to select a shape, it is recommended to first make a drawing on paper and then transfer it to cardboard. Make a template from cardboard, eliminating all the shortcomings
- Based on the template, make a cover using chipboard
- Drill a hole of the appropriate diameter on one side of the chipboard base. Use this hole to secure the finished attachment to the power tool.
- To connect chipboard when making the nozzle, you can use self-tapping screws or special furniture fasteners of appropriate length
The photo below shows the resulting case for the grinder. Such a cover is easy to make, but its drawback is the absence of a hole for connecting a hose. A sleeve of the appropriate diameter and length, which must be mounted in the upper part of the structure, will help eliminate this drawback. A hose from a vacuum cleaner should be connected to the protrusion of the sleeve.
This is interesting! When using a vacuum cleaner to suck up debris and concrete chips, it is recommended to use industrial or construction vacuum cleaners, but not household ones. They are not designed for such things, so in the end they can quickly fail.
The process of making a nozzle is not difficult, and the quality of the final device depends more on the ingenuity and imagination of the master. You can make not just a simple case for an angle grinder with your own hands, but also an adjustable one. The principle of manufacturing an adjustable protective casing is that you need to make an additional moving part. Due to this moving part, the required size of the protrusion of the cutting discs on the grinder will be selected.
In a similar way, you can make a nozzle with an adjustable part from chipboard and other materials.
purpose of the product, making a device for an angle grinder with your own hands
In addition to a large number of advantages, an angle grinder has one drawback. When carrying out various work with wood or concrete, an angle grinder produces a lot of fine dust. This debris then needs to be removed from the most inaccessible places. To avoid this, you should use a casing for an angle grinder under a vacuum cleaner, which you can make yourself from scrap materials.
Contents of the material
Purpose of the dust collector for angle grinders
Modern construction technologies provide for a large number of works that are performed with the help of an angle grinder. Cutting metal parts does not present any particular difficulties, but there are other technological processes that produce a lot of fine dust.
Special attachments for an angle grinder will be needed when carrying out the following types of work indoors:
- Grilling floors or walls. In this case, a lot of dust is produced, regardless of the type of material. The greatest difficulty is that such work is mainly performed at high altitudes. In addition, debris falling from above settles evenly throughout the room. For these works, it is better to use a powerful bosch wall chaser.
- Cutting tiles. This is the most common dust process. Dust from ceramic tiles is considered the finest and most harmful to human health.
- Sanding wood floors. This is a very voluminous work that is performed over a huge area. That is why a lot of dust and small debris is released.
Homemade casing from a saucepan
In some cases, it is worth using a welding machine and making your own casing for an angle grinder for a vacuum cleaner from a thin metal sheet. This design will turn out beautiful and durable, but requires welding skills and expensive materials. If you have an old aluminum pan in your workshop, you can make a high-quality casing without using a welding machine.
We also recommend reading:
For this work you will need the following materials and tools:
- aluminum pan;
- Bulgarian;
- measuring instruments;
- dye.
A special mounting axis is cut out of the other part for mounting on an angle grinder. The diameter of the exhaust product is measured directly at the angle grinder. Its size must be as accurate as possible so that the homemade casing does not jump off due to high vibration during work. Experts advise using a strong tightening clamp when securing the device.
Canister device
Home craftsmen have developed a more economical option for upgrading an angle grinder with a casing for a vacuum cleaner. In any workshop there will always be an unnecessary plastic canister for technical fluids. Such containers hold their shape perfectly, are quickly processed and have a factory outlet pipe of the required size.
To make such a product, you will need the following tools and materials:
- plastic canister;
- stationery knife;
- fastening materials.
First, fitting is performed, the main criterion of which is to ensure the required immersion depth of the cutting blade. Use a utility knife to cut out the required through holes. Their sizes are selected taking into account further preservation of the maximum rigidity of the product. Both mounting holes are cut out on both sides of the canister so that you can change the direction of rotation of the cutting disc. The hose of a household vacuum cleaner is attached to the neck of a plastic container and secured with a clamp.
Next, you need to attach the casing to the angle grinder using a strong clamp and a special adapter ring. The assembly of this part must be treated with extreme care. The hole in the canister is closed with a lid, which can be moved to the opposite side when changing the direction of rotation of the cutting disc.
Cutting ceramic tiles without dust
It is very difficult to cut ceramic tiles using a factory dust extractor, because the cover covers the cutting area, and the builder needs absolute control over the work. For this purpose, it is worth making a homemade dust collector from transparent materials, for example, from a large plastic bottle.
This fixture is secured using the factory protective cover.
The neck of the bottle fits very well under the socket of a household vacuum cleaner. This homemade transparent nozzle will help you complete the most difficult jobs. The master will also be able to control the insertion of the cutting disc into the ceramic tile. Upon completion of work, you just need to throw the garbage out of the bag. No tags for this post.
What recommendations and tips to consider when gating
You can begin the procedure for preparing grooves indoors immediately after making your homemade product. When punching a groove, one important nuance must be taken into account - the work should be carried out in a room where the location of the electrical wiring is previously known. If a live wire is encountered along the path of the tool, the result of such an encounter can be fatal for the master.
It is necessary to carry out gating work with both a conventional wall chaser and an angle grinder, taking into account the following tips and recommendations:
- Procedures can be carried out in vertical or horizontal directions
- It is possible to ditch at an angle in extremely rare cases when it is necessary to bypass a decorative element or communications
- Horizontal grooves must be carried out exclusively at a distance of up to 15 cm from the floor slab
- Vertical grooves must be located at a minimum distance from doors and windows of 10 cm
- When carrying out work, it is important to take into account the depth of the groove. It is necessary to select the depth depending on the type of communications that are planned to be laid in the groove, as well as the thickness of the wall itself. If this wall is load-bearing and is external, then the depth of the groove should not be more than 3 cm
- The width of the groove is also selected depending on the technological task, but it is not recommended to exceed the permissible limit of 2.5-3 cm
After laying communications, the groove should be sealed with cement mortar. The location of the groove should be leveled with the plaster of the wall. It is recommended to carry out gating work at the construction and repair stage before plastering the walls.
It is not at all difficult to make a wall chaser for concrete from an angle grinder, and if you set yourself such a goal, then everyone can achieve it. When drawing a conclusion about the work done, it should be noted that when chipping, you need to take breaks to allow the power tool to cool down. If the cover does not have a connector for connecting a vacuum cleaner, then work must be carried out in a respirator. Glasses must be worn in any case, as various small particles can get into the eye.
Depending on the type of material that is being cut, it is necessary to select the appropriate speed of movement of the tool. If you come across reinforcement in a concrete wall on the way, it is recommended to saw it with an abrasive wheel. It is necessary to use a wall chaser on wood with extreme caution, not forgetting about the backlash.