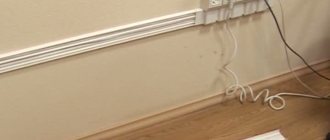
Advantages and disadvantages of installation
Electrical wiring in baseboards has its advantages and disadvantages. The main advantages include:
- This installation method is permitted in accordance with Chapter 2.1 of the PUE, clause 2.1.4.
- You can lay the electrical cable without damaging the wall cladding or finishing.
- The protected panel on the frame can be easily removed without the use of additional tools. Thanks to this, you can easily and quickly replace damaged wires or inspect the wiring.
- There is a large selection of these products available on the construction market. Thanks to this, you can choose a plinth to suit every taste and desire. Wires can be located on one shelf or on several.
But besides the advantages, wiring in the baseboard also has its disadvantages. The main disadvantages include:
- As a rule, cheap products are made from cheap materials. And as a result, the risk of cracking or damage during installation or operation increases.
- Over time, gaps appear between the electrical box and the floor due to the flexible edges of the structure. Small debris and dust get into them, which is very difficult to remove from there.
- Polymer coatings and materials do not withstand exposure to ultraviolet rays - they crack and fade.
That's all we wanted to tell you about this method of electrical installation. Now you know what wiring in baseboards is, how to install it yourself, and what the pros and cons of this wiring option are.
You probably don't know:
- How to hide wires in an apartment
- Electric heating baseboard type
- What types of cable channels are there?
Electrical wiring in baseboards - pros and cons
Of course, laying wires inside baseboards has its advantages and disadvantages; So, the advantages include:
- the ability to lay electrical wires without destroying walls or damaging their finish;
- the ability to hide communication cables (Internet and telephone, as well as TV antenna) from prying eyes;
- if necessary, it is easy to open the plinth and gain access to the wires for their replacement or repair;
- a large selection of colors and shapes, which allows you to choose exactly the type of plinth that will look perfect in a particular interior;
- you can choose a plinth with one or more cable channels;
- ease of installation - no special skills required;
- ease of care.
Fastening the baseboard with cable duct
The disadvantages of skirting boards with cable ducts are usually associated with some features of specific models:
- skirting boards with flexible edges lose their elasticity over time, which is why gaps may appear between the floor covering and the decorative element itself;
- opening certain types of plinth is quite difficult without the risk of damaging the fasteners;
- Skirting boards made from cheap PVC are prone to fading, are very fragile, and can crack during installation.
Such skirting boards have their disadvantages
Fire safety
Most electrical cables are made of plastic, which raises questions about fire safety. If you don’t take into account the very cheap options on the market, all the rest are made of plastic, which does not support or propagate combustion. More serious material is used. From a fire safety point of view, such an electrical baseboard is an acceptable option.
Electrical safety is guaranteed subject to cable operating conditions
Well, to be sure of fire safety, also take cables with a spare cross-section and in non-flammable sheaths. And it is cables, not wires, when it comes to wiring. There is a difference and not only in price.
Preliminary measures before installation
To do this, you need to compare the characteristics of the cable channels in the baseboard with the cables being laid. The width, height, and cross-section of the channels in mm2 are provided in the documentation for them. Let's look at a separate example:
Comparison of two versions of three-channel skirting boards of the MEX series
| MEX series plinth | Total channel cross-section in mm2 | Useful section. mm2 | Useful cross-section by channels mm2 | Capacity of wires of different sections per channel in pieces. | |||||||||||||
| 1.5 mm2 | 2.5 mm2 | 4 mm2 | 6 mm2 | ||||||||||||||
| 1 | 2 | 3 | 1 | 2 | 3 | 1 | 2 | 3 | 1 | 2 | 3 | 1 | 2 | 3 | |||
| 60x16/3 | 702 | 502 | 163 | 176 | 163 | 20 | 22 | 22 | 14 | 15 | 14 | 11 | 12 | 11 | 8 | 9 | 8 |
| 75x20/3 | 1113 | 800 | 232 | 331 | 232 | 29 | 42 | 29 | 20 | 28 | 20 | 16 | 23 | 16 | 12 | 17 | 12 |
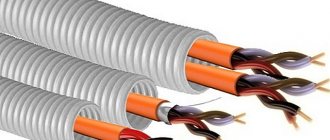
In the cable lines of floor skirting boards, you can lay not only power supply wires; the following fits perfectly there:
- Coaxial cable for TV or Internet signal input;
- Telephone pair, from city PBX;
- Cables for local computer networks and wires for other purposes.
When choosing the design of skirting boards, consider all factors.
There are three main methods for diverting sockets from baseboard wiring:
Having counted the quantity and purchased all the necessary elements, you can begin installation work.
Advantages and disadvantages
Installing a baseboard with wiring takes less time than laying wires in grooves
Skirting sockets have a number of positive aspects for the master:
- Using a multibox, you can place additional power points compactly and organically.
- Due to their low location relative to the floor, the sockets are not conspicuous, do not visually cut into a solid wall, and sometimes are completely hidden behind furniture.
- The rich color range of multiboxes gives the master the opportunity to choose the product exactly to match the color of the wall border.
- All wiring is securely hidden by the cable channel, does not lie on the floor and does not stretch along the walls.
- There is no risk of bumping into old cables in the wall when installing new ones - safety for the master.
- No dusty work.
- The ability to install an additional socket anywhere in the room without being bound to norms and standards when gating walls.
Baseboard sockets also have some disadvantages. These include:
- Moderate impact resistance. If there is frequent mechanical damage, the multibox may crack.
- Accessibility for children. In a house where there are children, it is better not to install such sockets or install them taking into account the placement of high furniture in order to block access to the power point.
- The negative impact of moisture on all wiring due to an accidental flood in the house or a bucket of water spilled directly on the outlet.
Types of PKK
Cable channel in the baseboard
Skirting cable channels are classified according to the following main characteristics:
- Depending on the location of the PCC relative to the floor and ceiling, the following are distinguished:
- floor-mounted PCCs installed at the junctions of floors and walls;
- ceiling PKK, mounted at the junctions of walls and ceilings.
- According to the location of the wire box, there are:
- PKK with a box located in the center of the baseboard;
- PKK with a box located behind the removable panel.
- Depending on the material of manufacture, they are distinguished:
- plinth cable channel made of polyvinyl chloride (PVC);
- MDF moldings;
- wooden moldings with cable duct.
Advantages of PVC made of polyvinyl chloride
PVC skirting products with cable ducts, manufactured in accordance with GOST 19111-2001 “Profile molded products... Technical conditions”, are endowed with a number of advantages that distinguish them favorably from analogues made from other materials.
PVC PCC
The main advantages of plastic PCCs include:
- excellent electrical insulation characteristics;
- increased elasticity and plasticity, allowing the PCC to maintain its operational functions when kinked;
- chemical inertness regarding the effects of moisture and dissolved components in detergents;
- resistance to temperature changes;
- ability to self-extinguish upon fire;
- absence of condensation on the inner surface of the baseboard due to temperature changes;
- wide model range;
- low price.
Installation principles
Grinder for cutting skirting boards
To carry out the work, the master will need:
- Perforator for forming holes for dowels.
- A hacksaw or grinder for cutting baseboards. The grinder makes a more even cut.
- A hammer equipped with a hammer.
- Tape measure/ruler and construction pencil.
- Side cutter for removing the braid from the cable.
- Screwdriver.
Also, to install hidden wiring, the master will have to prepare the following materials:
- Wall border (aka plinth), equipped with a cable channel. Its color and height can be arbitrary.
- End caps in the required quantity.
- Cable (three-core for grounding or two-wire - without it).
- Skirting socket (multibox).
Multibox
The socket box is a box with an adapter at the bottom
This is a special plinth overlay that has cutouts for the profile of the wall border. It fits tightly on it. There are different modifications of profiles on sale, so you can choose any multibox for any skirting board.
More often, the cover plate is used to install a regular socket. But it can accommodate outputs for telephone, Internet cables, etc. The multibox is installed as simply and quickly as possible.
Cable channel
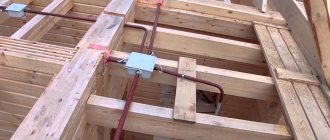
Despite the fact that PVC skirting boards often already have a built-in channel, some craftsmen prefer to use separate plastic U-shaped boxes for cable laying. Externally, the channels vary in depth and height, which allows you to lay from 2 to 5 wires in them simultaneously. The top of the box is closed with a decorative lid. The cable channel is laid under the baseboard (except for wooden or frame houses).
Sockets internal and external
Built-in power points are mounted in a multibox, and external ones are used in tandem with a cable channel when laying wiring in wooden houses. If the internal power point can be used on any walls except wood, then there are no restrictions on the use of an external outlet.
Selecting and installing floor moldings
A floor plinth with a cable channel eliminates the need to ditch the walls in order to remove the wiring in them. Previously, we had only one alternative to gating: fireproof boxes that are laid on top of the walls. Now we can put everything into the floor molding, except, perhaps, the wires for the ceiling lights. The most common version of such molding is made of PVC. Models are made from this material in different sizes and colors. and some even have a transparent cable channel. Aluminum is used less often and wood is used very rarely.
Plastic moldings
Firstly, we are all familiar with the floor molding with a channel in the center. It holds a small amount of wires, and is suitable if you just need to hide the TV cable. There is even special fittings for bringing the connector out. You simply install several of these output points in the right places, and thereby rid yourself of the “snakes” of wires lying here and there. In the next photo you can see what it all looks like.
PVC plinth with cable duct and connector outlet
The next plastic plinth with a cable channel is designed to accommodate more wires. For this purpose, there are special dividers on the mounting rail. Just like for the previous molding, all types of fittings are available for sale for this: corners, connectors, sockets and leads for wires.
High plinth with cable channel has several compartments inside
And the moldings that you see in the next photo are themselves boxes for wires. The correct name is plinth cable channels. If you need to hide all the apartment electrical wiring, then it is better to opt for them. These moldings have increased fire safety and are very well protected from the penetration of dust and moisture. They are made from high quality self-extinguishing PVC and can withstand very high temperatures.
Cable plinth for distributing electricity throughout an apartment or house. Color can be white, steel or natural wood
Wooden and aluminum baguettes
Wooden plinth with cable duct is almost never found on sale, and, as a rule, it has to be made to order. More often you can find this option, as in the photo, when the wire is pulled along the recess in the clips from the moldings. However, nothing except a television or Internet cable can be laid here due to fire safety rules. This is due to the fact that the contents will be in direct contact with the wood. The veneered MDF plinth with a channel has approximately the same appearance and the same operational limitations.
How to lay a cable in a wooden baseboard: mounting clip
An aluminum plinth with a channel for wires also serves its purpose perfectly. It is slightly inferior to plastic and wood in terms of aesthetic qualities, but in terms of fire safety, aluminum is, of course, better than other options. Designs can be designed for different numbers of wires, and the plinth itself is made entirely of aluminum or with a plastic mounting rail.
Wide aluminum plinth for wires
Installing moldings
Installing a plinth with cable duct will take you no more time than installing any other type of molding. All we need for this is the baguette itself, a drill and/or screwdriver, screws and dowels (40mm).
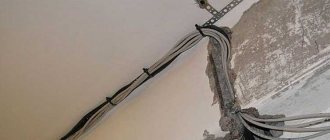
We mark the location of our molding on the wall, set it up, and then drill holes for the screws. We transfer these points to the plinth and drill it out. If you bought a molding with ready-made holes on the mounting rail, then we make markings on the wall in accordance with them. We screw the baguette to the wall, lay the cable and/or wires.
Fastening of skirting boards with cable ducts is carried out using self-tapping screws and dowels. Next comes cable laying
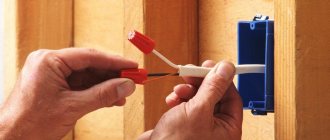
If you need to install a socket or switch on the plinth, then leave a gap of 60-70 mm between the sections of the molding. We pull the wire through the hole in the wire housing and attach the socket/switch to the wall with self-tapping screws, attach the contact pair inside.
How to lay electrical wiring and install a socket on a molding
And now the final part of the work. You need to install the inside and outside corners, connectors, and end caps on the molding. We snap the outer part of the plinth onto the mounting rail.
Important: all work on electrical wiring must be carried out in accordance with fire and electrical safety rules. There should be no damage to the electrical wiring in the baseboard, and all exposed areas must be insulated with materials intended for this purpose.
How to lay a floor plinth with a cable channel: installation of fittings and the outer part of the molding
Everything ingenious is simple
The idea of combining several functions in one item has always been very popular, so it is not surprising that floor plinths with cable ducts are so in demand when decorating premises. With its help, you can beautifully and neatly seal the gap between the mating surfaces, and hide the wires, of which there are now countless: telephone, Internet, TV, lighting, electrical wiring, etc.
According to the design features, the plinth with a cable channel can be divided into two types: a profile with a groove in the middle, which is closed by a decorative insert, and a profile consisting of a base that is completely covered by a decorative element.
The first model is more common, but can accommodate only 5-6 wires in a cable channel, but the shape of the plinth is made in such a way that you can hide the same amount before installing the cable in place. The second type of skirting boards allows you to lay 10 or more wires for various purposes in a cable channel.
A standard cable cord with a cable channel allows you to lay 5-6 wires
Materials
Plastic plinth with cable duct is the most popular and inexpensive profile, which has gained its leading position among analogues from other materials, thanks to its very affordable price, practicality, resistance to mechanical stress and microorganisms. It can be called universal, since the profile is presented in different sizes in width and height; the color and texture of the decorative coating can be used to match the PVC skirting board with cable duct to any interior.
The huge demand for such profile models with a cable channel has pushed woodworking enterprises to modernize production technologies. In the wake of competition, wooden plinths with cable ducts appeared, as well as veneered and MDF laminated profiles with grooves for wiring. Now installing baseboards for parquet, laminate and other natural wood flooring has become much easier.
Practice has shown that cable plinth is a convenient device for laying wires. But in addition to this practical function of the cable channel, the aesthetic component also plays a huge role: the upper decorative strip hides the fastening of the profile to the surface, the front part remains intact, it does not need to be covered or tinted, and no nail heads or screws stick out.
Electrical wiring in the baseboard, in the photo there is a way to hide a lot of wires
To satisfy the demand of the most demanding customers when it comes to interior design, the market also offers aluminum plinths with cable ducts. As a rule, it consists of a base with a groove, and a decorative metal strip is fixed onto it. This profile with a cable channel is in demand in rooms with a specific microclimate and difficult operating conditions, for example, in public places with huge traffic.
It should be noted that the price of skirting boards with a cable duct made of these materials is slightly higher than their plastic counterparts, but it is now possible to finish the perimeter of the floor from different materials, and at the same time you do not have to worry about choosing a skirting board from what is available, as in the old days.
Some profiles do not have a cable channel, but their back part is modeled in such a way that the wires can be hidden; the photo shows how to lay a cable in a baseboard that does not have a special groove
Preparation for installation
Before starting installation, you must review the detailed instructions for laying the cable in the baseboard. First you will need to perform several preparatory operations. The material must be selected in accordance with the interior of the room. The number of planks is purchased by calculating the perimeter of the room.
You need to create a plan that will indicate where household appliances, lighting fixtures, as well as sockets and switches will be installed. It is necessary to prepare a cable routing diagram. At the same time, its purpose is taken into account. Next, the quantity of cable and its cross-section are calculated (in accordance with the rated load).
In accordance with the existing need, you need to determine how many cable channels the baseboard should have. Telephone, television and electrical wires must run in separate channels. It is important to take into account the rated power of the cable. It should not exceed 3.5 kW.
Installing a plinth with a cable channel
We have previously talked about installing floor skirting boards. Features of installation of electrical baseboards depend on its design. The one with a built-in gutter is mounted like a regular one - pressed tightly against the floor with its lower edge. When installing models with a removable front panel, you need to know one trick.
Corners and edges are decorated with special additional elements
With removable cover
Pieces of the required length are cut using a regular hacksaw with a fine-tooth blade. It cuts well with a blade on metal. Cut the entire plinth assembly with the lid on.
Before installation, the strip covering the cable channel is removed. Screws or dowels are screwed into a recess, which is the cable channel. If the wall is thin, it is better to place a washer under the cap.
Dowels are used for concrete and brick, special fasteners are used for drywall, and self-tapping screws are used for wood.
To decorate corners, there are special additional elements: external and internal corners, connectors for planks. The pieces of skirting boards are simply inserted into them. But the trouble with such a system is that these “spare parts” pop out. Therefore, it is recommended to seal them with transparent silicone sealant. The system is first assembled, then wires are laid into it.
And one more point about installation. It is not always easy to route cables into an already assembled system. Some additional elements are made inconveniently and make it difficult to pull wires. Therefore, it makes sense to stack them as they are installed. And also, if you are going to tuck cables not only into the recess, but also into the space formed below and above, they definitely need to be laid before attaching the baseboard to the wall.
https://youtube.com/watch?v=AavzJ3NxLyE
Electrical plinth with removable front part
When installing an electric skirting board of the second type with a front part and a “back” that is attached to the wall, the situation is similar. But the point here is that the bar must be fixed at the same distance from the floor. Otherwise, putting on the decorative part will be problematic. The soft bottom edge makes things easier, but it's only one or two millimeters. So the installation has to be really precise. How to be? Use "samples".
- We cut off two small pieces from the front part - 7 centimeters long. And we use them to set the bar at the desired level.
- From the point where we plan to install the fasteners, we retreat a few centimeters and place a piece of decorative strip - on one side and the other. This area is set to exactly the height that is needed.
The second type of electrical skirting boards is with a removable front panel
We place the fasteners in the space between the two “samples”. We move on and so on until we install all the segments.
This method will allow you to screw the plank at the same level relative to the floor covering, even if it is not very level. So there are no problems when installing the decorative strip.
How to insert and remove a cable from a plinth cable channel
When laying cables in an electrical baseboard, it is necessary to insert the cables and remove them. Most plastic ones have a soft edge. It looks more like rubber than plastic. In this case, running the wires will not be difficult. Due to the elasticity, the edge will simply move away.
How to insert and exit a cable into the baseboard
If the edges are hard, try warming them up slightly and bending them back. Another option is to make small cuts. But this looks the worst, since it’s difficult to do everything perfectly. It's easier to heat it up and bend it. But heating not on an open fire is okay. And practice, for starters, on an unnecessary segment - that’s two.
Sockets on the baseboard
Some companies are developing sockets that can be installed between two pieces of strip anywhere. There is no need to cut anything. Everything is designed in such a way that the module is fixed on the strip (until it clicks), and the missing part is covered with a decorative strip of the same type. Usually these are expensive systems that are made in Europe and certified there.
Special sockets can be mounted directly on the baseboard
How to lay electrical skirting boards
Before starting work, you should calculate the required length of wires. It is better to purchase them with a margin of 10-20%. Then the type and length of the baseboard itself is selected
In this case, it is worth paying attention to how many and what cross-sectional conductors will be laid in it
At the same time, it is important to take into account color, design
Preparation of the workplace
Before installing a new electrical skirting board, it is necessary to disassemble the old one. Crude tools such as a pry bar or a heavy-duty screwdriver are suitable for this. The workplace is cleared of debris, dust and dirt. If necessary, the defects in the corner between the floor and the wall are covered with putty.
Next, the new channel is applied to the installation site. It is more convenient to do this together. Mark the mounting holes on the wall with an awl or pencil. They must be done with a hammer drill in impact mode.
Installation of cable channel
A plinth with a channel for wiring can be easily installed even by a person without experience. There are several important points to consider:
- To determine the required length, you need to calculate the perimeter of the room. You need to subtract the width of the doorway from the obtained value, because the corner tray will not be laid in it.
- It is better to fasten the dowel using nails or self-tapping screws, since the glue is too demanding on the materials it holds together.
- Corners and various adapters. If you forget to install at least one, the structure will have to be disassembled and reinstalled.
Installing the Removable Cover
The cover is installed with latches. This method is convenient and does not require third-party tools. The successful closing of the lid can be judged by a characteristic click.
It is important to ensure that there are no gaps left. Therefore, after snapping the lid into place, its correct position can be checked visually or by touch.
Skirting board with separate front part
This type includes products made from MDF. The fastening strip is installed strictly parallel to the floor. It is better to monitor the accuracy of measurements using a level. Or you can resort to a life hack. Cut two small fragments from the front part and use them as templates (samples, standards) when installing the mounting strip.
How to start and remove wiring
To remove the cable from the baseboard, you can use one of three methods:
- Carefully cut the groove in the required location. The method requires skill and is dangerous to perform, because the knife blade can easily slip off your fingers.
- Drill a hole. It will turn out neatly. But it can only be done if you have a thin drill of the required diameter at hand.
- In the place where the wire is removed, slightly heat the plastic with a lighter and carefully press the groove under the wire. This method should be used only with knowledge of the matter and some experience. However, the end result is the most aesthetically pleasing.
Negative sides
Plastic is fragile and breaks easily when moving furniture
When choosing a plastic baseboard for wiring, the average person is faced with another problem.
Existing models are not always able to accommodate the required number of cables and guarantee complete safety of residents.
This design does not provide effective protection for hidden wires. The thin walls of the baseboard are easily damaged when rearranging furniture or during general cleaning.
Plastic skirting boards are easily destroyed under the influence of negative factors, such as:
- ultra-violet rays;
- mechanical damage;
- chemicals included in detergents and cleaning products.
Installing plastic skirting boards is a process that does not require large material costs and the involvement of qualified specialists, but the slightest error during installation will lead to breakage of the skirting board itself.
The features of some designs do not make it possible to place the required number of wires inside the baseboard.
Dust and debris often get into the baseboard, which is difficult to remove.
The consumer will have to purchase a more expensive multi-core cable and accurately calculate the upcoming load. Another drawback of wiring in the baseboard is the accumulation of dust and small debris, which is quite difficult to remove during cleaning.
In the space between the floor covering and the baseboard itself, formed under the influence of changes in temperature and humidity levels in the room, quite a large amount of debris accumulates, which leads to breakdown due to the increasing heating of the cable. For more information on laying cables under the baseboard, watch this video:
https://youtube.com/watch?v=2Dc3LcS2csQ
The latches used to secure the cable channel protective strip cannot be called strong and durable. The need to verify the integrity of the cable or the suspicion of an existing fault forces the consumer to open this channel with the help of a tool, which leads to cracking of the baseboard and a decrease in the level of security of the wires located in it.
Step-by-step installation
In general, any man can perform this procedure, since this operation does not require special knowledge. Work starts from the inner corner and is carried out in the following order.
- The decorative overlay for the cable channel is removed from the baseboard.
- The inner corner is put on the right end, after which the plinth is applied to the site of the planned installation.
- Take an awl, with which you can easily pierce the back wall and thus mark the locations of the fastening elements.
- The plinth is removed, and holes are drilled in the marked places with a drill or hammer drill. The dust that inevitably forms when drilling a wall is removed immediately with a vacuum cleaner.
- Next, dowels are driven into the drilled holes, a plinth is applied and screwed with self-tapping screws.
- Afterwards, the wires are inserted into the cable channel, which are closed with a snap-on top cover.
- The left end of the plinth is inserted into the connector, after which they begin to install the next section of the plinth, carried out according to the algorithm described above.
When it comes to the next corner of the room, the remaining distance to it is measured and a piece of plinth of the appropriate length is cut off. Moreover, when sawing off the plinth, do not forget that approximately 5 mm will go into the corner element when inserting the end. If you forget about this, the cut piece will be short and therefore not suitable for installation.
Important! To cut plastic skirting boards, use a grinder with a thin circle. Measure the cutting angle using a school protractor. Professionals use a special tool called a miter box, which allows them to quickly cut the baseboard at the desired angle. Precise adherence to the angles requires the installation of a wooden plinth, because there are no special plastic connecting elements that can be used to cover a small discrepancy in the ends.
Sequence of installation work
- If there is an old wooden baseboard, carefully dismantle it so as not to damage the smooth surface of the walls and floors.
- Remove any remaining nails or screws from the walls and flooring, and sand the walls if necessary until the base of the floor is level. A typical mistake of novice installers, this point is very important; on an uneven surface there may be large gaps between the baseboard and the wall.
- Disassemble the plinth panel box, take the frame of the installation strip, the first stages of installation and cable routing are carried out on it.
- Installation starts from the outer corner along the entire perimeter of the room, so attach the corresponding corner connecting element to the end of the plank. Place the structure in the corner between the wall and the floor so that the channels where the cable is laid are on the outside, facing you.
- Use a marker to make marks on the wall through the mounting holes in the plank. In some models, the plastic strip does not have these holes; drill them yourself.
Option for installing a socket above the baseboard
- Depending on the design features, the cable strips are stacked in one cable channel or on separate shelves. If compact installation is necessary, you can use a plastic bundle that tightly ties the wires into a single bundle.
- When laying out the wiring, especially when you tie it together with a bundle, do not forget to make bends in the planned places. Leave loops for cutting wires and connections in universal boxes that are built into the baseboard structure. This is one of the typical errors that has serious consequences; the wiring will have to be disassembled and re-installed. It is not advisable to build up or make unnecessary connections in the new wiring.
Universal box with socket
After installation is complete, the decorative panels can be secured in place, creating a perfectly smooth baseboard, under which all communications are hidden.
How wires are laid in cable channels
Laying wires in electrical boxes has one important advantage - the availability of wires for repair in the event of a break or short circuit. If you need to add any electrical unit, the wire is easily added to the box
It is also easy to add an additional box after completion of installation work, without causing damage to the final finish of the walls. When laying cables inside the box, it is important that they do not twist and are laid straight.
After this, the cable channel can be closed.
It is not allowed to connect two short wires in the middle of the cable channel. Wires must only be solid. Wires can only be connected at branch points or in junction boxes. For connecting wires there are
- Terminal blocks are plastic devices, inside of which there is a brass sleeve with screws that clamp the wires;
- Connecting insulating clamps that simultaneously perform both connecting and insulating functions. The connection is made using a spring built into the plastic cap;
- Crimping sleeves are the most optimal option for connecting power wires through which more than 1000 W of electricity is consumed at a time. Crimping sleeves are short tubes into which wires are inserted. The tubes are clamped with a special tool - a compactor;
- Good old twisting also withstands energy-intensive appliances and lasts for decades.
Crimping with sleeves and twisting must be carefully insulated with special heat-resistant tubes or electrical tape.
Design features of floor skirting boards with elements for electrical wiring
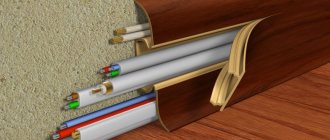
Taking into account consumer demand, manufacturers make various designs of skirting boards for laying wires. The basis for the plinth is a frame with cable ducts, which is closed with a decorative cover. The material from which the products are made is taken into account; due to the increased risk of fire, it is made from non-combustible materials. In most cases, this is durable and elastic plastic; skirting boards can be single-channel or multi-channel. The single-channel model provides a wide channel into which several cables are laid, from three to five depending on the diameter.
There is a successful design when the cable channel is mounted on the wall, the leads are placed in it, on it and under it, you get three compartments. Then a decorative panel is fixed on top and you get an excellent baseboard with hidden wiring.
Skirting board with 3 channels
Regardless of the differences, model and manufacturer of skirting boards, they all have common basic elements:
- Frame;
- Decorative connecting strips;
- Connectors for internal corners;
- Connectors for external corners;
- External decorative panel.
The frame is attached to the wall below, near the floor, the remaining elements are fixed manually; assembly does not require high qualifications or special tools. Therefore, builders and electricians are happy to use this technology when finishing premises in residential and administrative premises, stone and wooden buildings. Skirting boards come in a variety of colors and are laminated to resemble different types of wood; customers have a wide choice to suit any interior. From a technical point of view, they believe that this is a method of laying open wiring, but in fact it is securely hidden and protected from external influences.
Materials
The plinth can be made of several materials. However, not all of them meet certain requirements and some may not be suitable for wiring.
Table. Types of skirting boards depending on the material.
| Material | Description |
| PVC or polyvinyl chloride | The most commonly used type of skirting boards, as it has many advantages. This material meets all fire safety requirements. PVC skirting boards are inexpensive, but at the same time they are durable, elastic and strong, and are not afraid of exposure to moisture and a number of chemicals. However, under strong mechanical stress, PVC skirting boards can easily break. There are also special skirting boards for laying high-voltage cables - they are made of a special type of PVC, which has maximum fire safety. |
| Tree | It is undesirable to use skirting boards made from this material as electrical equipment, since their fire hazard is quite high. However, wooden skirting boards are highly environmentally friendly. |
| MDF or fibreboard | Such skirting boards are usually solid and require fastening of cables using clips. According to manufacturers, MDF is a non-flammable material, but it still does not have the same fire safety ratings as PVC skirting boards. That is why it is recommended to use it only for laying communication wires. |
Veneered plinth
Expert opinion
Afanasyev E.V.
Chief editor of the pol-exp.com project Engineer.
It is best to use PVC skirting boards for laying wires in an apartment or private house. They have a presentable appearance and are not prone to fire even if the wires are shorted.
Plastic floor plinth with cable duct
Electrical plinth - a solution to the problem of laying cables in an apartment
The problem of masking wires remains relevant not only for new buildings, but also for old houses. During a major overhaul of a secondary home, there is often a need to replace outdated, worn-out wiring that cannot withstand the load, because every year more and more different technical devices appear in the apartment.
Wires in the room must be hidden
Often indoors, wires are placed along the walls, which looks extremely unesthetic. In addition, such wires can become a source of danger, because they are easily damaged. And children and pets do not realize the dangers posed by wiring, which is why they can become victims of accidents. Fortunately, there are now several basic methods that allow you to insulate wires, keep them out of sight and protect others from contact with them.
Table. Methods for masking electrical wires.
cable channel pvc
Wiring in skirting boards in an apartment
Today, several methods are used to create electrical wiring. It can pass through special shafts in the thickness of the wall. To do this, you have to trench the walls, which significantly complicates the repair work. Many property owners install electrical cables in an open way. In this case, the wires run along the surface of the base.
Design Features
Open electrical wiring is the installation of attachments on the surface of walls or ceilings.
There are several types of skirting boards that are used as a device that allows you to hide not one, but several cables.
Cable channels are most often designed for wires
However, most models can only accommodate one electrical wire, which makes the job much more difficult.
The open method of laying wires is:
Placing cables inside special plastic channels. Such a thin box allows you to hide the wire running along the walls or ceiling. In order not to spoil the design created in the room, they use not only ordinary U-shaped boxes, but also designer models that can decorate the room
However, both of them stand out quite strongly on the surface of the finishing coating and attract the attention of others. Corrugated plastic pipes provide high-quality reinforcement of insulation, but do not look aesthetically pleasing and cannot be used during renovation of residential premises. Plastic skirting boards are created with the expectation that in models equipped with several compartments for cables, it will be possible to place wires leading to sockets, household appliances and lighting lamps. True, most of the models sold by modern manufacturers are designed for laying only one wire.
It is better not to install plastic skirting boards in unheated rooms
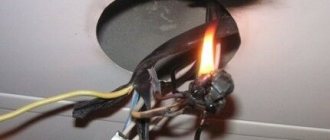
During operation, electrical wires become hot and close contact between several wires can cause a fire.
Inside the plastic baseboard there is no possibility of quick and high-quality cooling of all wiring components, and the baseboard itself quickly heats up and melts easily.
Certain existing deficiencies in the wiring in the baseboard will not allow such installation on an unglazed balcony or in a bathroom. This applies to all rooms characterized by high humidity.
Types of devices
Skirting boards with cable duct are available in two types:
- a model with a recess in the middle, which is closed with a cap;
- a hollow decorative strip that is laid along the line of contact between the floor and walls.
Such a device is a volumetric cable channel into which a large number of wires can be laid in order to later route them in the desired directions. As for the first model, the cables are placed in a special recess, but it is possible to place the wires in the cavity formed between the baseboard and the wall.
Particular attention is paid to the fittings that allow cables to be routed out. For this purpose, special linings have been created that can be installed anywhere and even at several points. Inside such a device there may be a wire for an Internet connection, an antenna cable, or electrical wires. For each of them, a special outlet is arranged to the outside, for which an overlay is installed.
No less popular is the high molding, equipped with several compartments inside the structure. It is protected from moisture, is a fireproof product, durable, and resistant to various types of deformation.
Since the main functional task of such molding is to decorate the joints between the walls and the floor, special fittings have been developed and created for all models, allowing the connection to be made in any desired place, to ensure the output of connectors, and to hide external and internal corners.
PVC moldings do not require painting, are easy to maintain, and are resistant to stress.
Skirting design
The electrical wiring is housed in a very simple electrical design. As a rule, the material used is durable plastic, flexible and elastic. When choosing a strip, you should consider the level of fire protection. Some household models have reduced flammability and are not advisable to use when laying power cables.
In design, electrical skirting boards are similar to each other: they consist of a plate that is attached to the wall, a place where the cable is laid and an upper mounting shell. Electrical wiring is laid in special shelves. But there are models that contain only one recess where the wiring of 3-5 cables lies. The outer panel is a protective plate that can be securely fixed to the structure without additional tools.
Electrical wiring in electrical baseboards is used not only in the apartment. It has become very popular in the country or in a wooden house. This is explained by the fact that the installation of such a strip is quick, convenient and cost-effective, while the electrical wiring will be securely hidden from prying eyes.
Advantages
There are many advantages to laying cables in the baseboard. This installation method requires a minimum amount of working time. After installing the electrical wiring, there is practically no dust or construction debris left. This allows you to carry out repair work without damaging the finish, furniture and other interior elements.
If you need to create an additional outlet, connect a new TV, or perform other similar work, using a plinth is the optimal solution. All wires will be hidden from prying eyes. In this case, the integrity and harmony of the interior will not be compromised.
When using the presented design, the sockets are mounted close to the floor surface. This allows you to avoid wires from household appliances hanging along the wall surface. It also greatly improves the overall appearance of the interior. The cost of installation will be affordable for almost everyone. Therefore, many owners of apartments and private houses choose to install wires in the baseboard.
Preliminary measures before installation
Before you begin installing electrical wiring inside the baseboards, you will have to carry out a number of preparatory measures. They should not be neglected, because through them it will be possible to ensure the fastest and most correct installation, while also taking into account decorative aspects.
First you need to decide on the color and size of the skirting boards. Our article will help you with this. Here everything will depend on the wishes of the apartment owner, as well as on the interior of the rooms and their dimensions. So, in a room with high ceilings you should not install narrow skirting boards. In dark rooms, radically light or dark finishing strips are not used unless they are combined with other interior elements.
Even before you begin installing the baseboards and laying the wires, you should decide where the various electrical devices will be located. This will allow you to choose the correct location of sockets and lay the cables as secretly as possible
It is best to immediately draw up a diagram of where and how the wires will be laid. It is important to calculate the amount of plinth - it will depend on the perimeter of the room. Don’t forget to take into account the amount of possible waste that is generated during cutting of the material.
This is about 5-10%. At the design stage, the size of the cable channel is also calculated. Here the choice will depend on how many wires will be laid in it.
The procedure for performing work when installing skirting boards
At the preparatory stage, it is important not to forget to calculate and purchase components in the required quantity. They will not only facilitate the installation process, but also make the entire structure beautiful and neat.
In this case, the components must match the color and size of the baseboard itself.
Accessories for plastic skirting boards
Types of skirting boards for cables
There are two types of wire trays:
- The product has a recess on the front side. The cable fits into it. After which the groove is closed with a compact lid. It can be quickly removed and returned. A good option in case new wiring is added in the future, but you don’t want to remove the entire baseboard.
- Initially, only the tray is attached to the wall. A wire is attached to it. A massive front cover is placed on the structure. The assembly turns out to be more durable and capital. Suitable for families with small children, because getting to the cables is not so easy.
Arbiton skirting board design with front cover
Installation technology
Before starting work, it is necessary to carefully think through everything and carry out preparatory work. The first step is to decide where the wiring will go. When planning, you should calculate the total cable length.
The next stage is the purchase of all the necessary materials for the work. Please note that if you plan to install additional sockets, you will need to purchase a special box for installing electrical products in the baseboard, as shown in the photo below. Or you can use a cable channel to lift the wiring up and install an overhead socket.
Then you can begin installation. To do this you need:
- Remove old unusable baseboard.
- Remove the protective panel of the box. Only the installation bar should remain, with which further work will be carried out.
- Start installing the fastener from the inner corner. Place the corner adapter on the end side of the plank. And in the place where the wiring is planned, attach a strip.
- Using an awl, you need to make punctures for fastening. The marks on the wall should be small.
- Then the plinth is removed, and using a puncher, holes with a diameter of 6 mm are made into which dowels are inserted.
- The installation strip is returned to its place and screwed with self-tapping screws.
- Using special adapters, the plinth is attached to the frame.
- Once the strip has been installed, you can begin installing the wiring. To do this, all wires are placed in special cable channels or on shelves. If necessary, the wires are additionally secured with mechanical fasteners.
- Holes are made where the socket boxes should be. To avoid damage to the insulation, its edges should be cleaned with a file. The next stage is the installation of sockets and their fixation.
- Once the electrical wiring is in place, you need to put the protection panel in place.
The video clearly demonstrates how to do wiring in a baseboard with your own hands:
Solution evaluation
The first and main question: what is better - hidden wiring in grooves, or nominally open wiring in the baseboard with a cable channel?
Expenses
When installing wiring, wall gating is a separate item in the estimate. A linear meter of grooves costs from 100 to 200 rubles, depending on the wall material: aerated concrete, which is easier to process, is priced cheaper, durable ceramic bricks are more expensive.
A polyvinyl chloride plinth with a cable duct costs in Sevastopol, where the author of these lines lives, from 70 rubles for a 2.5-meter-long strip. Moreover, its price is almost equal to the cost of a plinth strip without a cable box, which in any case is used to finish the junction of the wall and the floor.
Important: Baseboard electrical wiring is beneficial.
The author must admit to some bias: wiring electricity in the baseboard seems to him extremely practical and convenient. This is exactly how it was done in all the rooms that “His Majesty Renovation” reached. Nevertheless, we will try to maintain at least the appearance of objectivity, and try to weigh the pros and cons.
Delight and adoration
- Electrical wiring in a baseboard box requires a minimum amount of dusty work. Fastening it with dowel screws is an order of magnitude simpler than hammering walls, and is not accompanied by a monstrous amount of dirt in the house or apartment;
Tip: If you drill walls while the vacuum cleaner is on, the appearance of dust on furniture and inside household appliances can be completely avoided. When chipping, this is almost impossible, if only because you have to hold the hammer drill with both hands.
- If you need to install an additional socket, this will not cause any problems: just open the cable channel, remove the decorative strip from it, cut the de-energized wire and connect it to the outlet with blocks;
Let's make a reservation: this solution is not suitable for wiring operated with a heavy load (up to the maximum permissible 3.5 kW per outlet). The block will become an area with increased resistance and will heat up noticeably.
- A plinth with a cable channel involves installing sockets just above the floor, which, in the author’s opinion, is extremely convenient: power cords for household appliances will not hang untidy on the walls.
A spoon of tar
With all my sympathy for baseboard electrical wiring, the author must admit that it has several rather serious drawbacks.
- Heat dissipation when laying wires (especially several wires) in the baseboard is noticeably worse than when installing wiring hidden in grooves;
- Laying several three-core wires with a cross-section of each core of 2.5 mm2 in the cable channel of the plinth is quite problematic. In the groove it’s much easier;
Meanwhile: with heavy loads on the wiring, each group of sockets must be powered with a separate wire with a cross-section of the same 2.5 mm2. Several sockets connected in series will share the wiring capacity, which will lead to overheating of the latter.
- To find sockets on sale that are installed on a baseboard... Let's say politely, the task is not trivial. At least in Sevastopol, where the author lives. Connecting a regular wall socket to the wiring hidden in the plinth is possible, but it requires the same gating that we wanted to avoid (in the case of hidden installation) or is done by somewhat “collective farm” trimming of the plinth (when installing an external socket);
- The plinth, willy-nilly, will have to be installed around the entire perimeter of the room. Including where it will interfere with the installation of furniture close to the wall;
- The wiring will need to go around the doorways. It will have to be placed under the trim around the perimeter of the door frame or... yes, in those same hated grooves.
FAQ
Question No. 1. Is it possible to lay cables with a wire cross-section of Ø – 6 sq/mm in the plinth, for electric stoves or other high-power household appliances?
It is possible, preferably a separate line in a multi-channel baseboard, but you must be sure that the following conditions are met:
- the power consumption of the device and the cross-section of the wire are calculated correctly, there will be no heating of the wiring;
- A reliable circuit breaker with appropriate ratings is installed in the distribution board;
- The baseboard body and mounting strip are made from non-combustible materials.
Question No. 2. It is impractical to install switches in the baseboard structure, how do you route the wiring to the light switches and lighting fixtures in the ceiling?
The picture shows one of the options for how to bypass the doorway and connect the switch.
In most cases, this technique is used as a complementary element to already finished wiring. For laying telephone, computer networks, cable television, and separate power lines.
If you want to do a complete installation of electrical wiring on this basis, you must understand that wiring in baseboards significantly reduces gating, but does not eliminate it completely. This article describes how to make bends from baseboards into grooves of closed wiring and for cable ducts of open wiring.
Question No. 3. If there is not enough space in the baseboard cable channel for the wire, in order to simplify and save money, can a branch be made to the opposite wall under the floor?
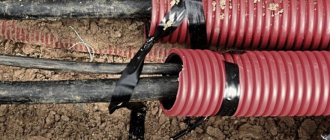
Following fire safety regulations, you can lay the cable in a corrugated tube and run it under the floor covering, if the design allows this.
Wiring. Installation methods and masking of cables
During construction and renovation work, we are faced with a number of problems that, of course, must be solved in order to achieve the ideal final result. Masking electrical wires is no exception. How to install electrics in the house so that they do not spoil the appearance of the entire interior?
When this question is asked long before the finishing robot, it is not a problem, since its solution is quite simple:
- Firstly, the location of the elements that are consumers of electricity is planned relative to the walls and ceiling (switch, sockets, distribution box).
- Secondly, the electrical wiring is marked. When marking, it is worth taking into account the degree of load on a separate branch; if possible, it is better to make the power supply for each outlet individual, i.e. Run a separate cable from the junction box.
- The next step is cutting the walls for the wiring and directly laying the cable in the grooves.
Laying electrical communications on the floor
Installation of electrical communications on the floor
You can also hide electrical wiring by laying it under the floor covering. This operation is possible when the floor screed has not yet been poured. Everything is quite simple, but is it necessary?
All the pros and cons of installing wiring inside the floor
Advantages:
- Electrical wiring safety. Everyone has encountered a situation where you carelessly drove a nail into a cable, or interrupted live wires with a hammer drill. The inconvenience of restoring the damaged area is enough for this reason alone to give preference to installing electrical communications under the floor.
- Saving. First of all, we are talking about saving cable, since it will not have to be laid around the perimeter of the room, and it can be run under the screed using the shortest route.
- Ease of installation. The fact that you don’t have to hammer into the walls to remove dust and dirt is already understandable. All you have to work on is threading the cable into the corrugation or pipe, and bringing all the ends to the “electrical points” for connection.
Features of installing baseboard sockets
Laying the wire in the cable channel
There are a number of rules that should be followed when installing power points on a wall border:
- The plinth is fixed to a flat wall in increments of 0.5 m. If the panel has bends, the fastening spacing is reduced to eliminate the appearance of gaps between the curb and the wall.
- It is better to work with a hammer drill and install dowel-nails directly through the baseboard attached to the panel. This saves time.
- It is better to fill the cable channel with wires by 40%, but no more. Otherwise, overheating of the electrical wiring will occur.
- It is advisable to lay the cable freely, without tension. Sometimes, if the channel cross-section allows, even a small reserve is made.
- If the master installs ordinary overhead sockets close to the baseboard, a grinder is used to make a cutout right up to the box with the wires. This will make it easier to route the cable to the power point. And connecting the outlet to the curb will be neat.
Installation of plastic PKK
Do-it-yourself installation of PKK made of plastic is carried out in the following sequence:
- PKK panels are laid on the floor and installation sections are marked along the entire route.
- Strips of skirting boards are cut in accordance with the markings.
- Disconnect the outer decorative profile strip and the cable channel box.
- Mark the centers of the holes at a distance of 40-60 cm to which you need to attach the base of the baseboard cable channel box to the wall.
- Holes are drilled in the wall and base.
- Plastic dowels are installed in the holes.
- The base of the cable channel is fixed to the wall with screws.
- The wires are laid in cable duct boxes.
- Place the outer profile on the cable channel and snap the locks around the entire perimeter of the installation.
Important! The elastic edges of the plinth should fit snugly against the wall and floor, protecting the internal cavity of the PKK from dust and moisture. Laying plastic PKK
Laying plastic PKK