Installing a TV cable in an apartment is an important step in connecting a TV. It provides not only a functional component, but also an aesthetic one.
A well-laid line provides a continuous, clear signal, and several simple methods will help you remove, disguise, and hide the wires so as not to spoil the overall picture of the situation. In addition, it is important to provide for all the components of the television line, thereby ensuring the connection of additional devices without forced modification of the design.
Choosing a TV cable: what to pay attention to first?
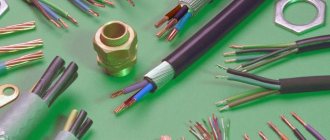
Many providers, for example, such as Tricolor, lay out the cable for cable or satellite television themselves. However, in this case, the quality of the cable may be lower than desired. And in connection with this, there is an option to search for this product yourself, focusing on a number of parameters. We will choose the RK 75 model (analogous to SAT 602).
Quality is something you cannot skimp on when laying cables. Ideally, we do this once and for many years, since sometimes such communication elements are located under the baseboard or even under the trim. And if we want to re-stretch them, it may involve a lot of extra work. At the same time, a high-quality cable has minimal signal attenuation, which means that the picture and sound will be of the highest quality.
The wire must be flexible enough so that we can lay it with our own hands at different angles if necessary. At the same time, it must have high-quality external insulation that is resistant to water and other factors. This is especially true if some of the wiring is located on the street.
Depending on what kind of television we conduct, we are looking for the following types of cable:
- Digital television: RK 75-4.8-312, or RK 75-4.8-318;
- Cable television: RK 50-7-11, or RK 75-4-11;
- A simple cable from TV sockets to a TV: RK 75-2-1.
What you need to know and be able to do when connecting several TVs to one antenna
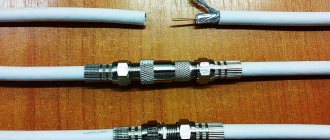
To do this job you will need some skills in connecting cables to different connectors - it is not difficult. If you haven't done this before, take a look at the pictures and description below.
Step one - Carefully cut off the top layer of cable insulation so as not to damage the braid wires, they will come in handy later. We wrap the braid and foil back onto the cable, as in the figure. In principle, the foil can be cut off; it is actually polyethylene. It is important to leave the braid.
Step two - We cut and remove about 1 cm of internal insulation from the wire, we also try not to cut the wire itself.
Step three - We screw the F-connector (Connector) onto the cable, right on top of the braid, making sure that no wires of the braid remain on top, next to the central core, otherwise there will be a short circuit. You need to screw the connector so that the inner layer of insulation is 1-2 mm higher than the lower edge of the connector nut. And the central wire itself ended 2-5 mm above the upper edge of the nut.
Step four - We screw the finished connection onto a splitter or other switching elements.
Well, we’ve learned how to connect, let’s move on.
The first thing you need to understand when deciding to connect several TVs or digital set-top boxes to one antenna is that the signal from the antenna must be reliable. If the signal is insufficient, there will be no success or you will have to combine the wiring with additional amplifiers.
If we talk about digital terrestrial television, the signal level is not difficult to find out.
To do this, you need to connect a TV with DVB T2 or set-top box to an existing antenna and go through the menu to manual tuning mode. Next, enter the number of the television channel that is broadcasting in your region and after a few seconds a signal should appear - it will be reflected in the form of a scale, if the level is more than 70%, then everything is in order. If you don't know the channel numbers for your region
Note: In some TV models, for example SONY, in order to see the signal, after setting the desired TV channel number in the settings menu, you need to go back a step in the TV menu - exit the “window” in which the TV channel number is set. Otherwise you won't get anything.
When you have decided on the signal level, it’s time to start wiring. Let's look at a few simple options.
Cable laying rules and sequence of actions
Important! When laying the TV cable, try to place it at a distance from the electrical wiring. In this case, electromagnetic radiation will not affect the quality of the television signal. This effect is called stray currents.
The fewer branches and interruptions, the better. Ideally, the cable should be laid directly from the point to the outlet or TV. But sometimes this is difficult to do, and you need to connect splitters in series. The signal in this case may be worse.
A few other rules for laying a TV cable:
Television cable is low-current. If it is laid in a cable channel with other types of wiring, it is best to also choose a “low current”, such as a telephone or the Internet;
When laying the cable, you must not create loops or twists (coils). All this can lead to significant signal degradation.
Now let's talk about the procedure itself:
- We find the shield, and in it the cable we need;
- We pull it along the panel tunnel in the case of a vertical installation in an apartment building. If the signal source, an antenna, is connected directly, then you often have to pull the cable along the outside of the house and through a window or wall;
- We drill a hole in the wall or plastic window and run the cable into it;
- We run the cable through the room directly to the receiving device.
Installation of TV wiring is carried out using special plastic holders, nailed to short nails included in the kit.
Laying and installation of TV cable
To begin cutting our cable and installing connectors on it, we first need to remove all obstacles encountered on its way to the installation site of the satellite dish. That is, drill transition holes in the window frame and door jambs.
Here, first of all, I want to give a little advice: when installing a cable, try to do everything well at once, and not temporarily, something like “oh, then I’ll redo it,” everything that is done temporarily is often done permanently (this is from own experience), especially since it often happens that it is better to do it again than to spend more time redoing it.
Laying a TV cable along the wall of a building
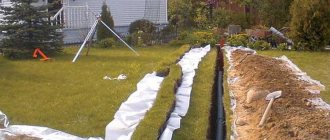
Cable laying along the wall of the building is carried out with the condition that the wiring is parallel to the architectural lines of the building: window casings; slopes; cornices.
Cable laying along the facade of a building with brickwork or cinder-concrete walls is carried out using screws that are screwed into sockets or nail dowels nailed to the wall with a hammer.
TV cable passing through the wall of a building
It is advisable to run the cable through the walls in semi-solid cut tubes, which are insulated indoors with bushings at the ends, and outside with funnels.
If the cable will be routed inside the wall without using protective tubes or ducts, you can seal the cable entry hole into the wall with silicone.
Important! When organizing a passage through the outer wall, it is necessary to ensure an inclination in the direction of the outer wall surface.
If your satellite dish is located not on the balcony, but on the roof, then the coaxial cable must be given some slack and a loop made in front of the cable entry hole. That is, it should, as it were, first hang down, and only then go to the top. This must be done so that when it rains, the water flowing down the cable does not pour onto the window, but flows down through the formed loop.
Loop in front of the hole for cable entry into the wall
On the left is a direct cable entry into the wall. On the right, we spent another ten centimeters of cable on a loop for water drainage (in real conditions it is better to make the loop more massive, about twenty centimeters)
As you can see, on the left, water with all the force of gravity rushes into the cable entry hole. And this already means dampening of the walls, falling off of the wallpaper and other despondency. On the right, water rushes down from the bottom of the loop. The hole is not bombarded by streams of water flowing from the roof, remaining dry.
Cable routing through the window frame
To lay the cable through the window frame, take the diameter of the drill, a millimeter larger than the diameter of the cable itself. My cable was 7 mm, so I took a drill, 7 + 1 = 8 mm. Since window frames are usually double, you have to drill two holes. The main thing in this case is that both holes coincide in their center, otherwise the cable will bend in these places and it will be more difficult to stretch it. In my case, since there were two signals coming out of the converter, and therefore two cables, I also had to drill two holes (Photo 1 and Photo 2). To prevent street air from entering the room through the cracks between the walls of the hole and the cable, you can seal them, for example, with silicone or window putty. For example, I made such a seal in the external window frame, since in the summer sometimes you have to open the windows, and it is necessary for the cable itself to have some free movement.
1. Laying the cable through a wooden window frame.
2. Laying the cable through a wooden door frame.
Features of cable routing through the plastic frame of a double-glazed window
I would like to warn owners of plastic windows. If your window is quite expensive, then the frame can be sealed and filled with gas (like a double-glazed window). Therefore, in this case, it is not the frame itself that needs to be drilled, but the space between the frame and the wall of the window opening. In that place, as a rule, there is a small distance that is filled with polyurethane foam.
Sectional diagram of an installed plastic window with double glazing
Option #1 (recommended). Usually, if possible, you can pierce the foam under the window sill with a long knitting needle and take the cable out from there, wrapping it overlappingly to the knitting needle with electrical tape from the street side. But if this is not possible, in order to run the TV cable into the room, do the following:
1) drill or beat off the slope at a smooth angle (to make it easier to pull out the cable) in the lower part of the window opening until we reach the foam on the side of the double-glazed window frame
2) take a thin long metal object (knitting needle or metal wire)
3) we pierce the foam with a slope towards the street (to protect against moisture) in the place where the cable should enter (usually the lower corner of the double-glazed window frame)
4) we connect the cable to the spoke with electrical tape in an overlap on the street side.
5) pull the knitting needle into the room along with the cable (wire). Don’t forget to leave a supply of cable (20 cm) outside if necessary.
6) we seal all the cracks with polyurethane foam, sealant or silicone and restore the slope of the window opening with plaster or plaster.
Option No. 2 If your window is simple, without any bells and whistles, then use a regular metal cut. Naturally, you should try to drill the part of the window that does not open and always with a slope towards the street. Then seal all the cracks with silicone or sealant.
Option No. 3 (temporary option) - for the lazy :-).
The following flexible adapters are sold in SAT equipment stores:
It is simply clamped between the sash of the plastic window and its frame, and the street and indoor ends of the cable are already connected to it using. Essentially this adapter is a flexible one.
This cable routing option is highly undesirable. It is only good for temporary cable installation and ease of connection. Because if the window sash opens and closes, sooner or later the adapter will not hold up and you will be left without a TV.
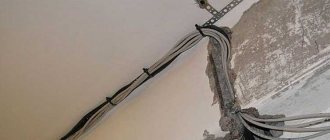
Laying TV cable indoors
When laying the cable, you can hang it on the walls of the apartment using homemade fasteners made from sections of vinyl tube or cut pieces of “noodle” type telephone wire. Although, if you wish, you can also use factory-made brackets by purchasing suitable ones in size at the nearest hardware store.
1.Factory version
2.Option with pieces of plastic tube
When laying the cable, avoid strong bends, and also do not use fasteners such as bent nails (Photo below), which can seriously damage the cable itself.
Extremely undesirable cable fastening.
Remember that even a cable that is not very wrinkled already changes its transmission characteristics (its characteristic impedance changes). The cut shape of the coaxial cable should be exactly round. That is, if you look at a coaxial cable in cross-section, then the distance from the middle core of this cable to the shielding braid should be the same (Fig. 1). Whereas in a crumpled cable, these distances are different (Fig. 2).
Connecting two pieces of cable
But as they say, a crumpled cable is half the trouble. What to do if it happened that when laying the cable, you accidentally broke it, or, for example, it was not long enough, and you had to increase this length with a second piece.
There are only two ways out of this situation. The first, and best, is, of course, to replace the damaged one with a solid cable, without any connections. Second, connect the two sections with a special coupling (Photo below), you can buy it in the same place where you purchased the connectors.
Two types of couplings.
Connecting two cables through a coupling.
Buy two or three at a time just in case. Even if your cable comes in one piece, they can be useful if it is damaged in any place. To do this, it is enough to cut out the damaged area, install connectors, and connect them with this coupling. I, on the segment converter > DVB computer card , used to have two such couplings, now I replaced them with a solid piece of cable, but in principle I didn’t notice any difference. Neither the level nor the quality of the signal has changed, although... anyway, I recommend doing without couplings, especially if a cheap brand of cable is used during installation (!). And one more thing, if such a connection is not located on the street, it is advisable to wrap it tightly and around the entire area of the connection with electrical tape in order to prevent moisture from entering.
When installing cables for satellite equipment, it is strictly not recommended to use various types of manual twisting. If this option somehow happened when installing an antenna for receiving terrestrial television, then when installing a satellite dish, such a connection can lead to a complete impossibility of reception.
Also, when laying the cable, try to avoid passing through various heat sources located nearby, or devices emitting strong electromagnetic and radio waves.
When you are done with laying the cable, you can start cutting it and installing connector-connectors on it.
Masking a television cable in an apartment
After the television cable is installed in the apartment, there is a need to hide it. There are many ways to do this.
The first is to hide the wiring in a plastic box. It is a rather long structure, about two meters, with an opening upper part. You can attach the box to the wall using glue or self-tapping screws.
The next method is to lay the wiring behind the baseboard. To do this, the bar must be removed, and after placing the cable there, reattach it to its original place. Some models of floor skirting boards are even initially equipped with cable channels.
If the apartment is undergoing renovation, you can hide the wiring by making small recesses in the wall and placing the cable there, then covering the recesses with plaster or plaster. This is the safest option.
Today, overhead and internal sockets are used for laying television cables.
SAT-TV Sockets
| Internal TV socket | Overhead TV socket |
TV sockets are divided into the following types:
- terminal. They are used if only one TV device is connected to the cable, or at the end of branches to other TVs, when there is only one TV receiver left.
- checkpoints. They are used for branching a TV signal when you need to install several TVs. Two cables are connected to such a TV socket: the signal arrives through one, and through the second it goes further to the next TV receiver.
- simple, or, as they are also called, individual or single. Such sockets are also connected using a splitter, however, low characteristic impedance can cause distortion on the screen.
It is assumed that the apartment has one cable, in which the signal is strong enough, and there are 2-3 televisions in a modern apartment. To connect two or more TVs, use a special splitter device - a splitter, which has one input and 2-3-4 outputs. Then the connection diagram for TV sockets for televisions will be called “ star” :
The “Star” scheme for connecting several TVs to one antenna is most widely used, as it has the following advantages:
- Cables to all sockets come out of one junction box, which is convenient for installation and maintenance,
- Minimum attenuation of the television signal,
- If one of the signal lines or sockets malfunctions, the rest operate normally.
The only downside is the high consumption of the antenna cable, which is insignificant, especially with optimal wiring.
Alternative ways to disguise a TV cable and more
It is not always possible to hide cables in the wall or install a box, for example, if the apartment is rented and the owner is against construction work. There are also ways for such cases, and they are designed more for imagination and ingenuity than for any special skills.
The first thing to do is look around. Indoor plants, furniture, armchairs, chairs - all this can be used to disguise cables. Use the lighting in the room and see how the shadows fall. The cable can be hidden under carpeting, but it must be laid along the edges to avoid wrinkles and trip hazards.
Take a walk through hardware stores, especially those departments that sell gardening products, and use things other than their intended purpose.
| Decorative camouflage | Decorative staples |
| Laying cables on the table | Spiral tube for cables |
| Hi-tech cable pattern | Classic cable drawing |
How to install a television cable around an apartment
Often we need to use not one, but several TVs. And in this case, it may be necessary to route one cable to a number corresponding to the number of receivers planned for use.
For those who thought that this process could be carried out by simply cutting and twisting the cable and then fixing it with “blue electrical tape”, let’s say that this method is unacceptable. In this case, the quality loss can be catastrophic. It is necessary to use only factory splitters that will ensure reliable wiring. Splitters should be placed in places that can be easily accessed.
Connecting 2 TVs to the antenna
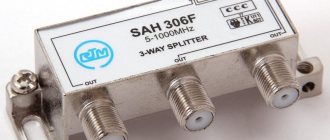
Often, several television receivers are installed in an apartment, one in each room. To divide the signal into several devices, use a special splitter - splitter .
Connection diagram of the splitter to the antenna and TVs. Plug F of the standard is connected on one side to the coaxial cable, on the other - to the input connector of the splitter
The choice of splitter depends on the number of receivers: how many TVs, so many outputs on the device. But we must not forget that the signal arriving at the antenna will be divided into as many parts as there are connected broadcasting receivers.
And if the signal quality is not the best, then when connecting even a second TV, the image or sound may suffer greatly. The problem can be corrected using an amplifier installed near the antenna (if it is passive).
We talked about the principle of operation of the amplifier in our next article.
Hiding television communications in a house or apartment
Nobody likes to have wires lying on the floor. They are easy to trip over and can be played with by children or animals. Therefore, we will hide the cable. There are several ways to do this:
- A plastic box, also called a cable duct. This is a long, hollow structure into which one or more cables can be routed. The channel itself is attached to the wall, and sometimes to the ceiling. The method is simple, but for some it is not suitable due to the fact that, having hidden the cables, we continue to see a box for them, which may not be combined with the interior, especially if it is necessary to maintain the integrity of the latter;
- Skirting board. Some modern models of skirting boards are equipped with cable channels. However, the necessary space can also be found under the old baseboard;
- Hiding the cable with trim. If the installation of television communications is carried out simultaneously with repairs, then there is an option to hide it all in the walls. Some people gouge the wall to create a channel there, and then cover the whole thing with plaster. In other cases, the cable is hidden under drywall.
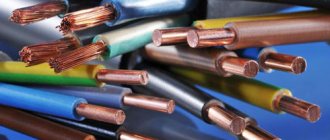
How to choose the right cable
Even the most modern television receiver and cable plugs are unable to produce an acceptable image if the cable is of insufficient quality. High-frequency TV signal currents flow somewhat differently than home electrical currents. The higher the frequency of the current, the closer to the edges of the main wire it flows, therefore, in cables used in the military or space industry, in order to avoid a critical reduction in the quality of the television signal, they are treated with a silver or gold compound.
Selecting a cable to connect
When selecting material, you must adhere to the following recommendations:
- all markings must be present on the outer shell;
- the resistance value of the product should be 75 Ohms, because all television receivers are designed for this value;
- the outer diameter must be more than or less than 6 mm;
- The main core and shielding braid must be made of copper.
Marking of television cables
Let's look at the marking using the example of the Chinese RG 6U television cable, the most common in our country.
| CABLETECH RG 6U/48 HIGH QUALITY COAXIL CABLE 75 OHM 055M | |
| Designation | Decoding |
| CABLETECH | Manufacturer company name |
| RG 6U | Cable brand |
| HIGH QUALITY COAXIL CABLE | High quality coaxial cable |
| 75 OHM | Resistance 75 Ohm |
| 0.55M | Cable length mark |
An example of Russian-made cable marking indicating the main characteristics and technical conditions
How to connect a cable to a plug
You can connect the plug to the cable yourself, especially since the TV signal voltage is too low to cause any harm to health. Even an unplugged cable can be cut without fear of electric shock. A short-circuit between the braid and the main conductor also does not cause any harm. Different plugs are produced for different cable sizes, therefore, when selecting a cable, you need to pay attention to its diameter. The most commonly used are F-plugs.
First you need to cut the cable, which can be done in two ways:
- with braid bend;
- without inversion.
The most reliable method is considered to be cutting with a twist, but if it is not possible to install the plug, then the second method is used. The cable is cut with a scalpel or a sharp knife: the outer sheath is carefully cut to length without damaging the screen. Once the cut is complete, the insulation is folded back and removed.
Step-by-step diagram of crimping a television cable with bending the braid and releasing the main core by 3-5 mm
The copper braid and shielding foil are wrapped. In general, three types of shielding can be used in TV cables:
- aluminium foil;
- copper braid;
- aluminum foil with copper braid.
Aluminum foil is often coated with polyethylene on the inside for strengthening purposes. It is unlikely that it will be possible to clean the film without damaging the foil, so to improve the contact of the screw-on plug with the foil, the bent part of it is slightly wrapped back so that the uninsulated piece of foil faces outward. If the cable diameter is too small, the end entering the plug is wrapped with electrical tape.
The insulation from the main core is removed in a manner familiar to many, similar to removing insulation from electrical wires, without damaging the core itself. Then the plug is screwed onto the foil, and the excess main core is bitten off with wire cutters or cut off with a knife, leaving a length of approximately 3 mm on the outside.