Connecting wires by twisting and soldering - what does the PUE say?
Let's start with the fact that twisting wires in electrical installations is prohibited. At least in the PUE, twisting is not allowed (PUE, Chapter 2.1). This can be explained by the fact that the quality of twisting depends very much on the experience, tool, and even the mood of the electrician. And there is no way to check this quality, you can only evaluate it “by eye” or test it with increased current.
Soldering in PUE is allowed, but is recommended in GOST R 50571.15-97. This is motivated by the fact that in some emergency conditions the connection temperature can reach 300°C, the solder will melt and drain. Honestly, I can’t imagine how this can happen if the circuit breakers are installed with the required rating. But even if this happens, in my opinion, such wiring will need to be completely changed! And it won’t matter whether the solder melted or not.
As for crimping - yes, the method is good, but it requires additional equipment (press molds) and consumables (sleeves). The same goes for welding - you need a transformer (inverter) and graphite rods. And experience - how many times have I seen that the ball at the end of the twist fell off due to excess current, or did not grab all the wires in the twist due to low current.
Therefore, I believe that twisting followed by soldering is the best way to connect wires in junction boxes. The soldering iron is lightweight, the price is low, the solder and rosin are cheap.
Next - more about this hot smelling process)
Advantages and disadvantages of soldering electrical wiring
A soldered connection is considered one of the best in terms of reliability.
In order to properly solder wires, you need to familiarize yourself with the advantages and disadvantages of the method. Despite existing analogues, this method is considered the most widespread and in demand, especially in electronics.
Advantages:
- Reliability. An important parameter is the presence and magnitude of the contact resistance. The lower it is, the better. For soldering, this parameter is extremely small. In terms of reliability, soldering is inferior to welding only in one case - if the work had to be performed in extreme conditions, for example, in an environment with extremely high or low temperatures, or exposure to aggressive environments. If we are talking about apartment wiring or a country house, such factors are excluded.
- The connection does not require maintenance.
- Versatility of use. With the help of soldering, it is possible to connect single-core and stranded wires with different cross-sectional areas, in any combination. This versatility allows you to solve many non-standard and difficult tasks. In addition, the use of fluxes ensures a reliable connection of copper and aluminum conductors.
- Low connection cost. To carry out the work you will need a soldering iron, solder and flux. The cost is low and the consumption is economical.
Flaws:
- Low technology. To carry out the work, it is necessary to carry out many preparatory measures, hence the high labor intensity.
- The need for performer qualifications.
When soldering, changes in materials occur at the molecular level, so the pre-soldered parts undergo thorough preparation.
Soldering twisted copper wires
Let's start from the place where the wires are twisted in the junction box.
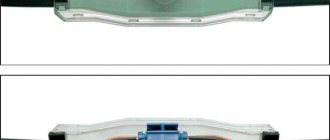
1. Twisting the wires in the box
In the left box, the wires are twisted according to the electrical wiring diagram. In principle, many electricians stop there. And they are 90% right, it can be insulated, such wiring will last 100 years, we don’t need any more. But this is provided that in this distribution. the box will always be dry and the circuit breaker has been selected correctly. I recommend my article about choosing a circuit breaker - How to choose a circuit breaker.
I saw that in old boxes there was a twisted connection between aluminum and copper. These were twists from 50 years ago! And everything worked great! This is very risky, and such compounds will live for a long time if several favorable conditions are met. Such twisting is usually subject to severe criticism among electricians, and it is considered extremely unprofessional. But we’ll forgive you, especially since those who made such twists are already in another world, where there is no need to connect wires...
Solder and flux. What are they needed for?
Soldering is the process of welding two parts together. Only instead of an electrode, solder is used - an alloy of lead and tin. Flux is used to wet the soldered surface and protect it from oxidation. This is usually rosin made from pine resin. In appearance and color it resembles a piece of amber.
Solder comes in the form of a wire or tube with flux inside. The first option is more popular. Flux is used in any case.
Depending on the connection methods and soldering of wires, the appropriate type of solder is selected. The darker it is, the more lead it contains; it is designed for a higher melting point.
Solder for certain purposes is selected according to its marking. Decoding the designation code is very simple: the letters indicate that the solder consists of tin and lead, the numbers indicate the percentage of elements
For household purposes, solder of the POS 60 brand is optimal, the melting point of which is about two hundred. Despite the low lead and high tin content, the connection will be quite strong.
Soldering wires in a junction box
We take out a soldering iron with a power of 65 or 100 watts. The power depends on the sum of the cross-sections of the wires being soldered. For example, if you solder 3-4 wires with a cross-section of 1.5 sq. mm, then a 65 W soldering iron will be enough. If the total cross-section of twisted wires is more than 10 sq. mm, then the soldering iron should be 100 watts.
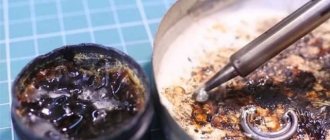
So, we take rosin in a piece or in a plastic jar. The wires should stick out with their tips facing up. We warm up the twist area and touch the rosin so that it melts and flows a little down the twist.
2. Application of rosin
This is especially visible on the central and right wires. Then we take the solder in the rod, heat the solder and the twist at the same time, tinning the twist.
It is better to use solder with rosin; there is a lot of this on sale now. The rosin is found inside the solder rod. If there is no rosin inside, you need to apply more of it to the twist beforehand, and more carefully control the soldering time and temperature. otherwise the rosin may simply evaporate.
3. Soldering twists in the junction box
We solder the wires. Tin the twist so that the solder penetrates into all places. In this case, the copper should be covered with solder over a length of 40...80% of the twist length.
4. Wires are soldered
You must try not to overheat the soldering area so as not to damage the insulation. And in general, try to do everything quickly, automatically.
We cut off the ugly protruding ends of the soldered twists with side cutters (3-5 mm).
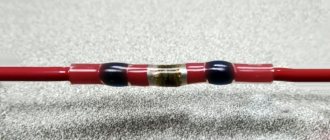
Soldered, insulate the soldering points with electrical tape (usually I use PVC of different colors). And that's basically it. You can wall the boxes.
5. Insulate solder joints
6. Lay wires in junction boxes
Isn’t it true that there is something mean-spirited in the word “flush”?))
7. Closed boxes. Flush
You definitely don’t have to worry about contact in such boxes; you can completely bury them under a layer of plaster. Although, it’s better, of course, to have access to the boxes, you never know – check, connect additionally, etc.
As cs-cs.net spoke on this topic: If at 2 o’clock in the morning you wanted to see how your twisting of copper and aluminum is doing, you should have access to the distribution box without any problems.
Selecting and preparing a soldering iron
This is perhaps the most crucial stage. A poorly chosen or improperly prepared tool will not produce high-quality soldering.
Power and type
The main criterion for choosing a soldering iron is its power. The industry produces instruments with power from 10 to 200 W and higher. The former can be the size of a fountain pen, the latter look like a natural hammer of impressive size.
Electric soldering irons with a power of 30 (left), 60 and 200 W.
All that remains is to decide which soldering iron to choose for soldering wires. Here everything will depend on the operation being performed, or more precisely, on the thickness and massiveness of the parts that need to be soldered. The more massive the parts, the greater the heat capacity the tool should have. An approximate dependence of the recommended soldering iron power on the task being performed can be presented in the following table:
- 15-25 W – small radio elements, microcircuits, conductors with a diameter of up to 0.3-0.5 mm;
- 30-40 W – large radio elements, wires with a diameter of up to 1 mm, including multi-core ones;
- 40-60 W – fairly large parts, conductors with a diameter of up to 2 mm;
- 100 W – massive parts, wires with a diameter of up to 3-4 mm;
- more than 100 W – power wiring with a diameter of more than 4 mm.
If you don’t have a soldering iron with the necessary characteristics at hand, you can take a slightly larger one in power, but not vice versa. With a massive device, it is possible to solder thin wires with a certain skill, but with a small and low-power thick one, it is almost never possible. Ideally, your household will have several electric soldering irons of varying power.
But what to do if there is no soldering iron of the required power or if it does not exist in nature at all? Trying to solder busbars into a pencil thick with a 100-watt soldering iron? In no case! In this situation, regular fire will help. Place the parts prepared for soldering, for example, in the flame of a household gas burner or alcohol lamp and solder. Additional heating will help to perform high-quality soldering even with low-power tools. The only thing is, when heating the wires over an open flame, do not overdo it - a little additional heating is enough.
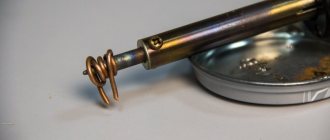
Separately, it is worth noting the so-called “pistol” or pulse soldering irons, which were widely used, and even today are in service with craftsmen on the road.
A modern version of a pistol soldering iron.
At first glance, the advantages of such a device are obvious - it heats up instantly and cools down just as quickly. But this feature is convenient only for a narrow circle of specialists - on-call specialists. He came, took it out of the suitcase, poked it, put it in the suitcase, took the money and left. But anyone who has seriously worked with such soldering irons knows very well their shortcomings.
Preparing wires for soldering
Good preparation is half the success
Before soldering, the wires must be properly treated. To do this, just follow the sequence:
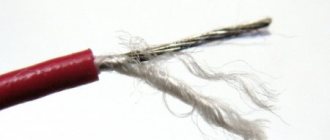
- At the junctions of the wire strands, the insulating layer is cut off by 2-5 centimeters.
- Bare areas are cleaned of the oxide film.
- Tinning is carried out, for example, using rosin resin.
- The wires are connected by twisting.
Now you can directly solder.
Soldering boards
As a rule, on boards, radio components are soldered to current-carrying tracks or special “nickels”. If the tracks are already tin-plated (grey), they do not need to be tinned first.
If they are yellowish in color, they must first be coated with flux and then tinned with a soldering iron, similar to wires. After this, you can solder the parts.
Instructions on how to properly solder parts to the board:
- Using tweezers, bend the leads onto the parts so that they lie flat against the tracks (nickels) or fit into the mounting grooves.
- Fix the part evenly using tweezers.
- Treat the soldering area with flux.
- Take a small amount of solder onto the tip and apply it to the soldering point.
- Wait until the solder is evenly distributed. Do not hold the soldering iron for too long; overheating may cause the part to fail. To prevent the part from moving out of place, it should be held with tweezers.
- After cooling, wash the soldering area to remove flux residues. To do this, it is optimal to use alcohol (ethyl or isopropyl) or Galosh gasoline.
If necessary, the contacts can be coated with protective varnish for circuit boards. This is necessary to protect against wet conditions and prevent the risk of shorting when coming into contact with other surfaces.