Wire cross-section from pole to house. What cable is needed to enter the house?
When planning to build a house, you need to supply electricity to the site where it will be located. Let's look at how you can conduct electricity from a pole to a house. Cable entry into the building is carried out following the completion of construction in two ways: underground or overhead. The overhead electrical line is easy to install and maintain; any damage that occurs in it is easily corrected.
This method of supplying electricity is used more often than underground, as it is cheaper. Connecting electricity from the pole to the house by air is carried out in two stages. First, the wire is laid from the pole to the house, then electricity is introduced into the building. A branch from a pole, that is, wiring, is a section of cable stretched from a pole to an insulator mounted on the outer wall of a building.
By input is meant the section that goes from the insulator to the panel in the house. When the distance from the pole to the house is from 10 to 25 meters, the wires must be taken with a cross-section: aluminum wires provide a minimum cross-section of 16 square meters. mm, copper - not less than 4 mm. If the distance from the house to the pole is more than 25 meters, then it makes sense to install intermediate poles.
The standard distance between electric poles is up to 50 meters. External electrical wiring is placed so as to avoid contact with balconies, metal fences, fences; the height of the location must also be sufficient. The wires run along the walls, and horizontal wiring above the roof and under the balcony requires a distance of 2.5 m, under the window - 50 cm.
Vertical wiring allows an acceptable distance to the window of 75 cm, to the balcony - 1 m, and possible vibration of the wires must be taken into account. The cable is introduced into the building through the walls in insulating pipes. Entering an electrical line underground is much more expensive due to expensive consumables than an overhead entry, although it is more aesthetically pleasing, since hidden wires do not spoil the appearance of the site, unlike an overhead entry.
To perform underground entry, the cable is laid down to the trench along a pole, protected by a steel pipe from any mechanical influences to a height of up to 3 meters. The cable laying depth, taking into account the voltage, is expected to be from 70 cm to 1 meter. There must be a distance of at least 70 cm from the underground cable to the foundation of the building.
It is not allowed to pass electrical lines under the foundations of buildings or in the ground. When laying a cable in the garden, you should remember that the distance from the cable to the trees cannot be less than 2 meters, and the acceptable distance to the bushes is 75 cm.
How to choose a cable from a pole to a private house?
It is best to use SIP wires from the pole to the house, that is, self-supporting insulated wires. It is dangerous to connect electricity to a private home with your own hands; it is better to have this work carried out by specialists. To do this, you need to contact the distribution network of the area where the house is located, write an application for connection, and also indicate the power consumption.
Connection to the electrical network of private houses is most often made using SIP cables (self-supporting insulated wire).
This is a specialized cable suitable only for external networks (it contains aluminum cores). The cable is connected through an overhead branch from the power line.
According to the technical regulations, the installation of SIP cable from the pole to the house must be carried out by certified specialists. It is not recommended to do such work with your own hands, so this article is given for informational purposes only.
Cable entry underground
A wire laid underground does not require fastening to the wall; in this case, the conductor is laid through the foundation. The part of the cable that comes out of the ground must be protected using a metal tube or a thick PVC conduit.
To lay a cable in the ground, a trench must be made, at least 70 cm deep. At the bottom of the trench, a sand “cushion” is made, 15–20 cm thick. The cable is laid on it and closed with earth on top. Underground cable entry is a labor-intensive process, but more durable than overhead entry.
Advantages of SIP
A SIP type cable includes several cores, combined by twisting into a single structure. The entire surface of this bundle is covered with insulation, which is cross-linked or thermoplastic polyethylene.
The technical capabilities of SIPs allow us to achieve better technical performance in comparison with old type wires (A or AC). Legacy cables did not use an insulating layer, but rather each core was installed individually using dedicated insulators located on the crossarms. In SIP, the device is much simpler, since the harness pre-tensioned by a winch is simply fixed to the support.
SIPs can even be installed on walls, which was impossible with the old type of wires. This feature is especially important in urban conditions, since it becomes possible to use short supports and install cables near low-current lines.
SIP allows you to save material and technical resources. For example, such a cable does not require wide forest clearings for power lines, as is the case with old-style wires. In addition, SIPs are reliable: such wires are less susceptible to breaks and overlaps, and therefore to short circuits. And the SIP structure itself is stronger: breaking four tightly twisted wires is not easy.
SIP is resistant to moisture, low temperatures and temperature changes. If an ice crust inevitably forms on ordinary wiring in winter (resulting in broken lines), then the SIP wires are protected by an insulating layer that prevents icing of the material.
The only exception to the above is the two-core modification SIP-1, in which the load-bearing conductor is not covered with insulation. In other cables, the supporting conductors are either inside the bundle (SIP-4) or insulated.
It should be said that SIP has become a technical standard: all energy sales organizations require the use of this particular type of cable to organize new connections.
One of the motivations of marketers: SIP allows you to avoid unauthorized connections (in other words, theft of electricity), which is easy to organize in the case of uninsulated wiring.
In addition, thanks to special devices, it is possible to arrange branches from the main cable without turning off the power. This possibility is provided by the presence of an insulating layer. Consequently, another advantage of SIP is operational safety.
And, finally, another advantage of SIP is the smallest losses among competitors when transporting energy over long distances. This is achieved by low reactance (for old type cables this figure is three times higher).
How to serve input
The very first thing that needs to be done after installation is to test the resistance of the insulating layer, as well as the zero-phase loop. If the tests give a satisfactory result, then the main switchboard and input can be allowed to operate. Six months after installation, it is imperative to tighten absolutely all screw connections - start from the circuit breaker, which is installed before the meter, and end with the clamps on the ASU.
Once every five years it is necessary to reupholster, and if oxidation is detected, cleaning must be carried out. At approximately the same frequency, you need to inspect the wires to identify damage. The input can last about 30 years. After this period, it is necessary to conduct a thorough examination of the cable. If there is melting on the insulating layer, drying out, or crunching in the cable, this indicates that the conductors are not coping well with the load that is placed on them. Therefore, it is recommended to replace the input with a more powerful one.
These are approximate inspection times. If you notice damage early, it is recommended to check the condition of the entire cable and, if necessary, replace it. The best way out of the situation would be to calculate and install a new input. Moreover, you need to make a power reserve of about 25-30% so that the wires can cope with any peak loads.
Selection of section and grade
When choosing a brand of SIP, you should take into account the following factors:
- purpose of the overhead line;
- operating conditions, installation location, safety requirements;
- the required number of phases;
- total estimated power.
Design features of different brands of SIP:
- SIP-1: bare steel core on a zero load-bearing core;
- SIP-2: the zero of the load-bearing core is covered with insulating material;
- SIP-3: each core has a reinforced core enclosed in an insulating layer;
- SIP-4: the cores are insulated, but the cores are not used;
- SIP-5: there are no cores, and light-stabilized polyethylene is used as insulation. The cable is marked “NG”, which indicates its non-flammability. SIP-5 can be used even inside buildings, although to a greater extent this SIP, like any other, is intended for external lines.
The easiest way is to select the SIP section. The fact is that the minimum cross-section of such a cable cannot be less than 16 square millimeters. This is more than enough to provide electricity to an average-sized private home.
If you need to insert a cable into a large private house or apartment building, you will have to use special reference tables to calculate the required cross-section.
The most common SIP is two-wire (zero and phase) or four-wire (two additional phases). Cables with five cores and an additional PE protective conductor are very rarely used.
Remote metering node
Electricity supply organizations practice installing a metering station outside the consumer’s property. This could be either the intention to prevent the theft of electricity, or the reason was the significant length of the outgoing line - power losses in the conductor must be taken into account.
Transportation of energy resources up to 1000 V usually occurs via a 0.4 kV overhead power line with a self-supporting insulated wire. In rare cases, cables are laid underground, but only if installing an overhead line is impossible or undesirable. Both of these methods are also applicable for introducing electricity to the facility.
Arranging an underground input is more practical: nothing will spoil the aesthetics of the facade, there is no chance of the line breaking in strong winds
There is a more important advantage: underground cables can be laid indoors, but SIPs cannot. The overhead line wire requires a special fixation system that distances it from the wall for normal ventilation: the polyethylene sheath does not tolerate overheating.
Laying an underground line is very simple; all you need is a slot in the ground, a 20 cm sand cushion and a protective sheath (HDPE pipe), if the cable does not have its own armor.
Underground electricity supply to the house: 1 - SIP wires; 2 - pipe stand; 3 — metering board; 4 - pipe for cable laying
When working with an overhead line, you have to switch to an internally laid cable, that is, with copper conductors. The formation of oxides at the interface of two non-ferrous metals is prevented by terminal connections filled with insulating grease or an open screw block. Technical means for such a connection can be found both among SIP fittings (piercing clamps) and in the list of installation products for general electrical installation.
In most cases, a box with screw terminals will be sufficient. The problem is different: a maximally loaded line loses its integrity, a vulnerable spot appears on it, requiring attention and requiring periodic maintenance.
Input of electricity into the building
As mentioned above, laying the input cable is the prerogative of the employees of the energy sales organization.
Connecting a house to a power line can be done in three ways:
- Overhead line from pole to building. Aluminum wires without insulation are used. The method is unsafe; in recent years, they have been trying not to use it.
- Input from the overhead line using SIP. Due to the reliability of the line and operational safety, this method of delivering electricity is considered a priority.
- Armored underground cable. The method is considered the safest (especially for wooden buildings), but its disadvantage is its high cost. Rarely used.
Despite the advantages of SIP described above, there are many opponents of this technology when it comes to residential buildings (even if they are houses made of brick or stone). Many experts consider the SIP insulation layer to be not reliable enough for residential buildings.
To prevent undesirable consequences in the event of an insulation rupture, cables must be positioned at a certain distance from building structures.
The fact is that overhead lines are protected from short circuits by an automatic device that operates under conditions of high currents, and shutdown, if necessary, occurs with some delay. Even in a short period of time, the resulting electric arc can ignite building structures, especially if they are wooden.
However, most specialists prefer SIP. The numerous advantages of this type of cable cancel out the disadvantages, especially since safety can be ensured using a special thick-walled metal pipe into which the cable is laid.
The pipe allows you to neutralize the effects of an electric arc. It is recommended to pay close attention to the inlet and outlet holes of the pipe: they should be covered with corrugated material to prevent the wire from rubbing against the metal.
One of the ways to organize the input is to switch from aluminum SIP cores to an internal cable, which is used for wiring throughout the building. The main requirement for such a cable is fire resistance. In addition, the area up to the switchboard must be additionally protected with a circuit breaker. An automatic device is all the more necessary if wires without insulation are used, connected to a piece of cable.
Note! The rating of the machine must be one value higher than the value of the input panel.
In what cases is it necessary to lay a power cable along the facade?
The most obvious option: if an obstacle in the form of a building appears in the path of an overhead power line. It can be bypassed by organizing a route loop in the power line. But it will cost extra design money, and extra wire, not to mention poles. This is how they used to do it (when power lines were built only on bare wires). And since the Rules for the Construction of Electrical Installations (PUE) allow the laying of SIP along the facade (or any other walls), it is possible to draw a power line directly through the obstacle.
But this applies to energy drinks. We are interested in the applicability of the PUE permit for private houses, in the area of responsibility of the owner of the property.
- If the switchboard in the house is located on one side, and the main power line is on the other, it was necessary to install another pole (the length of the overhead line is limited in length). Often right on the site. A self-supporting insulated wire is laid through the air to the nearest point of the building, and to the switchboard it can go along the wall.
- The mounting point from the pole is too high on the wall, and the shield is located at the surface of the ground. It is necessary to organize the so-called cable lowering. The SIP is attached to the wall before entering the panel.
As an alternative, a transition is made from the aluminum conductors of the self-supporting wire to the copper conductors of the input power.
And then the usual cable is laid along the facade.
It would seem easier to tighten the input wire directly into the shield without buying crimp sleeves or piercing couplings. But connecting the SIP to the metering device (meter) is so problematic that it is easier to make the transition and lay the VVG cable along the wall of the building.
Pole connection
Next, we will consider ways to route the cable from the pole to the home electrical network. The least financially expensive option is to supply electricity by air. According to the requirements of technical regulations, the height at which the cable is inserted into the building should not be lower than 2 meters 75 centimeters.
If this standard is feasible, an RCD (residual current device) is mounted on the wall. A cable is supplied to the RCD from the pole.
If the above height cannot be achieved, a stand made of a metal pipe is installed. The stand can be straight or in the form of a “gander” (curved). Each of the outlets has its own methods of fixation on the wall.
The distance from the pole to the entry point cannot be less than 10 meters. However, if this distance exceeds 11 meters, additional support will be required. In this case, the distance from the support to the power line should be no more than 15 meters.
For lines up to 10 meters long, copper wire with a 4 mm cross-section is used. If the distance is between 10 and 15 meters, a 6 mm section will be needed. For aluminum SIP wires, the diameter must be at least 16 millimeters.
Advice! If you use a regular SIP rather than a fire-resistant one, it is recommended to choose a copper cable of the VVGng brand.
Prices for copper wires are much higher compared to aluminum wires. Usually, in order to save money, aluminum wires are connected from the pole to the house.
The eyeliner procedure can be carried out in two ways. The first option involves tensioning a cable or support wire, to which a conductive cable is then attached. The cable is fixed using clamps.
Advice! If you plan to lay the SIP along the wall, you will need clamps (SA50, SFW50), since the minimum permitted distance from the cable to the wall is 6 centimeters.
In the second case, additional supports and fastenings are not used. Protective functions are assigned to insulators made of porcelain, glass or polymers, and to special fittings.
Thanks to the safety margin, the fittings provide reliable cable protection in case of accidents. Under powerful mechanical influences, the reinforcement may be destroyed, but the cable will retain its integrity and continue to perform its function - transporting electricity.
From the building entrance area to the electrical panel, the cable is placed in a metal pipe for safety reasons.
Advice! Before entering the house, it is recommended to bend the cable downwards - this will prevent water from penetrating through the protective pipe. Moreover, it is advisable to do this regardless of the presence of a sealant, since it will still dry out over time and lose its functionality. This simple measure will reduce the risk of a short circuit in the future.
The main disadvantage of the air liner method is its open location, which is associated with the risk of damage. Overhanging wires create difficulties for the access of large vehicles.
Whoever carries out the electrical installation work to insert the SIP cable into the building, the process must be agreed upon with the energy supply organization.
Each location may have different technical requirements (location of installation of the meter, a solid section of self-supporting insulated wire or the possibility of connecting via cable, etc.).
If the wiring is done technically correctly, the input cable will be safe and will last for many years.
A modern dacha is a full-fledged home in which the owners create comfort and equip it with various household appliances. And work on the land plot is mechanized as much as possible, purchasing electric lawn mowers, pumps for watering, cultivators and much other equipment. Most of these mechanisms and numerous devices operate using electrical power. Therefore, energy supply becomes the most important component of the entire engineering of a house and requires competent wiring directly in the residential building, connection to an overhead power line from a pole and, if necessary, installation of an additional support.
Interior work
When installing internal power supply, it is necessary to make a temporary connection in order to carry out gating, drilling and commissioning. Therefore, you first need to make a so-called temporary input, and only after completing the installation of all internal connections can you open the meter and connect to the line through it. Of course, after commissioning, the metering device must be sealed.
By the way, sealing is paid and may be accompanied by various bureaucratic delays. To simplify things, an IP55 junction box is placed next to the metering device, into which the wiring is routed. Sometimes it is possible to install a distribution unit directly from the meters. In this case, it will be convenient to make several entries. For example, one for the house, the second for street lighting, the third for the garage or summer kitchen.
Permits
The first and important step towards electrifying your dacha is obtaining permits for the use of electricity from the energy supply organization. When contacting the company that services the electrical networks to which the owner of the dacha plans to connect, he receives technical conditions, which necessarily stipulate the following points:
- the ability to connect the house to electricity from a pole;
- attachment point;
- voltage;
In addition, the energy company puts forward requirements for the user regarding surge protection devices, automation devices, insulation, and electricity consumption metering.
According to current laws, the energy transmission company does not have the right to refuse the applicant to connect the building to electricity. However, there are pitfalls when obtaining permission is delayed for serious reasons. For example, there is no technological possibility of connection due to the fact that the old line is working at the limit and an increase in load can lead to an emergency. Then the applicant is informed of the timing of the modernization of the line and the issue of electrification of the dacha is postponed.
But happy holders of permits can safely begin work on wiring electricity from the pole to the house, but at the same time strictly adhere to each point of the technical conditions. If the owners plan to use electricity for heating the house, additional permission will be required from the organization that carries out energy supervision.
Connecting the cable to the meter and ASU
The input distribution device can be an automatic or differential circuit breaker installed at the beginning of the electrical circuit of the main panel. At its terminals there is a point of maximum electrical power of the entire network, so the cores need to be stripped by 15–20 mm and folded into a loop for more reliable contact.
If the connection to the meter is made independently, the cable cores are stripped to 25–30 mm and inserted into the holes of the terminal row, tightening them with two screws. In a single-phase meter, the phase wire is connected to terminal No. 2, the zero wire is connected to terminal No. 4. In a three-phase meter, the linear voltage is removed at terminals No. 2, 4 and 6, the neutral wire is connected to one of the two rightmost terminals. Connection work is carried out before connecting the input to the power line.
rmnt.ru
Performing a branch from the overhead line of the pole
Electric wires connected to the poles are divided into transit wires, which extend directly from the transformer or substation, and wires that supply electricity to the end consumer. In order to bring the electric cable to the house, a branch line is made from the pole. Two versions are possible:
- air;
- underground.
Depending on the chosen installation method, different cables and wires are used. For the air installation method, it is recommended to use SIP-4 wire or AVK cable. These materials are the most popular for making overhead lines. Based on the number of connected phases, choose a SIP wire with two or four cores and a cross-section of at least 16 square meters. millimeters. AVK coaxial cable has a more complex design. It consists of inner and outer conductors, insulated from each other with PVC plastic. Such an electrical cable costs much more than a self-supporting insulated cable.
Specifications require:
- So that the cable connection point on the house structure is not lower than 2.75 m from the ground. Therefore, if the height of the building is sufficient, then the distribution panel with an RCD is attached to the wall. At a lower height, the wire is mounted to a specially fixed pipe stand equipped with insulators.
- When installing an additional pole, the cable between the supports must run at a height of at least 6 meters.
It is prohibited to introduce aluminum electrical wires into the house through wall structures. Therefore, when using SIP cables made of aluminum, a transition to copper is provided. The VVG ng cable (in non-flammable insulation) is suitable for this purpose. Connect aluminum and copper electrical wires using terminal boxes. Connection by twisting is unacceptable! The fact is that upon direct contact, both metals enter into a chemical reaction and oxidize, worsening the contact. As a result, even with a small load, a spark may appear in the connection area. The consequences could be dire.
To protect against mechanical damage, installation through the thickness of the walls is carried out in a special metal sleeve. And the sealing of the entry and exit points is done with plastic or rubber plugs. Entry into the house is carried out from the side of the house where there is no roof slope, otherwise when the snow melts from the roof there is a risk of the electrical wire breaking.
How to conduct electricity from a pole to a house underground? The trench method of laying electrical cables is a modern approach to organizing the power supply of a country house. The absence of sagging wires increases the reliability and safety of the power line. For underground installation, the best option is the VBShv cable, consisting of copper conductors and reliable insulation. The VVG brand is cheaper, but due to the fact that this cable does not have armor, it requires additional protection. A practical solution is to install it in a HDPE pipe. However, installing a cable underground is much more expensive and more labor-intensive than the overhead method, since it requires excavation work.
The regulated laying depth should not be less than one meter when using a cable without protection and 0.6 - 0.8 m when laying in a pipe. At the inlet and outlet, the cable is placed in a metal pipe of an L-shaped configuration. The total value of its height from the bend to the edge is 2.5 meters, and the part protruding above the ground is 1.8 - 2 meters. Entry into the house is carried out as with overhead wiring.
Performing wall entry
The cable connected to the house must be brought inside. It is laid through the wall in a pipe filled with an easily destructible cement-sand mixture or similar material.
Entering an electrical cable through a wall in a wooden structure
Most often, the wire enters the house through the attic. When laying an aluminum wire near a wooden house, it must be replaced with copper. As a rule, a cable with non-flammable insulation VVGng is used for this. This is done in accordance with the PUE clause 2.1.70, which prohibits the laying of aluminum wires in the attic.
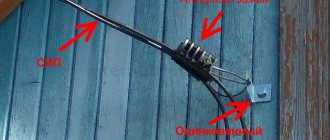
The conductors are connected outdoors using terminal blocks in sealed boxes. If there is no terminal block, the connection is made with a bolt, and a third washer is placed between the copper and aluminum. The figure shows how to connect SIP and copper cable.
Twisting connections are prohibited.
The electrical cable is inserted into a wooden house in a steel pipe with a diameter 4 times larger than the outer insulation. The minimum wall thickness is standardized by SP 31-110-2003 and depends on the cable cross-section:
- up to 4 mm² wall not less than 2.8 mm;
- up to 10 mm² - 3.2 mm.
A pipe is installed with a slope towards the street. This prevents water from flowing inside. Additionally, the pipe is sealed with rubber plugs.
To avoid damage to the insulation, the ends of the pipe are cleaned from the inside of any irregularities with a file.
Calculation of power consumption
Is 15 kW enough? This question should concern owners. The maximum demand is calculated simply: the power of all household appliances (kettle, iron, mixer, microwave oven, hob, hair dryer, TVs and computers), boilers, water heating units, heated floors, lighting is summed up. To assess the real power requirement, experts recommend using a reduction factor of 0.7. The probability of turning on all electrical appliances at the same time is low. In this case, it makes no sense to overpay for an additional energy resource. As a rule, for premises with an area of 100 m2, 15 kW is enough. If you need more electricity for life support, you will have to fork out more. The trick of dividing the plot into parts will not work: the owner has the right to use the benefit once every three years.
Counter location options
The main difficulties for electricity consumers arise when placing a metering unit inside a house or apartment. In this case, the passage of the cable through each wall and its walling in the grooves must be documented in the hidden work report, so it is unlikely that you will be able to carry out the electrical installation yourself.
If the meter is installed on the facade of the house, the SIP is inserted directly into the metering box. If it is necessary to carry out an entry into the building, they move from the wire to the cable using piercing clamps. Typically, energy sales representatives have an extremely negative attitude towards any breaks in the line to the meter, so both clamps should be placed inside a waterproof box, the lid of which has holes for installing seals. The inspector will be satisfied with this option, and he will not insist on installing wiring that violates fire safety rules.
Possible benefits
At the legislative level, the rules for the technological commissioning of residential buildings have been approved. (Government Decree No. 861 of December 27, 2004). This means drawing a line to the border of the land plot.
The conditions under which the preferential tariff applies are stipulated:
- power limit 15kW;
- maximum distance to the object: within the city limits 300 meters, for settlements - 500;
- Energosbyt has the opportunity to connect a residential building to the general network (no one will pull a special power line).
If all conditions are met, the owner of the building pays 550 rubles. Within six months, energy retailers are required to connect the building to the general network.
If the terms of the tariff agreement are not met, an individual estimate is drawn up. In this case, the bill runs to tens of thousands of rubles. The current, as a rule, is supplied to a pole located near the wall of the structure. The owner draws up the home connection plan independently. Then he goes to apply for permits.
DIY wiring
Modern construction trends provide for hidden wiring. It can be laid in specially made grooves in the walls - grooves. After laying and securing the cables, they are covered with putty, comparing them with the surface of the rest of the wall. If the erected walls will then be lined with sheet materials - plasterboard, gypsum plasterboard, etc., then grooves are not needed. The cables are laid in the gap between the wall and the finish, but in this case - only in corrugated sleeves. The shell with laid cables is attached with clamps to the structural elements.
How should internal wiring be laid? In a private home, when installing it yourself, you must follow all the rules
When installing, you need to remember that the internal electrical wiring of a private house is done according to all the rules and recommendations. This is the only way to guarantee safety. The basic rules are:
- laying wiring only vertically and horizontally, no rounded corners or beveled routes;
- all connections must be made in installation junction boxes;
- horizontal transitions must be at a height of at least 2.5 meters, from which the cable runs down to the socket or switch.
A detailed route plan, similar to the one in the photo above, must be saved. It will come in handy during repairs or wiring upgrades. You will need to check with him if somewhere nearby you need to ditch or make a hole or hammer a nail. The main task is not to get caught in the cable.
Wire connection methods
A large percentage of electrical wiring problems come from poor wire connections. They can be done in several ways:
- Twisting. Only metals that are homogeneous or do not enter into a chemical reaction can combine in this way. It is strictly forbidden to twist copper and aluminum. In other cases, the length of bare conductors must be at least 40 mm. The two wires are connected to each other as tightly as possible, the turns are laid one next to the other. The connection is wrapped on top with electrical tape and/or packed with heat-shrink tubing. If you want the contact to be 100% and losses to be minimal, do not be too lazy to solder the twist. In general, according to modern standards, this type of wire connection is considered unreliable.
- Connection via terminal box with screw terminals. The housing is made of heat-resistant plastic and contains metal terminals that are tightened with screws. The conductor, stripped of insulation, is inserted into the socket and secured with a screw or a screwdriver. This type of connection is the most reliable.
- Connecting blocks with springs. In these devices, contact is provided by a spring. A bare conductor is inserted into the socket and clamped by a spring.
Still, the most reliable connection methods are welding and soldering. If it is possible to make the connection like this, you can assume that you will not have problems. At least with connections.
Installing electrical wiring in a house with your own hands requires careful fulfillment of all requirements. This is a guarantee of your privacy and the safety of your private property.
After the wires from the machine to the connection point of the socket or switch are laid, they are checked for integrity with a tester - the wires are connected to each other, checking the integrity of the conductors, and each individually to the ground - checking that the insulation is not damaged anywhere. If the cable is not damaged, proceed with the installation of the socket or switch. Once connected, everything is checked again with a tester. Then they can be started on the appropriate machine. Moreover, it is advisable to sign the machine immediately: it will be easier to navigate.
After finishing the electrical wiring throughout the house and checking everything yourself, they call electrical laboratory specialists. They check the condition of the conductors and insulation, measure grounding and zero, and based on the results they give you a test report (protocol). Without it you will not be given permission to put into operation.