Squeeze the nut
When we looked at the basic ways of connecting wires in a junction box, special attention was paid to a special nut-type clamp. The product has a fairly simple design, but despite this it allows you to make the branch reliable and durable. The compression nut consists of a carbolite body, a steel die and a plate, which actually presses the cores with four screws.
The compact size of the nut, as well as its low cost, makes it one of the most popular power line taps. In turn, the disadvantages of the product are low tightness (degree of protection IP 20), as well as the inability to branch live wire cores. It should also be noted that a very important advantage of the “nut” is the ability to qualitatively connect copper and aluminum conductors with a cross-section from 1.5 to 150 mm2.
All you need is to place the stripped contacts in a special die and carefully tighten the screws with a screwdriver, then snap the housing into place. You can learn more about nut-type compression from our article.
Splicing electrical cables
The cables have to be spliced in the electrical box or outside it. To do this, you need to strip these cables in the same way as in the previous example. We make cuts, remove insulation, and strip the cables. In order to splice the cables, we lay them crosswise:
We twist them, about 3-4 turns, and we get a fairly strong twist:
You can use pliers for this work. We work with them, trying to ensure that the cable does not diverge.
If desired, if you have a soldering iron, you can also solder this connection to give it additional strength. If you don’t have a soldering iron, you can do it this way. We begin to isolate the resulting twist. We take electrical tape, start about a centimeter before the connection and insulate it.
We also go about a centimeter from the other edge and return to improve the dielectric properties of our connection with a second layer. We bite off the excess electrical tape.
That's it - we spliced the cable.
Piercing clamps
An improved model of nut cable compression are piercing clamps. Disposable products, however, allow you to make a wire branch without cutting and even without peeling off the insulating layer when splicing. The design of the clamp is represented by a hexagonal head, which tightens the conductors, as well as contact plates with teeth, which actually pierce the insulating material.
They are most often used to branch from an overhead line laid with SIP wire without relieving the voltage.
The advantage of these products is as follows:
- You can branch wires from an overhead line (OHL) even under voltage, without fear for your safety. This is due to the fact that the contact plate is reliably insulated from the clamping bolts.
- The housing of the products is sealed and reliably protects the connection point from bad weather conditions.
- The clamps are easy to use and have a long service life.
- Low cost of production.
- Possibility of bonding copper and aluminum conductors.
As for the disadvantages, the main thing is only the “disposability” of the product, but this point is very controversial, given the durability of this method of branching wires without breaking.
Installation is carried out as follows:
Video instructions for installing a piercing clamp
Overhead wire branch from overhead line
The maximum permissible distance from the input device to the overhead line support is 25 meters. If the distance is greater, it is necessary to install intermediate supports, they can be made of wood impregnated with an antiseptic on the base; the diameter of the intermediate support must be at least 12 cm.
The height of the aerial branch above pedestrian roads must be at least 3.5 meters from the ground. Above highways - at least 6 meters.
lowest point of attachment of insulators for cable entry into the house should not allow the wires to sag below 2.8 m from the ground. There should be no tall bushes, trees or piles under the overhead wire branch line.
The distance of current-carrying conductors at the input to protruding parts of the building such as balconies, canopies must be at least 0.2 meters. The connection to the linear wires on the support is made by twisting or special clamps. The cable is inserted into the house using a tube.
into low buildings through the roof. The distance from the roof to the wires must be at least 2 m; the steel pipe stand must be grounded.
The wires from the insulators to the panel with the meter and machines must be solid (no connections) and connected to the main machine, switch or terminals of the electric meter.
Clamp type OB
When repairing or replacing electrical wiring in an apartment, you can use another pretty good option for splicing wires - using OB type clamps. The products have a simple design and an equally simple operating principle - the cable is placed in a special latch, which uses a brass connector to pierce the conductor insulation layer. As a result, in a matter of seconds you can make a good branch from the main power cable (for example, to a socket).
As for the disadvantages of latches, the main one is the limited conditions of use - the cross-section of the cores should not exceed 6 mm2. In turn, for home electrical wiring, such a cross-section will be quite sufficient even for connecting a powerful electric stove.
Such connectors are also called “Scotchlocks”. You can learn more about what Scotchlocks are and how to use them in our separate article:.
Video instructions for using a latch to branch a wire without cutting:
The simplest version of a coupler
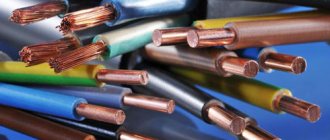
Selecting a cable/wire for a branch
We select the electrical cable for the branch based on where the input device will be installed, on a pole or house line.
If on a support, we use: for a single-phase branch - 3-core cable (phase - L, neutral - N, ground - PE). With three-phase - 5 wires. If on the wall of a building, single-phase - 2 conductors, three-phase - 4.
Cable cross-section:
- Aluminum wires - 16/25 mm2
- Copper cable - from 10 mm2
- Calculation of wire cross-section by power => here
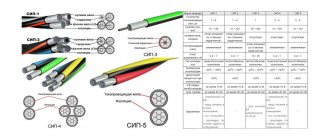
As I wrote earlier, we take into account the method of branching from the overhead line, overhead or underground. For the air branch there are wonderful self-supporting insulated wires - SIP-2A, SIP-3A, SIP-4A . the VBBShV type is no less remarkable .
The wires are secured using insulators or special accessories (for SIP). I bring to your attention an interesting video on the topic.
Polyethylene terminal blocks
A more outdated method of branching a wire is to use terminal blocks (they are also called polyethylene terminal blocks). It is not recommended to use compact terminal blocks, because... in this case, it is impossible to do without cutting and tearing the main core. In addition, the terminal block also has such disadvantages as poor sealing and the need to periodically tighten the clamping screw, especially if the conductor is aluminum. As a result, you do not get any important advantages when splicing and at the same time you get several serious disadvantages.
Terminal Blocks Overview
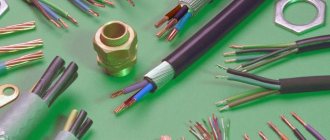
Connecting electrical cables
Let's start by connecting the electrical wires. Let's assume that we have three wires going into the electrical box, and they need to be connected to each other. How it's done? First, you need to cut off the excess cable and leave the cable at such a length that it does not interfere with the placement of the cables in the electrical box, but at the same time it is not too short, because a cable that is too short cannot be properly stripped and cannot be connected properly. It should extend about 5 cm out of the box, then we will trim it anyway.
Now we do the following: we strip each cable to a length of approximately 2–2.5 cm. We carefully cut it, trying not to damage the inner conductor. Here the technology is the same for all types of conductors - aluminum, copper, single-core and stranded.
We twist the veins. You can twist them in any direction you like.
To do this, you can use pliers or your own hands, if you don’t mind them. Naturally, only multi-core cables are twisted. If you have a single-core cable, then we simply strip it. We perform the same procedure with the second cable, then with the third: remove the insulation, strip it, twist it. Then we take two cables, lean them against the insulation and tightly twist them like this:
Next, we apply the third cable, also insulation to insulation, and as tightly as possible - this is very important for the further operation of your electrical wiring - we wind it onto the other two cables.
Most electricians recommend that after twisting, you cut the twist where the last cable ended. It ends a little earlier than the other two.
Why is this being done? First, we bite off the excess. We don’t need a strongly protruding twist, it’s inconvenient to insulate, and it won’t fit well in the box. Secondly, we get something like cold welding.
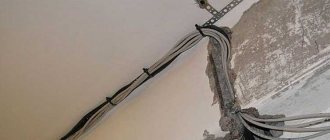
Branch from the main SIP line
Did you like the video? Subscribe to our channel!
A branch from the main SIP line, such as a branch from an overhead line or a linear branch, must be made in a certain sequence, which is described below.
- It is necessary to unwind the wire for the branch line.
- It is necessary to secure the wires at the very beginning of the branch line.
- It is necessary to tension the branch line and then secure its end.
- It is necessary to secure the branch line to specific supports.
- It is necessary to connect the branch line to the consumer.
- It is necessary to connect the SIP-2 branch or to the VLI.
The process of unwinding SIP for installing a branch line can be performed in the same way as the process of unwinding the main line. A distinctive feature may be the case when it is necessary to make a branch to connect a subscriber or consumer. In such a situation, the fittings used for branches may be slightly different and for such lines it is necessary to use a SIP system, which does not have a support wire and which consists of four or two insulated wires. Basically, the weight of such wires is significantly lower. Compared to main SIPs.
To secure the wires at the beginning of the branch line, you must use a special anchoring kit, which includes: a bracket and a clamp. To make a SIP-4 branch for connection to a house, you need to use some types of kits: EA 1000, EA 2000, EA 95-2000, EA 1500. Anchor clamps from the kits of this series can be attached to the bracket using a steel rope. Afterwards, you need to pull the neutral wire to the desired level and jam it using two wedges on the anchor clamp.
In order to correctly branch from the main line of self-supporting insulated wires that do not have a carrier wire, it will be enough to use during the work special clamps for subscriber wires, which are of the type HEL-5505, PA25x100. Just as in the version with the PA 1500 clamp, these clamps for subscriber wires are attached to the CA 1500 anchor brackets, which in turn must first be secured to the branch support. To do this you need to use a metal bow.
How to tension and secure the end of a branch line. These procedures are performed in exactly the same way with the highway. The only difference may be the case when you need to make a SIP-4 branch to connect to the house, when the end of the line is mounted on the facade or on the wall of the building. In such cases, it is possible to use a special wall bracket, the type of which is KNV. Its use will be advisable only in cases where the descent of the line deviates from the vertical by an angle of up to sixty degrees. If the angle is much larger, then it is better to use anchor brackets CA 1500. The brackets themselves can be attached to the building using dowels or screws, and then attach the clamp to it through a loop or bow.
How to secure the branch line to supports. If the project provides for intermediate supports, then in order to secure the SIP, the neutral of which is insulated, it is necessary to use intermediate clamps, which are of type ES 1500.
Connecting the branch line to consumers. In such work, a necessary condition will be the use of sealed tips covered with insulation. The first step is to lay the branch line wire to the connection point, then you need to accurately calculate how much wire is still needed. After this, you need to cut off the excess part of the wire using hand sector scissors. Tips can be used of two types: CPTA or CPTAU, it all depends on what material the consumer’s contact terminals are made of. To correctly select the size and type of tip, it is necessary to accurately determine the cross-section of the wire that is being mounted.
These are just some of the points you need to know in order to make a SIP-4 branch to connect to your home.
Connecting wires in electrical wiring
Contact terminals
due to its simplicity and convenience, it is widely used for connecting wires to sockets, switches, and current-carrying elements of electrical appliances, for connecting and branching wires in electrical wiring.
Dismountable contact clamps
must be performed using steel fasteners protected from corrosion. Collapsible contact clamps are divided into: screw (Fig. 7) and screwless (spring).
3.1. Screw terminals.
Screw terminals
supplied:
- for single-wire copper conductors
with a shaped washer and an asterisk washer, which prevents the conductor from being squeezed out from under the fastening, - and the aluminum conductors
are equipped with a split spring washer, which ensures constant pressure on the conductor.
Steel parts
, as well as parts
for connecting to aluminum wires
must have an anti-corrosion galvanic coating.
1- contact clamp body; 2- clamp screw; 3- conductor.
From the end of the wire being prepared for bending into a ring
, cut off the insulation at a length equal to three screw diameters plus 2-3 mm. To prevent the individual wires of a multi-wire core from coming apart, they are tied into a wire bundle.
The veins are cleaned with fine sandpaper. The prepared end of the core is bent with pliers into a ring with a hole diameter corresponding to the screw. Ring bend
on the screw terminal should be directed
clockwise
.
The clamping screw or nut is tightened
until fully compressed by the spring washer and press another approximately half a turn.
3.2. Screwless (spring) clamps
Majority
unified
electrical appliances
are designed for a screw connection (Fig. 8), in which the straight
end of the core
is inserted
into the clamp without forming a ring
.
1- clamp body; 2- elastic clamp spring; 3- conductor.
In luminaires with fluorescent lamps
and connections of wires with
lamp holders and starters
are made in the form of screwless
clamps - spring plates
made of high-quality bronze.
Trying to pull the wire out of such a clamp may cause the clamp to break.
.
To release the wire, insert a thin screwdriver or a steel knitting needle into the clamp, which can press the spring
and release the wire.
In threaded lamp sockets
incandescent in sockets for fluorescent lamps and starters, in pass-through and built-in switches,
the contact clamps
are designed to connect
only copper wires
.