Requirements for installation of end fastenings and installation features
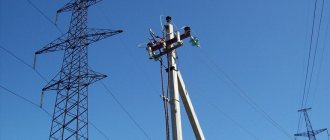
Never attach end pieces to decorative building siding or roofing components. Devices intended for heavy loads are fixed on both sides of the load-bearing wall with steel plates fastened with through bolts. As shown in the picture for the tension bolt with hook. They must be located above pedestrian passages at a height of at least 2.7 m, and above vehicle passages at least 6 m. Anchors for strings with lighter loads can be secured with simple anchor screws for concrete.
Ideally, tension anchor devices are installed in the wall during the construction of buildings according to the project. In practice, this is not always provided for; then you have to drill into the walls with a hammer drill. Under the end fastening, a metal plate with a bolted contact is attached at 20-30 cm for grounding the cable. It is connected by a welding joint to rolled wire with a cross-section of at least 16 sq/mm, which goes to the common ground loop. In some cases, grounding is performed with a separate copper wire with a cross-section of at least 2.5 sq/mm using bolted connections.
Laying the cable on a cable when connecting to a wall
| Option A - direct connection of the cable to the ground terminal | Option B – grounding the cable with a separate wire. |
| 1 – tension anchor; 2 – loop with a cylindrical clamp; 3 – wire rod going to the ground loop; 4 – grounded end of the cable; 5 – bolted grounding contact. | 1 – tension anchor; 2 – loop with clamping plates on bolts; 3 – wire going to the ground loop; 4 – bolted connection of the copper grounding wire with the cable; 5 – stranded copper wire with a cross-section of 2.5 sq/mm or more; 6 – bolted connection of the wire to the ground loop. |
GardenWeb
Category: Electrical installation work
Cable wires are open electrical wiring made with insulated and protected wires and cables suspended from a steel cable, or special wires that have their own supporting galvanized cable between three or four twisted cores. This type of electrical wiring is the best for industrial installation in two stages and the cheapest. Cable electrical wiring, compared to others, has a simple and reliable fastening to reinforced concrete foundations with a limited number of embedded parts per unit length; They are distinguished by ease of dismantling and moving the line, the ability to suspend the line at any level and reuse wires, as well as all mounting parts. These electrical wiring can be adapted to any environmental conditions, including hazardous areas of certain classes and by selecting wire brands that meet these conditions.
The cable line of electrical wiring is formed by a steel supporting cable (or wire rod), from which insulated unprotected or protected wires or cables are suspended. Postings on supporting cables are a universal type of wiring based on the method of their suspension: on special cable suspensions; fastening directly to the cable (string pendants); on suspended and supporting structures with insulators; on slats, boxes, trays, pipes and other structures suspended from a cable; on a supporting cable built into the wire.
In addition to the supporting cable, wires and cables, the cable wiring line includes anchoring, tensioning and supporting devices, parts for fastening the wire or cable to the supporting cable, branch boxes with parts for attaching them to the cable. To complete electrical wiring, factory-made products and parts are used that are necessary both for preparing wiring lines and for their installation: tension couplings for steel cables (or wires of different diameters) with a screw stroke of 50; 100 and 300 mm; anchors for the end fastening of steel ropes (or wires) to building elements; clamps for connecting hangers, guy wires and guy ropes with the supporting cable, including cable clamps that fasten loops at the end of a steel cable; earrings securing the cable to steel trusses; a series of cable boxes, branch clamps in a plastic case, etc. A steel cable with a diameter of 3 to 6.5 mm or hot-rolled steel wire, galvanized, coated with polymer or painted with a diameter of 5 to 8 mm, is used as a carrier.
Rice. 1. Cable tension anchor: 1 – tension sleeve, 2 – thimble, 3 – cable bolt clamp, 4 – cable
Anchor and tension devices are used for end fastening of the supporting cable, adjusting the tension and sag. The cables are secured using tension anchors (Fig. 1), which are attached to the building elements on spacer dowels, girth beams, trusses, etc. The cable tension is ensured by tension couplings. End fastening is also carried out using anchor bolts made in the form of hooks with elongated threads. The bolts act as tension devices.
Supporting devices are string suspensions and vertical, longitudinal and transverse guys attached to the lower chords of trusses, columns, and ceilings. Intermediate fastenings are installed for large spans and the mass of the installed wiring every 18 - 24 m, which reduces the sag and gives the entire line significant stability and mechanical strength. For hangers and braces, galvanized wire with a diameter of 2 to 5 mm is used.
Intermediate cable fastenings can also be made directly to beams, trusses, columns and floors using separate parts - studs, earrings, dowels, fixed in the cracks between the corners of trusses or floor slabs, or wraparound structures.
To hold the cable in intermediate sections, three-bolt cable clamps are used, with the help of which the ends of the cable, hangers and guy wires are terminated with loops. The ends of the wire are terminated with loops using sleeves and clips. In some cases, for example, with a large height from the cable suspension mark to the floor trusses, a second unloading cable is used, which is stretched above the load-bearing cable and to which intermediate fastening strings are attached. Vertical strings should be secured in places where branch boxes, plug connectors, and lamps are installed using a three-bolt clamp.
The main scope of installation is carried out in the MEZ outside the installation area, where electrical wiring units are prepared and assembled, anchor structures, tensioning and supporting devices are assembled, and transported to the installation site. At the installation site, anchor and tension structures, vertical suspensions, transverse and longitudinal braces are installed, and routes for supply lines are prepared. These works of the first stage of installation are carried out when the building elements on which the electrical wiring is suspended and fastened are of a certain readiness. The distances between intermediate hangers, branch boxes and lamps, as well as the diameter of the cable, hangers and guy ropes, depending on the load on them, are determined by the project.
The metal parts of all cable wiring elements without painting or galvanic coating, as well as bare sections of the cable and the anchor device at the points of contact, are lubricated with technical petroleum jelly. Metal brackets and strips for fastening wires and cables must have a protective coating against corrosion and soft gaskets made of pressed wood, pergo-min or roofing felt, protruding from under the brackets by 1.5 - 2 mm on both sides.
The preparation of cable wiring assemblies is carried out according to measurements taken at the installation site, or working drawings without preliminary measurements on site. In the first case, the electrician-measurer draws up sketches of cable wiring lines based on measurements on site, on which he records the exact dimensions between the end fastenings to walls or columns, intermediate suspensions, installation locations of branch boxes and lamps.
When preparing cable wiring without on-site measurements, a sketch order is drawn up according to the working drawing. The length of the cable is determined according to the dimensions of the room indicated in the drawing, with a corresponding breakdown of the installation locations of the lamps. The standard sketch also indicates the type of anchorage, wire grades, and type of lamps. On production lines, wires are prepared and processed and attached to the cable. Unprotected insulated wires are secured to the cable using hangers with plastic clips for two and four wires for intermediate fastening and with a clip for hanging a lamp up to 5 kg. Branching from the wires is carried out in clamps with a plastic housing. The distance between hangers is usually 1.5 m along the length of the cable. It is allowed to directly fasten insulated wires to the cable (for dry and wet rooms) with polyvinyl chloride perforated tape with buttons or buckles every 0.5 m.
Protected wires and cables are attached to the cable with clasps, steel strips with buckles and plastic strips with buttons (Fig. 2, a-d).
Branches to lamps and other electrical receivers are made in branch plastic boxes with direct fastening of wires and cables to the cable and with the help of branch clamps in a plastic case when fastening wires to hangers. The boxes are secured with screws to pieces of perforated strip or tape. They use structures made from a mounting strip, with the help of which, together with a branch box, a lamp of any type is attached to the cable. The boxes are also installed on steel plates with stamped hooks (tongues). The plates are put on the wire with these hooks and bent with the pliers down. Boxes can be attached to the plate with screws, staples or pins.
Rice. 2. Methods of fastening wires and cables on cables or strings: a - with clips, 6, c - steel strips with buckles, d - plastic strips with buttons
With string wiring, which is a type of cable wiring, the boxes are attached: in strips directly to the string by grasping; on a metal (suspended) plate fixed to the string with hardware or without hardware; directly on the building foundation (ceiling, column) with a low height of the structure. Methods for attaching boxes to a supporting cable or string are shown in Fig. 3, a-d.
The end fastenings of string wiring are made blind or using tension devices at one end, intermediate fastenings are made after 10-15 m using fasteners intended for installing boxes and lamps. Intermediate fastenings are made sliding to ensure constant tension of the string along its entire length. String wiring is more economical than cable wiring, since it requires less metal (string diameter is 2 - 4 mm instead of 6 - 8 mm for cable wiring) and fasteners for intermediate fastenings, as well as labor costs.
At the second stage of installation, the cable wiring units prepared and delivered to the installation site are mounted on pre-installed tensioning devices and hangers in the completed premises.
This stage of installation includes the following operations: – unwinding the cable wiring on the floor; – temporary suspension of the cable line at a height of 1.2 - 1.6 m for straightening wires, hanging and connecting lamps (if they were not mounted on the cable line in the workshops); – lifting the electrical wiring to the design location, securing the cable at one end to the anchor structure, connecting the cable with intermediate hangers and guy ropes, pre-tensioning the cable (manually for spans up to 15 m and with a winch for large spans) and putting it on the second anchor hook; – final tension of the supporting cable and adjustment of the suspension boom using previously loosened anchor bolts and tension couplings; – grounding of the supporting cable and all metal parts of the line; – connecting the cable wiring line to the main supply line;
– testing electrical wiring and checking for lighting effect. Depending on the type, weight, transportation conditions, remoteness of the object and other local conditions, the lamp is mounted either on the production line (without glass) or directly at the installation. In this case, the workshop only assembles the lamps and prepares their mounting locations. Lamps suspended from a cable must be located on the same horizontal plane, which is achieved by changing the length of the pendants.
Rice. 3. Methods for attaching branch boxes to a supporting cable or string: a, S - with strips directly on the cable or string, b - on a hanging plate, Mr. plate for fastening boxes without hardware
Cable wiring is placed along the room - respectively, along the line of location of lamps or power electrical receivers. The cable is stretched and secured at the ends to the walls and suspended or rigidly attached after 6-12 m to trusses or beams, depending on the length of the construction spans, as well as the frequency of placement of lamps and their mass. Intermediate cable fastenings are made on strings made of galvanized steel wire 0 1.5 - 2 mm. Pendants are attached to the cable or placed in places where branch boxes and lamps are installed.
The cables are attached to the end walls using through-type anchors or anchors attached to through pins, bolts or dowels. A loop is made at the end of the cable and a cable clamp and tension couplings are installed to adjust the tension of the cable. The sag for a span of 6 m is recommended to be 100-150 mm, and for a span of 12 m - 200-250 mm. According to SNiP, the sag of the cable in the spans between the fastenings should be from 'To To'/in the length of the span.
The supporting cables are grounded at two points at the ends of the line. On lines with a neutral wire, the supporting cable is connected to this wire with a flexible copper jumper with a cross-section of 2.5 mm2, and on lines with an insulated neutral - to a bus connected to the ground loop. It is not allowed to use a support cable as a grounding conductor.
If the amount of work is small, the preparation of cable wiring can be done directly in the bay of the workshop where the wiring is supposed to be installed. The pre-treated and painted hot-rolled wire is pulled out by a winch, unwound along the route and temporarily fixed at an accessible height for working from the floor (1.3-1.5 m). The supporting wire is terminated with loops on both sides and flags are welded for grounding. Install the base for branch boxes according to the markings on the supporting wire. Cut the cable or wire into measured sections corresponding to the distance between the boxes, secure them to the supporting wire with cable hangers or directly to the cable every 300-350 mm with metal banding strips or polyvinyl chloride tape with buttons. Place the ends of the wire or cable into boxes or branch clamps in a plastic case and make the necessary connections and branches (after testing and marking the ends).
Installation of electrical wiring with APT wires has some features. APT cable wires are used for indoor installation in 660 V networks of industrial electrical installations and are rubber-insulated aluminum conductors twisted around an insulated galvanized cable. Wires are made in two or three Electrical installation work - Installation of cable wiring
gardenweb.ru
Advantages of open wiring
Corrugated
Wiring done openly, that is, located in boxes, corrugation or something else, has a number of advantages:
the wiring is protected from deformation and accidental damage; no one will connect something of their own (unless, of course, they guess to open the box lid or cut the corrugation); a metal hose used in fire hazardous areas not only protects against fire, but also secures the cable so that it does not come out of it; if necessary, you can leave a supply of wire in the cable channels; the aesthetics of the installation are preserved, which is important, because no one wants their utility room to look like a barn.
For more detailed information on box installation, you can watch the following video below:
Installation and tension of the cable
After installing the terminal fastenings, the cable is attached to the guy wire on the ground, lighting fixtures with junction boxes are fixed and connected. The assembled structure is delivered to the installation site and unwound along its entire length from one mounting anchor to another.
The length of the cable must be at least 2 m greater than the distance between the end anchors. The reserve will be needed to seal the fastening to the terminal devices and bring the ends to the grounding terminals, which are located below the anchors. The end loops of the cable are attached to the tension anchors, after which they regulate the tension. The tensile force should be up to 100 kg/cm for light structures with cables with a cross-section of 4-10 sq./mm. For heavy cables with a cross-section of 16 – 25 sq./mm – up to 500 kg./cm. This parameter is measured by a dynamometer, which is installed between the anchor and the tension loop.
After tensioning the cable, the ends of the cable are grounded, the cable is inserted into distribution devices and connected to protective circuit breakers.
Selecting the diameter and material of the cable
Determine the weight of the cable and other elements that will be attached to it. If the distance between the supporting fasteners is 5-6 m and the weight of the wire is not significant, you can stretch galvanized steel wire with a diameter of 2-3 mm. When the distance is more than 10 m, the cable is heavy, especially if the cable structure is used with lighting elements, galvanized steel cable with Ø 4-6.5 mm is used. Such a cable will withstand any cable with a wire cross-section of up to 10 mm/sq.m; larger cables are not used in private households due to limited power consumption. You can also hang up to 5 pieces on such a cable. lighting lanterns in a lightweight housing.
The cable can be wound and weighed on ordinary scales, or calculated by knowing its brand according to the characteristics table, which is included with the sale. The weight of the cable per 1 meter is indicated; you need to multiply the specified weight by the number of meters to get the total weight of the segment that is used for fastening to the steel cable.
For domestic conditions, in order not to waste money, you can hang the cable that was used for hidden wiring. In order for the insulation to last longer, lay it in a corrugated pipe; its weight is not significant. There are reference tables indicating the brand and weight of the cable. You can look it up on the Internet; some sites have calculators for calculating the length and weight of wires and cables.
Table indicating the cable brand and weight in kg. by 1 meter
For high current loads, it is better to use special cables for overhead cable structures:
- AVT, AVTS, APT already have a built-in supporting steel cable;
- AVRG, ANRG, APVG, AVVG are suspended from a supporting steel cable.
Cable hanger for cable
String method
The easiest way to conduct an electrical network to any nearby building is by air. There is no need to make trenches on the site or select a special cable. And sometimes another method is simply not suitable, for example, in production facilities, workshops, warehouses.
Having chosen the overhead method of connecting the electrical network, you need to do everything correctly to avoid unpleasant situations with a line break. To do this, use the installation of cable wiring or, if the distance is not large and the cable is light, the string method.
Preparation for installation
The entire process of installing a cable on a cable begins with choosing the cross-section of the wire. This depends on the total power of the devices that are planned to be used. After this, you need to measure the distance between the switchboard and the machine, taking into account all the nuances (turns, lifts).
Next, you need to select a cable that can withstand the weight of the cable being laid along the entire route. But its strength and the strength of the remaining suspension elements must be calculated for three times the weight of the cable, since in severe weather conditions the load increases and the possibility of breakage arises. For these purposes, galvanized steel cables are most often used, the diameter of which ranges from 4.5 to 6.7 mm.
For the string method, galvanized steel wire or varnished hot-rolled wire with a thickness of 5 mm or more is used.
Cable fastening
It is good to choose a strong and reliable base, but it still needs to be well secured. The cable and cable are installed using anchors. The anchors, in turn, are secured with studs or bolts on both sides of the wall. This is done in order to distribute the stress throughout the wall, and not concentrate it at one point, which will help prevent the fastener from falling out of the wall
The distance between the two main anchors should not exceed 100 m. Additional anchors are also installed every 30-40 m. Cable suspensions should be located at a distance of 70-90 cm from each other.
On the one hand, the cable is secured with a special loop clamp; on the other hand, a screw coupling, a hand winch or a pulley block is used. Such structures are needed to lift, tension the cable and give it stability and strength.
When tensioning, you need to take into account that in winter, under the influence of low temperatures, an overstressed cable may burst. That is, you shouldn’t be overzealous, but you shouldn’t leave it sagging too much.
Important! The support cable must be grounded, but under no circumstances should it be used as grounding.
Cable fastening methods
In order to attach the cable, several popular methods are used:
- cable suspensions;
- fastening directly to the cable;
- laying the wire in a tray, pipe, box or other structure that is attached to the cable.
If a tray, pipe or box is used for cable installation, this additionally protects the wiring from the influence of the external environment. This method is very convenient, since neither very high nor very low temperatures have any effect on the wire.
Laying cables in corrugated pipes
To attach the wiring directly to the cable, use plastic clamps, steel strips with buckles, or sheets of galvanized iron. If you decide to tie the wire with plastic, then before purchasing you need to clarify the conditions for which it is intended. Otherwise, after one season, the plastic clamps will have to be replaced.
Attaching the cable and cable to the plastic clamp
If a decision is made in favor of metal fasteners, then you need to pay attention to ensure that the material does not violate the integrity of the cable insulation. In order to avoid such a problem, a little insulating material should be placed under the steel buckles or iron during installation.
Steel buckles
How to make a pendant with your own hands
You can buy a special hanger for attaching the cable to the cable at a hardware store, or you can make it yourself. In order to make it yourself you need some tools and materials:
- wire cutters,
- round nose pliers;
- any rod that is slightly larger in diameter than the wire being laid;
- soft steel wire with zinc coating.
And so we begin to make the suspension. First, use wire cutters to cut a wire 25-30 cm long. Next, grab the cut piece of wire in the middle with round pliers and make a loop, the diameter of which will correspond to the diameter of the cable.
We make a few more turns in order to leave a distance between the cable and the cable.
Loop on future suspension
By winding the free ends of the wire around the rod, we form parts that will support the cable. You need to wind one end first and then the other. In this case, it is necessary to make a spiral pitch of approximately 2 cm.
The result should be a suspension like this.
Spiral sliding cable hanger
Subsequent installation of the cable on the cable is carried out in the following order:
- secure the cable to one building;
- put on the required number of hangers with the calculation of one for every 60-80 cm;
- thread the cable into the hangers;
- lift the cable and attach it to another building.
Helpful advice
Sometimes a rope is used to connect the wiring overhead, but this should not be done. Since the rope is made of fabric fibers, its integrity is very quickly damaged by the external environment. The rope can stretch, fray and break. Laying wires in this way is dangerous to life.
If the rope loses its strength, the wire may hang for some time due to its properties. But when the wire breaks, there is immediately a danger of electric shock.
Source: https://infoelectrik.ru/provoda-i-kabelya/podves-dlya-kabelya-k-trosu.html
Preparatory work
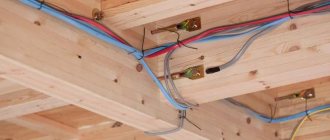
First, you need to accurately determine the type of wiring: open or hidden. In the first case, the installation of electrical wiring is carried out outside the walls and other surfaces; in the second, the wires are laid inside the channels of the slabs, in the voids of the walls, floors, or under the plaster. In the garage you can make it a simple open type, but in an apartment or cottage it is better to hide it so as not to spoil the appearance. Hidden wiring can be either replaceable or non-replaceable. In the replacement cable, it will be possible to frequently replace cables without destroying walls, floors and purchasing finishing materials.
Everyone chooses the laying method themselves, based on aesthetic criteria, structural features, and financial capabilities. You can also install cable wiring, that is, hang protected cables on a supporting galvanized cable.
Installation of electrical wiring in any room or building begins with various preparatory work: drawing up a diagram of the future electrical network, marking, punching work. It is necessary to decide before installation where the power cable will enter the building, and think over the location of the electrical panel. It is recommended to place it close to the doors, at a height of one and a half meters from the floor, and always in a warm place. Later, you will need to draw up an electrical and wiring diagram, and in accordance with it, mark out the places where you will have sockets, lamps, and electrical appliances.
Do-it-yourself electrical wiring installation must be carried out with knowledge of regulatory documents. In electrical installation work, the main ones are SNIP (building codes and regulations) and PUE (rules for electrical installations). Fire and safety requirements are also important.
The rules for installing electrical wiring PUE and SNIP to wooden dachas are the strictest. Any cables in such buildings must be in special tubes made of fire-resistant materials. The requirements for brick or concrete buildings are softer - in them it can easily be built into the structural details
It is only important to lay them vertically, and also to maintain a minimum distance from the ceiling - 250 mm. The finishing layer can be laid over cables by 15 mm
In any method of electrical wiring, the requirements of PUE and SNIP must be taken into account. For example, wiring installation cannot be carried out at all according to SNIP if the air temperature is below 15 degrees. You can also highlight the advantages of open wiring: ease of installation, maintenance, ease of replacement, savings in finishing materials. Having familiarized yourself with the requirements of the PUE and SNIP, you can proceed directly to the start of electrical installation work.
Laying wire through the air
This is the most popular and seemingly simple way to bring electricity into the house. There are advantages and disadvantages of this method of organizing input.
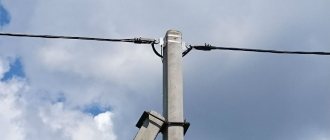
Advantages of an overhead line:
- Installation speed . Tensioning the bushing from the support to the insulators on the house takes no more than 40 minutes. In this case, the overhead line, which powers other houses on the street, will be turned off for no more than 10 minutes (it is necessary to connect the phase and neutral wires to the line), so the neighbors will not have time to express dissatisfaction due to the lack of light.
- Easy to maintain . The wire itself does not require maintenance unless it breaks due to a fallen tree or ice. If this happens, its repair will take relatively little time. Please note that it may be necessary to clean and tighten the contacts on the wire from time to time if the connection is made with regular twisting and not with piercing insulators (nuts).
- Relatively cheap . On average, 1 m of 4x16 SIP wire costs 60 - 70 rubles. For input, assuming a distance from the support to the wall of the house of 10 m, you will need about 13 m of wire (additional 3 m for installation in the panel and reserve in case of repair), which will be approximately 900 - 1000 rubles plus 1000 rubles for the installer to hook up the wire for a support, about 2000 rubles . This is several times cheaper than laying a cable, which costs on average 120 rubles per 1 m (AVBbShv cable).
Disadvantages of an overhead line:
- Exposure to environmental factors . Unlike a cable in the ground, an “overhead” wire is exposed to ultraviolet radiation, which affects the condition of the insulation, wind loads, lightning, icing and falling trees, which simply tear the wires. If it breaks from a support or at a connection near the house, then it’s no big deal, as it can be quickly repaired without twists. And if the wire breaks in the middle of the span, then in order to avoid voltage losses due to twists, the entire wire will have to be replaced, and this is an additional considerable expense.
- Obtaining permission to install a support . This may be required if the distance from the support closest to you to the entrance to the house is more than 25 m. Then, in order to avoid sagging of the wire, you will need to install an additional support, the installation of which on average costs 15,000 - 20,000 rubles, depending on the region of residence and the distance of the installation organization from yours country house. Connecting the overhead line to the house is carried out according to the following scheme:
- Lack of aesthetics. For many owners of country houses, the aesthetics of the electrical network is a key factor. Hanging wires spoil the appearance, while a buried cable is nowhere to be seen.
- They can be a nuisance in the yard. Many owners additionally route wires through the air, connecting a shed, workshop or garage. If you have large-sized agricultural machinery, then there is a possibility of breaking the wires by snagging them. In this case, you will have to route the wires in armored sleeves along the fence or walls, or lay the cable underground.
Wires for wiring.
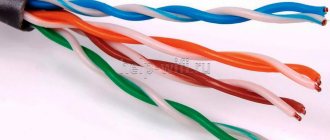
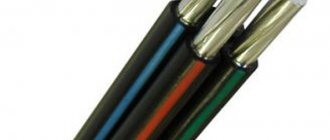
For external wiring, as well as for internal wiring, you can use VVG, NYM, ShPVVP, PVS wires; in addition, for external wiring, wires with textile braiding are used - retro cables. If the wire will be located outdoors, the wire must be stranded and its cross-section must be greater than 2.5 mm². Cables VVG and NYM are hard, and SHPVVP and PVS are soft, this is taken into account when wiring.
Different wires are braided in different colors, which makes them easier to choose when purchasing. Wires with copper conductors are better than aluminum ones. They conduct electric current better, last longer, in addition, they are less chemically active, but they have the disadvantage of oxidizing very quickly in air.
How is the cable secured?
There are several ways to secure the cable. The most popular are the following:
- by means of cable suspensions;
- directly to the cable itself;
- pre-laying in a tray, pipe and other structures, which are then attached to the cable.
Each method has its own characteristics. They must be taken into account when choosing.
Scheme
First you need to think about the route along which the wiring will go through the building or apartment. Try not to cause major damage to the room. Cables can be laid in special pipes or along building structures (in the voids of the ceiling or floor). The gaps between the tubes will need to be sealed with non-combustible materials (cement, clay).
Make a drawing of the house, indicate all the places where you are going to install sockets, switches and lighting points
Also pay attention to points where there will be a large amount of equipment. Electrical wiring involves determining the required number of energy-consuming devices and how to connect them
The wiring diagram determines the distance, number of wires and accessories.
In general, the wiring and installation diagram in the building can be drawn up arbitrarily, but with recommendations. Try to ground the sockets for powerful household appliances (stove, boiler, washing machine), that is, make the wiring three-phase. Light fixtures can only be grounded in the bathroom.
Having marked the connection nodes, mark the wires leading to them. There are several simple rules, in accordance with the requirements of SNIP and PUE for electrical installation work, which should be followed when marking the circuit:
- installation of electrical wiring on trays, boxes, sockets should be carried out in easily accessible places so that replacement later does not cause trouble;
- switches are placed 1.5 meters above the floor or 70 cm. The distance to gas stoves and batteries is at least 50 cm. One socket is needed per 6 square meters of room. In the kitchen, their number is calculated based on how many household appliances there will be. It is advisable to install an isolation transformer in the bathroom for an outlet in this room. It is prohibited to install sockets in the toilet;
- During electrical installation work, wires are placed on the walls vertically or horizontally, on the ceiling - at the shortest distance to the lighting point;
- groups and individual sockets, lighting points are connected to the distribution board, where auto switches will be installed. The power of the machine is calculated based on the maximum power of consumers: for individual sockets or groups - 16, 25, 40 A, and for lighting groups 10-16 A.
Cable wiring
First, you must secure anchors in the selected area. In most cases, they will resemble metal plates that are pulled together on both sides. To ensure fastening, special rings are welded to them. Tension fastenings must be made to completely protect yourself from the anchors falling out. This will also help you distribute the load evenly.
Now the cable should be secured with special loop cable clamps. On the other hand, the cable should be tensioned as much as possible and also secured.
The height of the suspension you are constructing should not be lower than 2.75 meters. The height above the car passage should be 6 meters. All standards for overhead electrical wiring can be seen in the diagram below:
After the bandage is completed, the strings simply need to be secured with a bandage. To hang cable wiring outdoors, you need to use special plastic clamps. The distance between the bandage should be 50-80 cm. If you are interested, then read about self-drilling walls for wiring.
Laying the wires
Before installing sockets and switches, you need to lay the wires. When starting to lay out the wires with your own hands, you first need to check the pre-drawn diagram, and then start working, guided by the following rules:
- We retreat from the floor and ceiling at least 10 cm.
- The wires are laid parallel to the ceiling or floor.
- You can't make bevels. To make bends, you need to bend the wires at an angle of 90 °.
Here you can feel the significant difference between copper wires and aluminum. Copper wires can be bent as many times as you like, while aluminum wires can break after just a few bends.
Electrical wiring can be laid in several ways:
- Open - now used quite rarely and only in cases where it is not possible to make hidden electrical wiring. In addition, open electrical wiring can be used for design reasons, because for loft-style rooms it is an integral element.
- Hidden is the most common type of electrical wiring. With this installation, the wire is laid inside the wall or under a layer of plaster. To lay the wires, you can use a corrugated pipe, or you can lay the wire directly into the wall without additional protection.
- Combined - the wires are laid openly, but hidden in cable channels.
If the wiring is hidden, then you need to prepare the walls. To do this, draw lines with a pencil along which we will make indentations. The size of the recess will depend on the diameter of the corrugated pipe in which the wire will be hidden - it should be completely hidden and should not stick out. Holes in the wall for wires are drilled with a drill or hammer drill.
Homemade suspension
Special hangers are sold at a hardware store. If the amount of work is small, you can make this design yourself. To assemble the fasteners:
- round nose pliers and wire cutters;
- galvanized steel soft wire;
- a rod whose diameter must be larger than the cable being laid.
Using wire cutters, the wire is cut into lengths from 25 to 30 cm. An air loop is made in the middle of each piece using pliers. It must correspond to the diameter of the cable being laid, which is then threaded through them. The wire begins to be wound around the rod, forming parts to support the cable. First, one free end is wound, and then the other. The spiral pitch should be approximately 2 centimeters. Such simple manipulations allow you to get a homemade canopy. The cable is laid along the cable in a certain order. The cable is fixed to one building. Suspensions are placed on it in increments of 60-80 cm, into which the cable is threaded. Next, the cable and cable are secured to another building. A similar procedure is followed for indoor installation.
Rope cable laying technology
There are situations during electrification when it is necessary to supply electricity to a separate room. At the same time, it is not possible to lay the cable in a trench due to the complexity of the terrain or architecture. Therefore, along with such types of external laying as trays, cable ducts, pipes, corrugations, wall mounting, there is such a type of laying as cable wiring. In this article we will look at the technology of installing a cable on a cable with your own hands.
Application area
According to Chapter 2.1 of the PUE, this method is applicable for networks up to 1000 volts. Most often, cable wiring is used in places where organizing an overhead line does not make sense, and it is enough to throw a cable attached to the cable, and this will be enough to electrify the facility.
In this way, lighting networks and electrical wiring for sockets in warehouses, power cables in production workshops, and also between two separate buildings are installed.
For a home craftsman, this wiring method is of particular interest. This is because with the help of simple technology it is possible to electrify outbuildings in the country. Thanks to cable wiring, it is possible to conduct light from the house to a bathhouse, garage, shed, gazebo and other buildings and lighting devices located at some distance around the plot.
Preparatory work
First you need to decide on the wire and its cross-section. We talked about how to calculate cable cross-sections in the corresponding article. After this, you need to measure the length, taking into account the entire route of wiring from the machine to the distribution panel. When choosing a cable and suspension elements, you need to take into account the weight of the wire in a given area, with a threefold safety margin.
Since in difficult weather conditions the load on the suspended structure increases, it can cause breakage and loss of power. Mostly galvanized steel cable with a diameter of 4.6 to 6.8 mm is used.
In cases where the length of the suspension is short and the weight is such that it can be neglected, instead of cable wiring, string wiring can be used (galvanized steel wire or varnished hot-rolled wire from 5 to 10 mm is pulled).
Installation technology
First you need to secure the anchor and the fastening elements of the cable wiring to the selected area. For the most part, these are steel plates pulled together on both sides of the wall with studs and rings welded to them for hanging the cable. The tension of the fastenings is done to strengthen and avoid their falling out, distributing the weight of the load evenly along the wall, and not at the fastening points.
Next, you need to secure the cable on one side with special loop cable clamps, on the other side, tighten it as much as possible, and use screw couplings to get it to the state of the string.
The height of the suspension should not be lower than 2.75 meters above the pedestrian area, and not less than 6 meters above the vehicle passage. All standards for overhead electrical wiring, including the distance between supports, are indicated in the diagram:
After installing the strings, they begin tying the cable with a bandage. To hang cable wiring on the street, you can use plastic clamps, galvanized iron strips, and galvanized binding wire. The distance between the bandage is 50-80 cm.
Recommendation from practice
When using a binding wire, it is necessary to prevent the core from cutting into the insulation; for this purpose, a gasket is made between the bandage and the wire made of insulating material. The winding area of the bandage should be distributed as much as possible by laying 7-10 turns of the bandage. When using plastic clamps, check their operational data. Otherwise, in frosty winters or very hot summers, you will find scattered clamps.
When laying the cable externally along the cable, it is also necessary to protect the line from the influence of the environment on the insulation, so it is recommended to stretch it in a corrugation, as shown in the photo below. This will then reduce the cost of operation and restoration of cable wiring.
If the span is short or there is no possibility of attaching the cable to the cable at the installation site, it is possible to assemble the suspension on the ground. The already prepared structure can be stretched and attached.
By following our instructions, you can independently conduct electrical wiring to separate buildings in the country. We also recommend watching a useful video that shows how to make a loop on a cable with your own hands:
That's all I wanted to tell you about how to install cable wiring with your own hands. As you can see, laying a cable along a cable is a rather labor-intensive task, but it is still within the power of a home handyman!
It will be interesting to read:
Application area
According to Chapter 2.1 of the PUE, this method is applicable for networks up to 1000 volts. Most often, cable wiring is used in places where organizing an overhead line does not make sense, and it is enough to throw a cable attached to the cable, and this will be enough to electrify the facility.
In this way, lighting networks and electrical wiring for sockets in warehouses, power cables in production workshops, and also between two separate buildings are installed.
For a home craftsman, this wiring method is of particular interest. This is because with the help of simple technology it is possible to electrify outbuildings in the country. Thanks to cable wiring, it is possible to conduct light from the house to a bathhouse, garage, shed, gazebo and other buildings and lighting devices located at some distance around the plot.
Preliminary measures before installation
At the first stage, it is necessary to determine how much power will be consumed by electrical appliances in the structures that are planned to be provided with electricity. Based on the power consumption, the cross-section of the cable wires is calculated, its length and weight are taken into account. These parameters determine which fasteners to use, the diameter and material of the cable. To calculate power consumption and cable cross-section, a more detailed study of a separate topic is required. In simplified form it looks like this:
The power of all electrical appliances that are supposed to be used in the calculated network is summed up. The power of each device is indicated in product passports or nameplates on the housing. The simplest example of a lighting lamp is always written 40 on them; 60; 75 or 100 or more watts.
∑Р = P1 + P2 +…Pn = 3.7 kW. (3700 W) – Total power.
Determine the maximum possible current in the circuit
I = ∑Р/ U=3700 W/220 V = 16.8 A. – Maximum current.
U – network voltage.
To determine the cross-section of wires in a cable, use the table
In our case, we choose a maximum current value slightly greater than 19A, taking into account that additional household appliances may be used in the future. According to the table, we obtain a power of 4.1 kW, which corresponds to a copper wire cross-section of 1.5 mm. You need to understand that the cross section is not the diameter, it is calculated using the formula:
Formula for calculating wire cross-section
Experienced electricians are well aware of the standards of cables and wires and determine the cross-section by eye. For ordinary consumers, there are tables for determining the cross-section by diameter; it is enough to measure the diameter of the wire with a micrometer or caliper and determine its cross-section using the table.
Determining wire cross-section by diameter
The next stage of preliminary work is measuring the length of the cable from the distribution board in the house to the switchgear (switchgear) on the building to which the cable structure is stretched. This can be done with a regular tape measure,
Installation
Basic elements of the box
In the case of a cable channel, everything is simpler than ever - the channel itself is attached, then the wires are laid in it and everything is secured with a lid (the well-known plastic box that is commercially available). The main thing is to use a level or tape measure when attaching it, measuring equal distances from the floor or ceiling to the box - but provided that the level of these surfaces is the same over the entire area, otherwise the channel will lie crookedly.
If a corrugation or pipe is installed, then the wire is not laid in it, but pulled through using a broach already lying there. The length of the corrugation is measured along the stretched length of the wire. First, you should carefully cut the corrugation, then pull it up and, holding the wire in your hands, slowly bite it so that both ends remain in your hands. The unnecessary part of the broach is bent over the bay, and with the help of the second we stretch the cable, tying it to it. To prevent the wire or sharp edges of the cable from resting against the walls of the corrugation, they can be bent back, if the cross-section allows. The assembled structure, measured in advance, is attached to the walls.
Products for installation of cable wiring
The K1016U3 earring is used for fastening the rope to metal structures, beams and ceilings for cable electrical wiring. The earring is attached between the corners of metal trusses between the floor slabs by turning and wedging into the crack. Cable diameter up to 8 mm. Permissible load 1.2 kN.
Manufacturing material: steel with metal coating Technical specifications: TU 34-1445-82 Climatic version: UZ
Anchor K675 M is used for fastening cables (diameter 6-8 mm) to structural metal structures of buildings. The K-675 M anchor is secured using welding and bolts. Permissible load - 16 kN.
Manufacturing material: steel with metal coating Technical specifications: TU 34-1445-82 Climatic version: UZ
The K-809 walk-through anchor is used for fastening cables (diameter up to 10 mm) to building metal structures and building walls. The K-809 anchor is secured using welding and bolts. Permissible load - 16 kN.
Material of manufacture: steel with paint and varnish coating Technical specifications: TU 34-1445-82 Climatic version: UZ Weight: - 1.51 kg
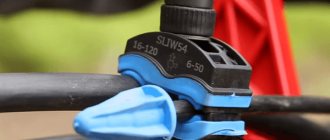
Tension coupling K-798, K-804, K-805 - used to tension the cable (diameter 2-8 mm) for cable wiring. Tension coupling design: body, hook and screw with nut. The hook attaches the coupling to the K809 through anchor, K675 anchor, K1016 UZ earring, etc. The cable is tensioned by rotating the coupling body around the screw.
Manufacturing material: steel with metal coating Technical specifications: TU 34-1445-82 Climatic version: UZ
| Type | Permissible load (P), N | Screw stroke, (L1-L) | Dimensions | Weight | |||
| L | L1 | A | d | ||||
| Clutch K-798 U3 | 1200 | 50 mm | 150 mm | 200 mm | 13 mm | 6 mm | 0.094 kg |
| Clutch K-804 U3 | 5000 | 100 mm | 265 mm | 365 mm | 20 mm | 12 mm | 0.55 kg |
| Clutch K-805 U3 | 16000 | 300 mm | 550 mm | 850 mm | 27 mm | 20 mm | 3.47 kg |
Caps K5A, K6A
Caps K5A, K6A serve as fastening of insulators to hooks KV-22A of overhead power lines with voltages up to 1000 V. Caps K5A, K6A secure the insulator without additional sealing, ensuring a reliable connection.
Manufacturing material: plastic Technical specifications: TU 36-1438-85 Climatic version: UHL1
| Type | Dimensions, mm | Permissible loads, N | Weight 1000 pcs., kg | ||||
| H | d | D1 | D2 | along the axis | perpendicular to the axis | ||
| Caps K-5A | 35 | 24 | 26,1 | 18 | 300 | 4000 | 9,3 |
| Caps K-6A | 43 | 32,5 | 35,9 | 22 | 735 | 2000 | 21,0 |
Cable boxes U230, U231
Cable boxes U230, U231 serve as a distributor of main lines from cable wiring. Execution with 3 or 4-core cable. It is possible to connect up to 3 electrical receivers and hang lamps up to 5 kg, with voltage up to 380 V.
Material of manufacture: steel with paint and varnish coating Technical specifications: TU 36-1908-83 Climatic version: UZ
| Type | Wire cross-section, mm2 | Method of securing wires to a cable | Lamp connection method | Weight, kg | |
| main | branch | ||||
| Cable boxes U230 | 4-10 | 1,5-2,5 | Using an anchor | To box clamps | 1,54 |
| Cable boxes U231 | 16-35 | 1,5-4,0 | 2,10 |
Cable boxes U245, U246
Purpose: Cable boxes U245, U246 serve as distributors of main lighting lines. It is possible to hang lamps up to 5 kg, with voltage up to 380 V. Material of manufacture: steel with paint coating Technical specifications: TU 36-1460-2003 Climatic version: UZ
| Type | Cross-section of main wires mm2 | Section of branch wires mm2 | Method of fastening on a cable | Lamp connection method | Number of squeezes | Weight, kg |
| Cable boxes U245 | 4-10 | 1,5-2,5 | using a bracket | to branch compressions | 2 | 0,54 |
| Cable boxes U246 | 16-35 | 1,5-4,0 | 7 | 1,16 |
Box U256, U257
Box U256, U257 is used to connect one or two lamps to the lighting network. Connection is carried out using a plug and socket 10A 250V GOST 7396. 0-89. The cross-section of main conductors is up to 25, branch conductors are up to 4 mm2.
Specifications: 36 -1460-82.
Climatic version: UZ, TZ
| Type | Cross-section of main wires, mm2 | Section of branch wires, mm2 | Weight, kg |
| Box U256 | up to 25 | up to 4 | 1,52 |
| Box U257 | 1,27 |
Rope clamp K-296, K-676
Cable clamps K296, K676 are used for connecting and tensioning cables with a diameter of up to 8 mm. Clamp K296 connects vertical wire hangers, guy wires, etc., permissible load 7.2 kN. The K676 clamp is used to secure loops at the ends of a cable with a diameter of 6-8 mm. Permissible load 16 kN
Material of manufacture: steel with metal coating Climatic version: ultrasonic
| Type | Load (P), N | Weight, kg | |
| acceptable | test | ||
| Clamp K-296 | 7200 | 9000 | 0,185 |
| Clamp K-676 | 16000 | 20000 | 0,76 |
Which wire to use for outdoor wiring: the best options
We smoothly approached the main question of which wire to use for external wiring in order to be confident in its reliability and ability to withstand negative natural influences. The main requirements for such products are combustion resistance, strength and non-hygroscopicity.
The most popular types include:
SIP is an outdoor power cable capable of conducting voltages up to 1000 V. Structurally, the product is a group of wires with individual insulation and aluminum conductors. Such products have their own subtypes (SIP -1, 2, 3, and so on) and are produced in many countries around the world. The main feature is the black insulation of the wires. The use of such a cable guarantees greater reliability during aerial installation and reduces installation costs. An additional advantage is its compactness, which allows the cable to be used even in conditions of limited space.
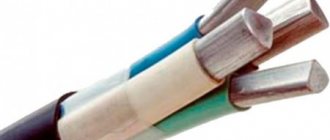
AVBbShv is a product based on a group of wires with aluminum cores combined under one armored sheath. One of the cable types is VBBShV - a version with copper wires. A special feature is the possibility of laying in the ground without the use of additional protection and resistance to mechanical stress. Main characteristics:
- The presence of steel tape in the shell.
- The wire insulation is made in different colors for ease of dialing and connection.
- The outer shell is black.
- Resistant to moisture and temperature changes.
- Resource - 30 years.
Due to the presence of armor, cable products of this type are characterized by increased rigidity, which creates additional problems during the installation process.
NYY is a cable characterized by versatility and reliability in operation. May have copper or aluminum conductors. This product is increasingly used for external wiring in the ground or in the air, as well as for connecting electrical receivers indoors. Main characteristics:
- Resistant to water and fire.
- Compliance with international standards.
- Availability of multi-colored wire insulation.
- Convenience of organizing outdoor wiring.
- The outer shell is black PVC plastic.
- Resistant to temperature changes.
- Resource - 30 years.
This cable is produced in many factories due to its versatility and reliability. The main competitor of the product is considered to be the VBBShV cable, which was mentioned above.
NYM is a reliable cable that is actively used in production and outdoor wiring. Its peculiarity lies in its versatility and ability to operate in various conditions. Characteristics:
- Compliance with the standards of the German Electrical Engineers Union.
- Heat resistance and ability to operate over a wide temperature range.
- Non-hygroscopic and durable, which allows the product to be laid in concrete or in a layer of plaster.
- The cross-section is round, the color is gray.
- Fire resistance.
When installing wiring outdoors using NYM, protection from sunlight is recommended. Such cable products are produced at many factories located in Europe and Russia. Some manufacturers produce cables according to individual specifications, but such products have a lower price and, accordingly, worse quality. The use of such cables for external wiring is not recommended.
Installation of switches and sockets
After the wires are laid, you can begin installing switches and sockets. The number of outlets in the room must be calculated in advance, based on the number of electrical appliances used. Installing a socket with your own hands is not difficult, but to make the task easier, it is better to first purchase a special crown for drilling a hole. Using a crown, drill a hole of the required diameter. The wires should go through the center of the hole. Next, we mount the installation box under the socket or switch and securely fix it.
Now you can install the outlet itself. We insert the wires into the terminals and fix them there. The socket is then inserted into the installation box and secured with screws using a mounting plate or mounting tabs. The overhead socket is installed on top of the wall and screws are fixed.
Single switches are installed according to the same principle as sockets. But there are two exceptions: these are two-key switches and pass-through switches. You can find out how to properly connect a two-key switch from this article.
Pass-through switches are used to control lighting from different places. Detailed instructions and connection diagrams for pass-through switches can be found here.