The design technology of this unit simultaneously resembles both a kettle and a thermos. It can boil water, or it can simply heat it to the desired temperature. The maximum hot water in a thermopot is up to 100 degrees (you can brew tea leaves without any problems). The device can maintain the set water temperature for up to several hours. Most models have 4-6 temperature settings.
- two heating elements that are built into the metal bottom of the tank. The main one brings the water to a boil, the other maintains the set temperature. Also, a stepless or step thermostat is installed in the device, which controls the heating of the liquid to the desired temperature;
- The water pump (pump) is designed to supply boiling water. Electric and manual modes are possible. Most often, both are included in the thermopot device;
- The main electronic board contains a time relay circuit. It turns on in reboil mode;
- control board - it contains buttons for the “Re-boiling” and “Water Supply” modes. It also contains LED indicators of the thermopot operation;
- thermal switch (breaker, thermostat) – temperature sensor. If the device was accidentally turned on without water, the thermal switch contacts open, thereby de-energizing the device.
Thermopot device
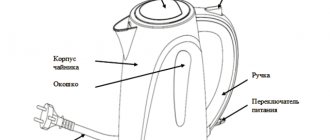
The thermopot is a steel flask, the volume of which ranges from 2.5 to 18 liters. The flask is enclosed in a plastic or metal case and closed on top with a sealed lid on which the unit control panel is located.
Boiled water can be poured into a cup using a pump. If the device is disconnected from the network, use a hand pump, or by pressing the edge of the cup on the valve.
- several modes of maintained temperature (50-90 degrees);
- display showing the specified program;
- boiling water at a certain time:
- several ways to supply water (manual, electric, by pressing the cup on the valve);
- two water tanks - in the first the temperature is regulated by the user, in the second - not;
- reduced vaporization function;
- self-cleaning function.
Expert opinion
Viktor Pavlovich Strebizh, lighting and electrical expert
Any questions ask me, I will help!
The resistance of the main spiral, which is used for boiling, is 70-80 Ohms, the resistance of the pilot heating spiral is approximately 700-800 Ohms. If there is something you don’t understand, write to me!
Why doesn't the thermopot turn off when it boils?
- Fill the tank with water no higher than the maximum level indicated on the scale.
- Water should be filtered before use; this procedure will reduce the likelihood of scale formation, and the equipment will last much longer!
- Never place the device under running water from a tap (this may cause damage)!
- We turn on the device to the network. After 20-25 minutes (depending on the power of the device), the water in the thermopot will boil. After two hours, the device will switch to water heating mode: if the water temperature becomes 60 degrees instead of the programmed 90, the thermopot will periodically turn on for 15-20 seconds to maintain the temperature.
- Bring the mug and gently press the valve.
Private faults
Like any other household appliance, the thermopot has a list of the most common problems.
Here are some specific malfunctions of the thermopot and parts that should be replaced or repaired with your own hands in this case first:
- The control panel does not light up at all, the device itself does not start and does not work.
In this case, the cause of the breakdown may be:
- thermostat located, depending on the model, either on the bottom or on the side of the device;
- fuse;
- broken wires and connections.
- Only the temperature maintenance mode works, but the main boiling of water does not function.
You can fix the problem by checking:
- bottom thermal switch;
- main heating element designed to heat water up to 100 degrees.
- The opposite situation is that boiling to “one hundred” works, but heating does not function.
There is only one piece of advice - check all elements of the electrical circuit, paying special attention to the board module.
- Pressing the water supply button has no effect.
The problem lies in the pump - you need to disassemble the thermopot, following the instructions below, and find out the real reason.
Do-it-yourself thermopot repair
The power supply board for a Vitek thermopot costs over 800 rubles. Textolite carries:
Network wire
The body of the thermopot is secured with several screws: unscrew the fasteners, first unplugging the plug from the socket. There will be a block inside, let's start with a visual inspection. Burnt parts inside the thermopot accurately indicate the location of the breakdown. The cord is carefully separated and rings with a tester (diode mode). A detected fault in the wire will not delay the repair of the thermopot.
Microcircuits
The technician will examine both, identifying the presence of swollen capacitors, burnt resistors, bad fuses, and broken tracks. Faulty radio elements are replaced with new ones, soldered, contacts are restored by tinning.
The first study concerns the presence of fuses and the integrity of elements. If the replacement is unsuccessful, the new element burns out - the problem is caused by the electronic filling. The thermopot is affected by a short circuit (sharp uncontrolled increase in current).
The resistor values are indicated by colored stripes. A typical problem is to detect the beginning and end of a marking.
Hint: there are special sites containing tables of various types of resistance designations. Gain access to the resource by filling out the search bar with the simple phrase “labeling resistors online.” The direction of the stripes is determined by the observed fact: a fixed set of colors meet at one edge.
Damaged electrolytic capacitors are easier to notice - the cylinders swell. Beginners looking for ways to repair a thermopot are interested in the appearance of a broken container. The answer will come automatically, as soon as a faulty capacitor is found. The appearance of the cylinder evokes the idea: the barrel is 100% swollen. The sidewall especially sticks out (imported ones are cut crosswise).
It is more difficult to test with diodes, but the semiconductor burns less often (silicon keeps temperatures below 150 degrees Celsius). Unsolder the element, ring both sides. The arrow marking shows the direction of flow of positive charges (lean against the positive probe of the tester).
Torn board tracks must be cleaned with sandpaper, removing the varnish from the metal. The shiny surface is tinned (with soldering irons), joined, and covered with solder. It will serve for decades. The mechanics repair the mechatronics and it works...
water pump
The required voltage is supplied by computer power supplies.
Heating elements and thermal switches
It is not recommended to try to replace flat sheets of metal equipped with terminals with homemade ones. The cost of heating elements on the counters starts at $45.
Protection against overheating is provided by bimetallic thermal switches. The characteristics of the thermopot are determined by the control part. Usually there are several thermal switches, one controls the water parameters, the second is protection against turning on an empty tank. In the latter case, the heating element reaches a temperature above 100 ºС and opens the power circuit.
What kind of lighting do you prefer?
Built-in Chandelier
Repair of other thermopot elements
- If your thermopot's heating element burns out, you won't be able to repair it - you'll have to buy a new device. A new heating element costs 2,000 rubles and more, so replacing it in an old thermopot is simply unprofitable.
- Electrical cord. There is a block inside the case that secures the cord. It is necessary to release the cable and check it for short circuit with a tester.
- Microchip. It can be a feeder and a manager. A visual inspection will help identify burnt elements that can be replaced using a low-power soldering iron.
- Capacitors. The faulty part appears swollen and is immediately visible.
- Diodes rarely fail, and their performance can only be checked with a continuity tester.
- Getinaks board tracks. Microcracks can be tinned with a layer of tin solder.
Safety rules when using a thermopot
As practice shows, the more carefully you follow the rules for using the device, the less hassle the user has. Thermopot is no exception.
Almost all modern models are equipped with an automatic shut-off function if there is no water in the tank. But if the device is already quite old, this safety measure may not work, and you risk losing the device or getting a fire.
All models have the “Locking the filling button during operation” function. And in some models, the hand pump is also blocked during operation. Sometimes it happens that after you have poured water into the cup and released the valve, another burst of boiling water occurs. If this happens to your appliance, you should always be on guard when pouring boiling water.
If you want to drain the remaining water through the neck of the device, disconnect the lid so that it does not break off. Both the lid may be damaged (break) and your hands (burned by boiling water). Even if the manufacturer does not warn about this in the product data sheet, it is better to pay attention yourself. When you screw the lid on, do it until it clicks into place.
Expert opinion
Viktor Pavlovich Strebizh, lighting and electrical expert
Any questions ask me, I will help!
The first step is to inspect the electric kettle; perhaps in a hurry and in anticipation of a break, a colleague at work did not close the lid tightly, or an uneven filter prevented the lid from closing tightly. If there is something you don’t understand, write to me!
Operating principle of the thermopot
To understand the causes of breakdowns and have a better idea of how to repair a thermopot, you should familiarize yourself with the principle of its operation. First, the device boils water, like a regular kettle, and then the control module of the device comes into action, which, through a thermostat, monitors the set minimum temperature of the liquid and, as soon as it drops below normal, immediately starts re-boiling. For heating, the thermopot uses a second heating element, which is always less powerful than the main one, since its functioning is very fleeting.
Due to the large dimensions and considerable weight of the thermopot, a built-in pump is provided for pouring boiling water into the cup. It can be powered by electricity, like Marta products. This pump allows you to configure auto-filling via the control module. There is also a mechanical (manual) pump, like the MAGNIT RTP-002, then the liquid is pumped into the mug manually through a special spout. Many models (for example: Vitek vt 1187 gy, Saturn ST-EK8032, Mystery MTP-2403 and Bravo TA-65 S thermos kettle) have both types of pumps.
In addition to the above parts (control module, thermostat, two heating elements and a pump), the circuit necessarily includes a thermostat (sometimes two, as in products from Maxwell and Scarlett) and a thermal fuse. Their main task is to prevent overheating and fire of the device. For correct operation of the electric pump and control module, a power supply with a step-down transformer is provided.
Basically, all thermopots work according to the same general scheme and differ only in small details. For example, some models are equipped with an auto-on timer. Budget options may not have a low-power heating element (as in products from Vitek and Magnit). But there are thermopots (for example, the Polaris PWP 4012D thermos kettle) that combine almost all useful functions.
Protection system
Heating elements on an electric kettle are installed during the assembly process at the manufacturer's factory and depend on its volume: the power of the heating element varies between 0.5-2.5 kW. When heated, they emit a large amount of heat, so in order to avoid a fire, the designers have provided effective protection against overheating.
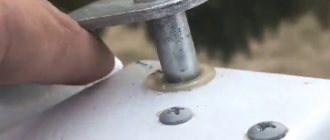
Round bimetallic plates are used as temperature sensors, with a special selection made in the center. They should fit tightly to the bottom of the kettle; for better heat transfer, their surface is lubricated with a paste with excellent heat-conducting properties.
When carrying out any complex repairs, it is not recommended to remove this grease.
The plate is assembled from two metals with different coefficients of thermal expansion, firmly glued together. When heated strongly, it bends due to different expansion of the metals.
To turn off the device, the bimetallic plate is connected to the contacts by means of a ceramic rod in the following way: one end of it rests against the disk, and the other supports the plate of the contact group. The mechanism of action is very simple: the plate bends, the rod moves and the contacts are disconnected.
We repair the kettle ourselves
If you find that the kettle has stopped turning off on its own, the first thing you need to do is inspect it for cracks and other damage to the body or lid. No cracks or damage were found, then the cause of the breakdown should be sought inside the case. Check that the filter is installed correctly, whether there is scale, and look into the steam outlet channel.
After an inspection that shows no visible faults, the kettle should be disassembled. During disassembly, the following causes of failure can be identified:
After completing the repair, the kettle should be assembled in the reverse order of its disassembly. How correctly the device is assembled can be easily checked using water. Pour water into the kettle and set it on any dry cloth for about half an hour. If there are no wet marks left on the fabric, then the device is assembled correctly and can be plugged into a power outlet.
Expert opinion
Viktor Pavlovich Strebizh, lighting and electrical expert
Any questions ask me, I will help!
A durable cord supplies voltage to contacts hidden deep inside the stand to prevent accidental contact with the human body. If there is something you don’t understand, write to me!
What to do if the electric kettle does not turn off when boiling?
An electric kettle is a mandatory attribute of all offices and industrial sheds. This warm friend will warm you up in winter, relieve fatigue on a weekday, share homesickness at lunch, and also become a reason to take a break during a hard day at work.
However, like any device, it can fail. Having collected water and plugged in the device, while running off for a couple of minutes to call your colleagues for tea, you can return and find a Finnish sauna, the cause of which was a steaming electric kettle.
In this article we will figure out why the kettle does not turn off when it boils and how to fix it yourself.
Causes of malfunction
If the kettle does not turn off when boiling water, the causes of the malfunction may be:
- its lid is not closed;
- large gap between the cover and the body;
- there is no filter or it is unevenly positioned;
- scale formation on the walls.
- the switch or the bimetallic plate that acts on it is broken.
Below we will look at instructions for repairing a kettle that does not turn off when it boils. If you are ready to disassemble the device and try to repair it yourself, read below what you need to do.
How to fix it yourself?
The electric kettle is designed in such a way that when water boils, steam collects under the lid and, having reached a certain concentration, is sent to a special section in which the switch is located. The latter, in turn, when heated, automatically releases the button, thereby disconnecting the kettle from the network. You can clearly see the design of the device in the diagram below:
The first step is to inspect the electric kettle; perhaps in a hurry and in anticipation of a break, a work colleague did not close the lid tightly, or an uneven filter prevented the lid from closing tightly
Please note that an open lid is the most common reason why the kettle does not turn off when boiling.
If everything is in order with this, then you should look inside the electrical appliance. On the side of the handle, between the lid and the wall, there is a hole for discharging steam to the switch. It must be clean, without any obstructions or scale plugs.
In old electric kettles, the hole is small and very often gets clogged, as a result of which the device does not turn off on its own when the water boils.
New models do not have this drawback, so if you want to replace the device, we recommend that you read our tips for choosing an electric kettle for your home.
If you examined everything in order and did not find the reason, most likely the electric kettle does not turn off automatically when it boils due to the switch. To get to it, you will have to disassemble the device almost completely.
To do this, you need to unscrew all the screws on the bottom cover, remove it, unscrew the screws on the handle, and remove it carefully without damaging the latches.
Try to remember the sequence of your actions so that after repair you can quickly assemble the case.
We draw your attention to the fact that the design of the switch does not provide for repair or intervention, so only replacing this unit with a similar one will allow you to repair the electric kettle with your own hands. If, at your own peril and risk, you want to repair a kettle that does not turn off for a long time when it boils, then to do this you need to get to the switch and first of all visually inspect it
If the contacts are burnt, clean them with fine sandpaper. You can learn more about the repair in the video below:
If, at your own peril and risk, you want to repair a kettle that does not turn off for a long time when it boils, then to do this you need to get to the switch and first of all visually inspect it. If the contacts are burnt, clean them with fine sandpaper. You can learn more about the repair in the video below:
Repair technology
By the way, a faulty button can even cause the electric kettle to turn off early without heating the water to a boil. In this case, you need to act according to a similar method - either change it or repair it.
Assembling the kettle occurs in the reverse order. Before connecting it to the network, fill with water and make sure there are no leaks. It is possible that the seal was moved during repairs.
Repeat disassembly and return the gasket to its place. That's all I wanted to tell you about this issue.
We hope you now know why the kettle does not turn off when it boils and how to repair it yourself.
Source https://samelectrik.ru/elektrochajnik-ne-vyklyuchaetsya-pri-kipenii.html
(Visited 1,039 times, 1 visits today) Quick kettle repair Quick kettle repair. Consultations are free. Spare parts are in stock and on order. Delivery throughout Russia. Repair of an electric kettle. Repair of a thermal switch is shown.
Replacing the pump if the thermopot does not pump water
- After removing the metal casing, disconnect the tubes from the pump. If you find scale on the wires, you need to get rid of it.
- Disconnect the pump itself from the tank and housing, while trying not to lose all the small parts.
- As soon as the pump and the electric motor are disconnected, remove all scale that interferes with the proper operation of the device.
If the thermopot does not pump water, then it is necessary to replace the pump
Like any household appliance, a thermopot needs care and maintenance. You can descale it at home using citric acid, acetic acid and baking soda. The thermopot should be cleaned immediately, as soon as the first scale appears. If the product begins to make suspicious sounds, then cleaning is all the more necessary. This is the first signal for help.
If after all these manipulations there is no water supply, then you need to change the pump itself - buy a new one. There is no point in restoring a damaged pump.
Thermopots: always with hot water
How to repair a kettle yourself
There are malfunctions that cannot be repaired at home and a call to a specialist is inevitable. If the microcircuit, switch, plate is faulty, it indicates improper use.
After consulting with a specialist, you need to determine whether it is worth repairing the device or whether it is more profitable to buy a new electric kettle. Estimating the cost of repairs and the price of a new device is not difficult. Of course, if it is more profitable to repair, then it is better not to abandon your old friend.
When you decide to buy new equipment, make the purchase as profitable as possible; high-quality branded equipment with a guarantee can last a long time and without breakdowns. But we must not forget that any household appliance requires proper handling.
Rules for using a thermopot.
1. The thermopot has a special scale, according to which you need to pour water into the device.
2. For boiling in a thermopot, you should use only clean filtered water. This will allow you to use the device for a long time.
3. When you plug in the device, you will be able to get boiled water within 20 minutes. If the water in the thermopot is standing, its temperature drops, but if you set to maintain a certain temperature, then the heating element of the thermopot will periodically turn on and heat the water to the required level.
4. If you need to draw water, then bring the mug to the water supply valve and use one of the possible methods. These methods depend on the model of your device.
Many users think that by purchasing a thermopot, more electricity will be used. No, in fact it is much more economical than using an electric kettle.
Expert opinion
Viktor Pavlovich Strebizh, lighting and electrical expert
Any questions ask me, I will help!
Each situation requires detailed consideration, since the causes range from poor contact to a burnt-out heating element. If there is something you don’t understand, write to me!
What is a thermopot and how does it work?
The design technology of this unit simultaneously resembles both a kettle and a thermos. It can boil water, or it can simply heat it to the desired temperature. The maximum hot water in a thermopot is up to 100 degrees (you can brew tea leaves without any problems). The device can maintain the set water temperature for up to several hours. Most models have 4-6 temperature settings.
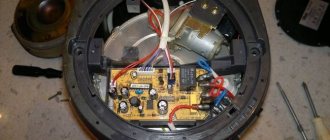
The thermopot consists of several parts:
- two heating elements that are built into the metal bottom of the tank. The main one brings the water to a boil, the other maintains the set temperature. Also, a stepless or step thermostat is installed in the device, which controls the heating of the liquid to the desired temperature;
- The water pump (pump) is designed to supply boiling water. Electric and manual modes are possible. Most often, both are included in the thermopot device;
- The main electronic board contains a time relay circuit. It turns on in reboil mode;
- control board - it contains buttons for the “Re-boiling” and “Water Supply” modes. It also contains LED indicators of the thermopot operation;
- thermal switch (breaker, thermostat) – temperature sensor. If the device was accidentally turned on without water, the thermal switch contacts open, thereby de-energizing the device.
Thermopot device
The thermopot is a steel flask, the volume of which ranges from 2.5 to 18 liters. The flask is enclosed in a plastic or metal case and closed on top with a sealed lid on which the unit control panel is located.
Boiled water can be poured into a cup using a pump. If the device is disconnected from the network, use a hand pump, or by pressing the edge of the cup on the valve.
More expensive devices have the following functions:
- several modes of maintained temperature (50-90 degrees);
- display showing the specified program;
- boiling water at a certain time:
- several ways to supply water (manual, electric, by pressing the cup on the valve);
- two water tanks - in the first the temperature is regulated by the user, in the second - not;
- reduced vaporization function;
- self-cleaning function.
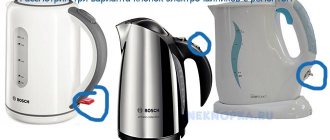
Thermopot Bosch THD 2023
What to do if the thermopot boils but does not turn off
In fact, a thermopot is a reliable household appliance and it rarely fails, but it does happen. And the first thing that should alert you is when the thermopot does not turn off after the water has boiled.
How should you deal with such a situation? This is the first question that comes to your mind. The most important thing is not to panic. Below we will describe what to do in such a situation.
1. The first thing you should do is unplug it from the outlet.
2. Don’t rush to pick up a screwdriver, take the warranty card and see if the warranty is still valid and you can contact the service center. If the warranty is no longer valid, call a specialist if you yourself do not understand household appliances at all.
Typical breakdowns and their elimination
Devices manufactured according to the same design are characterized by typical malfunctions. How to find and eliminate them will be described in pictures below.
Doesn't turn on
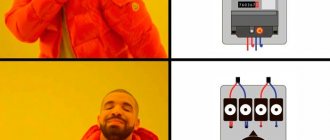
If the device does not turn on, then the problem is that the electrical circuit contacts are broken. The only question is where the break occurred. You need to start checking with the power cord. If it is unusable, replace the wire with a new one. Then all connections of both thermal switches must be checked. Perhaps an emergency trip occurred, and due to a faulty thermostat, the contacts did not return to place. Also, the connection at the thermal fuse may not be restored. To check, you need to disconnect the questionable part and short-circuit the wires directly. If this works, the defective part is replaced with a new one.
Constantly boils water
A situation where the water constantly boils and the device does not turn off can only occur with the most budget models with one thermostat. It is because of its breakdown that the thermopot does not turn off after boiling. Here you should immediately, without any checks, change the thermal switch. Good and reliable samples always have a backup thermostat. And some manufacturers install additional control in the form of a thermal fuse, which will protect you if for some reason both protections do not work and the kettle constantly boils water.
Shuts off before boiling
Usually this only happens with devices that have been in operation for more than one year. This is due to the loss of its properties by the bimetallic plate in the thermostat, which over time begins to react to a lower temperature than planned. To correct the situation, you can try to temporarily bend the contacts at the plate. The best solution would be to replace the thermal switch.
Banal scale may be to blame for the fact that the thermopot has stopped boiling water. As it settles in a thick layer on the heating element, it reduces its thermal conductivity. The heating element gradually begins to overheat. At a certain point, the thermostat sees this as a fire threat and opens the electrical circuit moments before the water boils. You can get rid of scale on heating elements by simply boiling a solution of citric acid. If this does not help, you will have to disconnect the heater and clean it with a knife.
Important! The thermopot may also not boil water due to a leak in the flask. Even a few drops of liquid can cause overheating. The search for cracks is carried out visually, and it is more reliable to eliminate them in a workshop.
Another cause of breakdowns can be poor contacts. In this case, you should check all connections to the wires of the heating element and thermal switch. If necessary, the contacts are resoldered.
Water supply button does not work
If the water supply button does not work, there may be several reasons. First of all, this could happen due to a blockage in the system. Garbage most often consists of scale particles that settle on the walls of tubes and hoses, gradually reducing their clearance. This ultimately leads to the pump not pumping water.
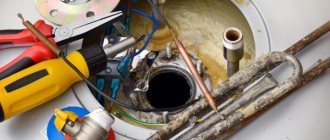
To remove scale, you also need to use citric acid or vinegar by boiling water with them in the device. In the case of insoluble debris, the pump and the entire water system will have to be completely disassembled. To do this, you need to disconnect all the hoses and blow them out. The pump itself should be disassembled as follows:
- disconnect it from the device body;
- unscrew the impeller and clean the scale from it;
- remove dirt from the magnet.
Advice! If after cleaning the pump still does not pump, this may mean that the winding on the motor has burned out. And it is better and more reliable to fix such breakdowns in the service.
The liquid filling button also does not work if there are poor contacts on the button itself or at the junction of the wires with the electric pump. To eliminate it, you need to check the entire circuit for breaks. If the second heating element fails, voltage is no longer supplied to the electric pump motor.
The auto-fill may not work if there is a problem with the control module. In this case, you need to check the board for cracks and burnt parts, if found, you will have to work with a soldering iron.
Important! If the thermopot has only one electric pump and the water supply does not work, then first of all you need to check the serviceability of the outlet and the presence of electricity in the house.
Doesn't heat water when the light is on
When the device does not heat water when the indicator is on, the first thing to do is check the heating element. But if the heater is working properly, then the reason may lie in the electrical circuit. That is, the thermopot does not heat the water, but the light comes on if there is a fuse in the circuit after the indicator that has blown. To fix the problem, the faulty part must be replaced.
Other faults
If the thermal kettle operates for a long time or incorrectly, other problems may occur.
- Reboiling does not work - the reason must be sought in the additional heater and control module.
- There is no main boil, while the restart button works - you should check the thermostat.
- The thermopot only works for heating, but does not boil - the culprit is a burnt-out main heating element.
Disassembling the electric kettle
Advice! If the self-tapping screw does not want to unscrew, then the easiest and fastest way to deal with this problem is to heat it up a little by applying the switched-on soldering iron to the head. The plastic will soften slightly and the screw will come out easily.
The last level of protection is the clever latches on the case and the lid itself. There is an opinion that sometimes removing the cover is more difficult than making the repair itself. In this case, two thin screwdrivers will help. The first one is pushed under the lid to create a gap. And the second one in this gap is to find the place of the latch and carefully release it.
Important! After disassembling the electric kettle, be sure to check all wire connections for integrity. Loose contact can cause many problems, including early shutdowns.
Why the electric kettle does not turn off when boiling: causes of breakdown and do-it-yourself repair
Usually there are two buttons on thermopots: electric and manual. So, if both do not work, and the manual one does not press all the way, then your water supply hole is dirty.
Expert opinion
Viktor Pavlovich Strebizh, lighting and electrical expert
Any questions ask me, I will help!
If the bolts are hidden under the cover plate, you need to use a sharp object to pry it up and carefully remove the part without damaging the latch. If there is something you don’t understand, write to me!
Disassembling the thermopot
To quickly find and fix faults, the thermopot needs to be disassembled. And since all models have a similar structure, there is a common algorithm of actions. Dismantling the device is not difficult; to do this, just follow the following instructions:
- disconnect the device from the mains and pour water out of it;
- remove the screws at the bottom;
- remove the clamps from the ring and unscrew the loosened screws;
- remove the pallet;
- dismantle the pump, first disconnecting the hoses from it;
- remove the thermopot cover to make it easier to install the device on the table upside down;
- unscrew the printed circuit board and move it to the side so that it does not interfere;
- Unscrew the screws hidden under the board gasket;
- remove the bottom along with the tray;
- unscrew another 8 screws holding the protective cover;
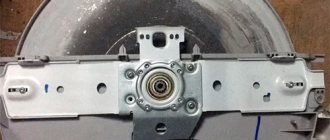
- remove the cover and remove the heater.
Advice! To ensure that assembling the thermopot after repair does not cause problems, you should record the location of the wires and parts on the camera.
Main reasons for premature shutdowns
Due to age, the thermostat may not work correctly. After many years of regular expansion and contraction, the bimetallic strip becomes deformed and begins to turn off at the wrong time. Taking advantage of the fact that the protection is duplicated and both thermostats are identical, some masters swap them. Often this solves the problem.
Important! It is strongly not recommended to replace a faulty thermostat with a backup one yourself, as this may lead to a fire.
It's better to try to bend the plate into place. The measure, although temporary, is more reliable. Don't forget about low-quality Chinese stampings. The service life of such products is short, and, as a rule, they cannot be repaired.
Analysis of common situations and ways to solve them
Here is a list of the most common problems - with instructions for solving them.
Thermopot provides constant boiling
It is not uncommon to find a situation where... The opposite is also possible - when the unit is turned off at a time when the liquid is still far from starting to boil.
The problem is faulty thermal switches. They are located on the bottom of the device and on the side of the case.
The main problem with their inoperability is that the manufacturer applies a small amount of thermal paste, which is why the thermal relay begins to work incorrectly due to poor contact.
The functionality of the relay is checked with a conventional multimeter - to do this, it is connected to the contacts of the thermostat and set to ohmmeter mode. The tester should show a resistance of 0 ohms.
Thermal relay
The thermopot drains liquid on its own
Some people encounter the following problem - immediately after plugging it into the outlet, the thermopot drains water from the flask, begins to hum, and a characteristic burning smell appears. How to correct such a deficiency?
The problem here is the water pump. First you need to disassemble the thermopot itself (see instructions above) and get to the location of the pump. Next, you should begin disassembling the pump.
After unscrewing the two bolts on the pump itself, you can gain access to the impeller and magnet. In order not to buy a new pump, you can repair the old one - to do this, you need to disconnect the blades from the magnet and clean them of scale with a rag or soft cloth. You should also inspect the magnet itself - tiny metal particles often accumulate on it, interfering with normal operation.
If the above steps have been performed, but the unit still leaks, you should buy a new pump.
The first thing to do is look at the settings on the control panel. You need to set the temperature to which you want to heat the water. If everything is fine with the adjustments, then the cause of the malfunction may be a thermal switch located in the bottom of the thermopot and (or) a thermal fuse attached to the walls of the tank. The reason may also be poor contact of the connectors on the electronic board or the parts themselves.
How to fix the bottom button of an electric kettle
Operating principle and electrical diagram
Before you begin diagnosing or repairing a household kettle, you will need to find out what components it consists of and how it works. Despite the abundance of offers under different brands, all electrical devices in this category have a similar design. They include the following parts:
Next, a heating element (spiral or disk) installed at the bottom gradually brings the water in the tank to a boil. After boiling, the automatic switches off the power to the heater (the light goes out with a characteristic click). If there is not enough water in the kettle or it is accidentally turned on empty, the protection system should also work, de-energizing the power circuits.
Arrangement of electric kettle components
Both the old models with spiral heating elements and the new ones with disk-shaped heating elements remain similar in principle of operation and the presence of main components. They will definitely contain a heating element, a power button and a protection unit. Without them, the kettle will not work.
Overheat protection system
This unit is necessary to meet fire safety requirements. If it were not there, then if the water level was insufficient and an empty kettle was turned on, a fire would certainly have occurred. And so a special contact group will de-energize the heating element.
As a working tool, it uses a special plate made of 2 metals that reacts to heat. The normal position is closed; when overheated, the bimetal is deformed, breaking the power circuit, turning off the heating element. Manufacturers of household appliances use a number of standard solutions for this unit. And all use bimetallic sensors, which are reliable and efficient.
The only drawback of thermal protection is the need to wait until the working part cools down and returns to its original position. After this, the kettle is ready for use again.
Detailed analysis of repair parts
There is a certain list of internal parts of the thermopot that are recommended to be inspected first.
Network wire
The 220 Volt power cord may bend or have poor contact with the three-pin connector located inside the case.
First, you need to check the wire itself directly in the “testing” mode using a multimeter or by connecting the cable to some other device.
Multimeter
If the cable is operational, you should check the presence of voltage at the terminal after the transformer.
Microcircuits
Most models are equipped with two electronic modules:
- power supply board;
- control board.
Control board
In fact, the power board is a power supply unit from which electric current of the required parameters is supplied to each element of the thermopot.
To repair both boards, you must first inspect them for:
- swollen capacitors;
- burnt out resistors;
- unusable fuses;
- torn contact tracks, etc.
All damaged elements must be replaced with new ones, having first taken care of purchasing them on the radio market. Damaged tracks can be restored by tinning with a household soldering iron.
The most common problem here is a blown fuse. You can identify it by a torn thread inside the glass case.
If the fuse is OK, you should check the resistors and diodes with a tester.
Water pump repair
What should you do if the thermopot starts running or, conversely, when you press the water drain button, nothing happens? In this case, you should get to the pump and start testing its performance.
This is done by simply dialing the contacts in pairs.
To check the functionality, you can also apply a standard voltage of 12 Volts, taking it, for example, from powerful batteries or from a car battery.
Also, the corresponding voltage is supplied by power supplies installed in the system units of personal computers.
Repair of heating elements
If heating or main boiling does not work, the problem may be a faulty heating element. It is not recommended to repair the heating element yourself - it is easier to buy a new one. The cost of heating coils starts from 2000 rubles.
Ten disassembled
The kettle turns off before the water boils: reasons, disassembly and DIY repairs
- insufficient knowledge, experience and self-confidence;
- The thermostat needs to be repaired or replaced;
- you need to repair the crack in the flask body;
- We have to work with a closed-type heating element.
Useful tips Connection diagrams Principles of operation of devices Main concepts Meters from Energomer Precautions Incandescent lamps Video instructions for the master Testing with a multimeter
| I couldn’t find any information on this problem on the internet, someone was also interested, but no answer, apparently the problem is unique to mystery. I decided to ask the experts what this blinking means? |
| Serg2278 wrote: |
| I couldn't find any information on this issue on the Internet. |